Looking to infuse your photos with a touch of vintage allure? In the realm of digital photography and editing, the deliberate addition of grain can evoke a sense of nostalgia, add a gritty texture, or impart a specific emotional tone to an image. While often associated with film photography, this aesthetic can be effectively replicated and controlled within Adobe Photoshop. This comprehensive guide will delve into the process of utilizing Photoshop's powerful tools to achieve a convincing grain effect, transforming your digital captures into pieces with a timeless appeal.
The Foundation: Preparing Your Image for Grain Addition
The journey to adding grain in Photoshop begins with your chosen photograph. The first fundamental step is to open your selected photo in Adobe Photoshop. To ensure the integrity of your original image and to allow for non-destructive editing, it is crucial to work on a separate layer. This practice preserves the original state of the photo and provides flexibility for future adjustments.
To create this dedicated layer, navigate to the top menu bar and click on "Layer" > "New" > "Layer." This action will open the "New Layer" dialog box. While this dialog box presents various options, for the immediate purpose of adding grain, you don't need to make any specific selections within it just yet. Simply click "OK" to close the dialog box. You will now see a new, empty layer above your original image in the Layers panel.
Embracing Flexibility: The Power of Smart Objects
To truly harness the potential of Photoshop's editing capabilities and to ensure that your added grain effect can be modified later without degradation of quality, it is highly recommended to convert this newly created layer into a Smart Object. This transformation is a cornerstone of non-destructive editing in Photoshop.
To convert your layer into a Smart Object, locate the layer in the Layers panel. Right-click on the layer, and from the contextual menu that appears, select "Convert to Smart Object." You'll observe a tiny symbol, typically a square with a smaller square inside, popping up at the lower right edge of the layer thumbnail. This symbol signifies its transformation into a Smart Object, indicating that any filters or adjustments applied to this layer will be treated as Smart Filters, allowing for re-editing at any time.
Applying the Grain Effect: Direct Methods
With your image prepared and your layer converted to a Smart Object, you are now ready to add grain in Photoshop to enhance the appearance of your photo. Photoshop offers a direct method for adding noise, which can be interpreted and controlled to mimic film grain.
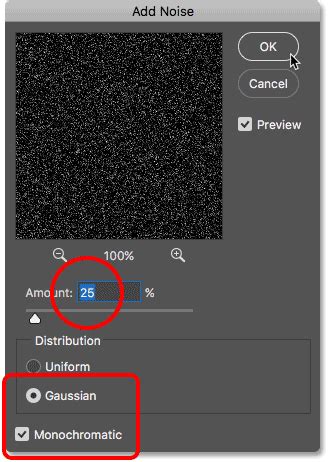
Select your Smart Object layer. Navigate to the top menu bar and click on "Filter" > "Noise" > "Add Noise." This will bring up the "Add Noise" dialog box. Within this dialog box, you have several key parameters to control the appearance of the noise:
- Amount: This slider dictates the intensity of the noise added to the image. A higher amount will result in more prominent grain. For a noticeable vintage effect, you might start with values around 10-20%. Here, to make the grain effect more prominent, let's adjust the Amount value to 20.
- Distribution: This setting determines how the noise is spread across your image.
- Uniform: Distributes noise evenly across the tonal range.
- Gaussian: Distributes noise in a bell-curve pattern, meaning more noise will cluster around the mid-tones. Gaussian distribution often yields a more natural-looking grain.
- Monochromatic: Checking this box is crucial for creating a realistic film grain effect. It ensures that the noise is rendered in shades of gray, matching the tonal values of the image, rather than introducing distracting color speckles.
For achieving a classic film grain look, it is generally recommended to set the Distribution to "Gaussian" and ensure that the "Monochromatic" option is checked. Experiment with the "Amount" slider until you achieve a grain density that complements your image without overwhelming its details.
Refining the Grain: Gaussian Blur and Layer Adjustments
While the "Add Noise" filter provides the foundational grain, further refinement can lead to a more nuanced and aesthetically pleasing result. One effective technique to soften and integrate the added grain is by applying a Gaussian Blur to the "Add Grain" layer.
You can further enhance the "Add Grain" layer by applying a Gaussian Blur. Select the "Add Grain" layer (which is now a Smart Object containing the noise filter). Go to the top menu bar in Photoshop, then click on "Filter" > "Blur" > "Gaussian Blur."
The Gaussian Blur dialog box allows you to control the radius of the blur. A small radius, typically between 0.2 to 0.5 pixels, can subtly soften the sharp edges of the noise, making it appear more like natural film grain and less like digital artifacting. The key here is subtlety; you want to integrate the grain, not obscure your image details.
Beyond Gaussian Blur, the blending modes and opacity of the grain layer offer powerful control. After applying the "Add Noise" filter, you can adjust the opacity of the Smart Object layer to further reduce the intensity of the grain if it appears too strong. Additionally, experimenting with different blending modes can subtly alter how the grain interacts with the underlying image. For instance, setting the blending mode to "Screen" and reducing opacity can create a lighter, more ethereal grain, while "Overlay" or "Soft Light" might offer more pronounced textural effects.
The Art of Iteration: Trial and Error in Photoshop
In fact, achieving the perfect effect in Photoshop editing is often a process of trial and error. The subjective nature of aesthetic choices means that what looks best can vary greatly depending on the image content, desired mood, and personal preference. However, constantly adding and removing filters in a repetitive manner can be inefficient and time-consuming, especially when dealing with large files.
This is precisely where the power of Smart Objects becomes invaluable. Because you converted your grain layer into a Smart Object, the "Add Noise" filter (and any subsequent filters like Gaussian Blur) are applied non-destructively. This means you can easily re-edit the noise effect in Photoshop.
To re-edit the noise settings, simply double-click on the "Add Noise" filter listed under the Smart Object layer in the Layers panel. The "Add Noise" dialog box will reappear with your previous settings. You can then readjust the "Amount," "Distribution," and "Monochromatic" settings according to your preferences until you are satisfied with the result. Similarly, you can double-click on the "Gaussian Blur" filter to fine-tune its radius. This iterative process allows for experimentation without commitment, empowering you to explore various grain intensities and characteristics with ease.
Realistic Film Grain in Photoshop
Alternative Approaches and Considerations
While the "Filter > Noise > Add Noise" method is a direct and effective way to add grain, Photoshop offers other avenues for achieving similar results, each with its own nuances.
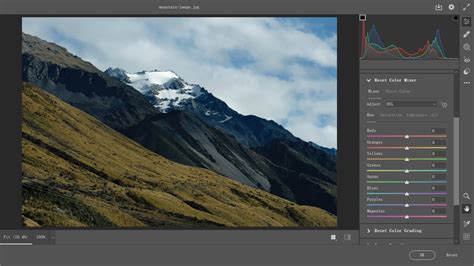
1. Using the Camera Raw Filter:For those who frequently use the Camera Raw interface for initial image adjustments, the "Texture" and "Clarity" sliders, along with the "Effects" panel, can be employed to simulate grain. Within the Camera Raw Filter (accessible via "Filter > Camera Raw Filter"), navigate to the "Effects" tab. You'll find a "Grain" slider. Similar to the "Add Noise" filter, this slider controls the intensity of the grain. You can also adjust "Texture" and "Clarity" to further enhance the perceived graininess and detail. The advantage here is that the Camera Raw Filter also operates as a Smart Filter when applied to a Smart Object, offering re-editability.
2. Creating Custom Grain Brushes:For ultimate control and a highly artistic approach, you can create custom Photoshop brushes that mimic photographic grain. This involves capturing a small section of natural film grain (either from a scanned film strip or a high-quality stock image), defining it as a brush preset, and then painting it onto a new layer. You would then adjust the blending mode and opacity of this brush layer to achieve the desired effect. This method is more labor-intensive but offers unparalleled flexibility in terms of grain shape, size, and distribution.
3. The Role of Image Resolution and Size:It's worth noting that the appearance of grain can be influenced by the resolution and final output size of your image. Adding grain to a very high-resolution image intended for large-format printing will require a different approach than adding grain to an image destined for web display. For best results, a little bit like with sharpening, it's often advisable to add the grain as one of the last steps in your retouching workflow, ideally after resizing your images to their final intended dimensions. This ensures that the grain scales appropriately and doesn't appear overly pronounced or blocky on smaller outputs.
Beyond the Technique: The Artistic Intent of Grain
The decision to add grain is not merely a technical one; it's an artistic choice. Understanding why you are adding grain will inform how you implement it.
- Vintage and Nostalgic Feel: Grain has long been associated with traditional film photography, instantly evoking a sense of nostalgia and a bygone era. It can make a modern digital image feel more timeless and classic.
- Adding Texture and Depth: In some cases, grain can add a tactile quality to an image, giving it a sense of depth and materiality that can be lacking in overly smooth digital photos. It can break up large areas of flat color and add visual interest.
- Imparting Emotion and Atmosphere: Grain can contribute to the mood of an image. A subtle grain might add a touch of softness, while a heavier, more pronounced grain can convey a sense of grittiness, urgency, or rawness.
- Concealing Imperfections: While not its primary artistic purpose, a well-applied grain can sometimes help to mask minor digital noise or compression artifacts, particularly in low-light situations. However, it's important not to rely on grain solely for this purpose, as it can also exacerbate existing imperfections if not applied carefully.
The TourBox Advantage: Enhancing Your Workflow
For creative professionals, photographers, and digital artists, efficiency and intuitive control are paramount. While Photoshop's built-in tools are powerful, managing multiple adjustments and filters can sometimes lead to a less fluid workflow. This is where specialized hardware like the TourBox can make a significant difference.
TourBox is an exceptional product designed specifically for creative professionals, photographers, and digital artists. It offers a customizable console with various dials, knobs, and buttons that can be programmed to execute specific Photoshop commands or adjust parameters with tactile precision. For tasks like adding grain, where incremental adjustments to sliders like "Amount" or "Radius" are common, the TourBox can provide a level of control that is difficult to achieve with a mouse and keyboard alone. Imagine being able to dial in the perfect grain intensity with a physical knob, or instantly access the "Add Noise" filter with a single button press. This can significantly speed up your editing process and allow you to focus more on the creative aspects of your work.
Mastering the Craft: Practice and Experimentation
In this tutorial, we have shared the method of how to add grain in Photoshop using the "Add Noise" filter and explored the benefits of Smart Objects. We have also touched upon alternative approaches and the artistic considerations behind this technique. Additionally, we have introduced the use of Smart Objects, a fundamental concept for non-destructive editing.
Remember, practice and experimentation are key to mastering any technique. Don't be afraid to try different settings, explore various filters, and push the boundaries of what you can achieve. The journey of a photographer and digital artist is one of continuous learning and discovery. We hope this tutorial inspires you to experiment and explore new possibilities in your photo editing work, adding that perfect touch of vintage allure or artistic texture to your images.