Adobe Photoshop, renowned for its powerful image manipulation capabilities, also offers robust tools for text editing. Whether you're a seasoned graphic designer or a beginner looking to customize a template, understanding how to effectively edit text in Photoshop is a crucial skill. This guide delves into the various methods and techniques for modifying, replacing, and enhancing text within your Photoshop projects, from correcting simple typos to applying sophisticated stylistic changes.
Understanding Photoshop's Text Layers
At the heart of Photoshop's text editing lies the concept of "Text Layers." Unlike rasterized images, text layers are dynamic and editable. They are easily identifiable in the Layers panel by a "T" icon preceding the layer thumbnail. This distinction is vital because it dictates the editing methods available. Editable text in Photoshop resides within these dedicated Text Layers, allowing for non-destructive modifications.
If you open an image file in Photoshop, it will typically appear as "Layer 1" by default. To work with text, you'll usually be creating new text layers or editing existing ones.
Creating New Text
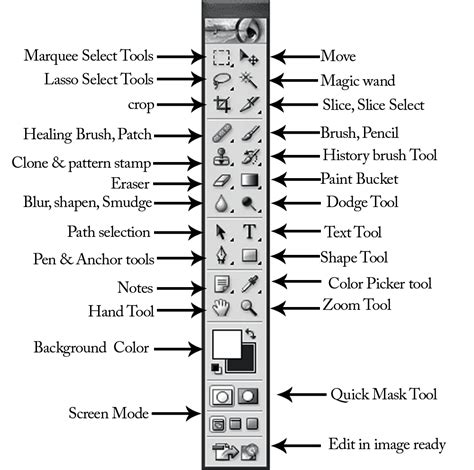
To add new text to your image, you begin by selecting a type tool from the toolbox. Photoshop offers two primary type tools: the Horizontal Type Tool and the Vertical Type Tool. The choice between them determines the direction in which your type lines flow.
- Horizontal Type Tool: When you use this tool, the type lines flow from left to right, and the characters are arranged horizontally.
- Vertical Type Tool: Conversely, this tool allows type lines to flow from top to bottom, arranging characters vertically.
Once you've selected your desired type tool, you simply click on the canvas where you want the text to appear. This action sets an insertion point. You can then begin typing. As you enter text, it appears in the image. The default font size is calculated based on the document's resolution and zoom factor, which can be a more accurate representation than the older fixed 12-point default.
The options bar (usually located at the top of the Photoshop window) provides immediate access to fundamental text formatting controls. Here, you can select a different font family, adjust the font size, change the color of the text, and modify other type options.
For new text, you write and commit the text you want to apply a style to. If you make a mistake at all during the process, the simple way to undo the error would be to use the hotkey Ctrl/Cmd+Z.
Editing Existing Text
Modifying existing text in Photoshop is straightforward, leveraging the editable nature of text layers.
Locating and Selecting Text
To edit existing text, you first need to select the text layer in the Layers panel. If you want to change all the text within a layer, simply select that type layer. However, if you only need to modify portions of the text, you can highlight the specific characters by dragging across them with the I-beam cursor of the Type tool.
Several methods exist for selecting characters:
- Click to set the insertion point: This places the cursor for typing new text or editing at a specific point.
- Drag to select one or more characters: This is the standard method for highlighting a range of text.
- Double-click to select a single word: A quick way to select an entire word.
- Triple-click to select an entire line of text: Useful for formatting or replacing a full line.
- Select a range of characters: This can also be achieved by holding down the Shift key and pressing the Right Arrow or Left Arrow key after setting an insertion point.
Making Text Changes
Once the text is selected, you can proceed with editing:
- Correcting Typos and Deleting Text: To correct typos or delete text, simply highlight the unwanted characters using the methods described above and then press the Delete or Backspace key. You can also make an insertion point by clicking your I-beam within the line of text and then enter text as desired, effectively replacing or adding to existing content.
- Changing Font Properties: You can change the font family, size, color, or other type options directly from the options bar or by using the Character panel (Window > Character). The Character panel offers more granular control over typography.
- Font Family and Style: You can select a different font family for one or more characters whose font you want to change. A font family encompasses a set of type designs that share a common design language, or "family," and are commonly packaged, sold, and licensed together. A typeface is a design for a set of type or text. A font is a member of a typeface family. A font is a complete set of characters-letters, numbers, and symbols-that share a common weight, width, and style. For example, Arial is a typeface, while Arial Bold is a font.
- Size: To change the size of characters, select the characters you want to edit. In the Tool Options (or Character panel), enter or select a new value for Size. You can enter a size larger than 72 points; the value you enter is converted into the default unit of measurement. By default, type is measured in points.
- Color: You can change the color of individual characters or all type in a layer. You can change the type color before or after you enter text. To do this, select the text you wish to modify, then choose a color from the Color menu in the options bar or within the Character panel.
- Faux Styles: If a font doesn't offer a bold or italic version, Photoshop allows you to apply faux (fake) versions of bold and italic. However, it's generally recommended to use the actual font styles for better quality.
- Applying Styles and Warping Text: You can apply predefined styles or warp type to fit specific shapes.
- Warping Text: For example, you can warp type in the shape of an arc or a wave. Select the text layer, then choose "Warp Text" from the options bar. Choose a warp style from the Style pop-up menu and adjust the Bend and other options to specify the amount of warp and apply perspective.
- Color Fonts: Color fonts let you go beyond basic black or grayscale by adding vibrant, multi-colored elements directly into your text. These fonts can include layered colors, gradients, and textures, adding a new dimension to your typography.
Committing and Canceling Changes
After making your edits, you need to commit them. You can do this by clicking the checkmark icon in the options bar, pressing Ctrl+Enter (Windows) or Cmd+Return (macOS), or by selecting a different tool in the toolbox. If you decide not to keep your changes, you can cancel them by pressing the Esc key. Note that the Esc key is set to commit text by default, but you can change this behavior in Photoshop's preferences (Edit > Preferences > Type on Windows, or Photoshop > Preferences > Type on macOS). Clicking away from the text layer on the canvas also commits the changes.
How to use Text tool in Photoshop CC Tutorial
Advanced Text Transformations
Beyond simple edits, Photoshop offers powerful tools for transforming text layers, allowing for more creative manipulation.
Free Transform
The Free Transform command is one of the most versatile tools for altering text layers.
- Select the Type Layer: In the Layers panel, ensure the type layer you want to transform is selected.
- Access Free Transform: Go to Image > Transform > Free Transform, or use the shortcut Ctrl+T (Windows) or Cmd+T (macOS). A bounding box with handles will appear around your text.
- Manipulate the Text:
- Scale: Drag any of the corner or side handles to resize the text.
- Rotate: Move your cursor slightly outside a corner handle until it turns into a curved double-arrow, then click and drag to rotate the text.
- Distort: Hold down Ctrl (Cmd on Mac) and drag a corner handle to distort the text, changing its perspective.
- Skew: Hold down Shift and drag a side handle to skew the text horizontally or vertically.
- Commit Transformation: Once you are satisfied with the transformation, double-click inside the bounding box or press Enter (Return on Mac) to commit the changes.
It's important to note that for path type (text created along a path), applying the transformation command enables you to change the shape of your path but not the actual type itself.
Rotating Type
You can also rotate type specifically:
- Using Rotate Commands: Select the type layer and use any rotate command (e.g., Edit > Transform > Rotate 90° Clockwise).
- Using Free Transform: As described above, Free Transform allows for precise rotation.
- Rotating Characters by 90°: For specific characters or lines, you can rotate them by 90° using the options bar or by choosing Layer > Type > Vertical (which also changes the flow direction).
Transforming Paragraph Type
For paragraph type (text enclosed within a bounding box), transformations affect the bounding box itself. This allows you to resize and reshape the area containing the text.
Replacing Text on Complex Backgrounds
When text is part of an image with a complex or busy background, replacing it requires a more nuanced approach.
Using Content-Aware Fill
One of the most effective methods for removing text from an image background is using Photoshop's Content-Aware Fill feature.
- Duplicate Layer: Begin by duplicating your background layer (Ctrl+J on Windows, Cmd+J on Mac). This ensures you're working non-destructively.
- Select the Text: Use a selection tool like the Lasso Tool, Quick Selection Tool, or Pen Tool to carefully select the text you want to remove. Precision is key here, especially on complex backgrounds.
- Apply Content-Aware Fill: Go to Edit > Content-Aware Fill. Photoshop analyzes the surrounding pixels and intelligently fills the selected area, attempting to match the original background. You can refine the sampling area in the Content-Aware Fill workspace.
- Insert New Text: Once the original text is removed, you can use the Type tool to add your new text in the desired location, matching the original font and style as closely as possible, or choosing a completely new one.
Rasterizing Text Layers
Sometimes, you might need to apply certain filters or tools that are not available for editable text layers. In such cases, you can rasterize the type layer.
- Select the Type Layer: Choose the text layer in the Layers panel.
- Rasterize: Right-click on the text layer and select "Rasterize Type." Alternatively, go to Layer > Rasterize > Type.
Once rasterized, the text becomes a pixel-based image, and you can use painting tools or apply filters. However, it will no longer be editable as text. If you need to edit it after rasterizing, you'll have to use selection and painting tools to modify the pixels. To ensure you can still edit the text later if needed, it's a good practice to duplicate the text layer before rasterizing.
Spell Checking and Language Dictionaries
Photoshop includes tools to help you maintain textual accuracy.
Spell Checking
You can spell check your text within Photoshop:
- Select Text: Select the text layer or specific text you want to check.
- Initiate Check: Go to Edit > Spelling > Check Spelling.
- Corrections: Photoshop will highlight misspelled words. You can choose to "Ignore," "Ignore All," "Change" to a suggested correction, or "Change All." The "Change To" text box allows you to enter the correct spelling manually.
- Language Dictionaries: To ensure accurate spell checking, especially for different languages or regional variations, you can select a specific language dictionary. This is done from the pop-up menu at the bottom of the Character panel. Photoshop uses language dictionaries to check hyphenation and spelling, providing a list of thousands of words with standard syllable breaks.
Find and Replace Text
For documents with a significant amount of text, the Find and Replace Text tool can be a significant time-saver. This tool is particularly useful for text that exists within text box objects.
- Access the Tool: Go to Edit > Find and Replace Text.
- Specify Search Scope: You can choose to search within a specific text layer or "All Layers" in the document. You can also choose to search forward from an insertion point.
- Enter Search Terms: In the "Find What" text box, enter the word or phrase you want to locate.
- Enter Replacement Text: In the "Replace With" text box, enter the revised text.
- Execute: Click "Find Next" to locate instances of the text or "Replace" to replace the currently found instance. "Replace All" will replace all occurrences within the specified scope.
This method is especially effective for replacing text that's in a text box object.
Understanding Text Measurement and Resolution
Photoshop's handling of text size is influenced by document resolution.
- Default Font Size: When a new document is created, or an existing document without type layers selected is opened, the font size resets to a newly calculated default size. This calculation is based on document resolution and zoom factor. Previously, the default font size was always 12 pt, which could sometimes be too small depending on resolution and zoom factor.
- Points as Units: By default, type is measured in points. You can change the default unit of measurement in the Units & Rulers section of the Preferences dialog box.
- Resolution Dependence: The actual physical size of type on screen or in a printout is dependent on the resolution of the image. For instance, text that is approximately 1-inch high in an image that is 72 ppi will appear smaller when printed at a higher resolution.
Text Alignment and Spacing
Photoshop offers controls for aligning and spacing text for better readability and aesthetic appeal.
Alignment
- Horizontal and Vertical Alignment: You can align text horizontally (left, center, right) or vertically (top, middle, bottom) using the options in the options bar or the Paragraph panel. To vertically align texts, you select the text tool and click the "Align" button, revealing alignment icons and options.
- Justification: For paragraph text, you can apply justification to align lines of text to both the left and right margins.
Character and Paragraph Spacing
The Character panel and Paragraph panel provide extensive control over spacing:
- Leading: Controls the vertical space between lines of text. It's often set to "Auto" by default, but can be manually adjusted.
- Kerning: Adjusts the space between specific pairs of characters. This is crucial for fine-tuning the appearance of certain letter combinations.
- Tracking: Adjusts the overall spacing between characters in a selected range of text.
- Horizontal Scaling: This resizes characters to the original width and height of the characters, with a value of 100% representing the plain type style.
Layer Styles and Blending Options
Photoshop's Layer Styles can dramatically alter the appearance of text without affecting the underlying text data.
Applying Layer Styles
Layer styles can add effects like drop shadows, glows, bevels, and more.
- Select the Text Layer: In the Layers panel, select the text layer.
- Access Blending Options: Right-click on the text layer and choose "Blending Options."
- Choose Effects: In the Layer Style dialog box, you can select various effects from the list on the left and configure their settings. For example, you can add a drop shadow for depth or an outer glow for emphasis.
These styles are non-destructive and can be easily modified or removed at any time.
Converting Text to Shapes
While it's best to keep text editable for as long as possible, there are times when converting text to shapes might be necessary, for instance, to create custom vector-like elements or to achieve specific design effects.
- Select the Text Layer: Choose the text layer in the Layers panel.
- Convert to Shape: Go to Type > Convert to Shape.
The text layer will be converted into a shape layer, which can be manipulated using the shape tools. However, once converted, it's no longer editable as text.
Conclusion
Mastering text editing in Photoshop opens up a world of creative possibilities. From simple typo corrections to complex typographic transformations and integrations with image elements, the tools available allow for precise control and professional results. By understanding text layers, leveraging the options bar and dedicated panels, and utilizing advanced features like Free Transform and Content-Aware Fill, you can effectively manage and enhance all textual elements within your Photoshop projects. Remember to always consider the non-destructive nature of text layers and duplicate layers when performing irreversible operations like rasterization.