Tethered photography, the practice of connecting your camera directly to a computer or tablet for instant image review and import, has become an indispensable tool for many photographers, particularly in studio and controlled environments. This powerful workflow allows for immediate evaluation of shots on a larger screen, facilitates client collaboration, and streamlines the post-production process. While the concept is straightforward, mastering tethered capture within Adobe Lightroom Classic, and understanding its limitations, is key to unlocking its full potential.
The Genesis of Tethered Shooting: Why Go Beyond the Camera LCD?
The allure of studio photography, with its controlled lighting and deliberate setup, can quickly be met with frustration. As Rikk Flohr of Adobe Photography Org notes, "In the studio, every little detail counts. A blemish or piece of dust on a product, a slightly out-of-position light on a portrait, a too-powerful flash, an off-color ambient light; each has the potential to ruin the photo and make it useless to both you and your clients." The limitations of a camera's built-in LCD screen become starkly apparent when faced with these critical details. These small, often low-resolution previews simply do not offer the necessary magnification or clarity to meticulously check focus, exposure, and composition. This need for a more robust evaluation method is precisely where tethered photography steps in, offering a significantly enhanced visual feedback loop.
Understanding Tethered Photography: How It Works
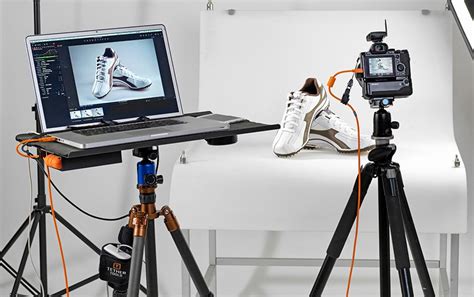
At its core, tethered photography is the process of establishing a direct link between your camera and another device, typically a computer, tablet, or even a smartphone. This connection is usually facilitated by a cable or a wireless app. As soon as the shutter button is pressed, the captured image is not only saved to the camera's memory card but is also simultaneously transmitted and displayed, often in high resolution, on the connected device's screen. This immediate display allows photographers and their clients to scrutinize each shot on a large monitor within moments of it being taken.
Top Tethering Tips | Take and Make Great Photography with Gavin Hoey
The Advantages of Tethering in Lightroom Classic
The integration of tethered shooting directly into Adobe Lightroom Classic transforms the photographic workflow. Beyond the crucial benefit of instant, large-screen previews for detail assessment, tethering offers significant organizational advantages. As soon as an image is captured, it can be immediately imported into Lightroom with pre-defined settings. This means that while you are still shooting, you can begin applying metadata such as star ratings, keywords, and notes to each photograph. This proactive organization drastically reduces the time spent on importing and culling images after the shoot concludes, leading to a more efficient and faster overall production time. For food photographers, for instance, this allows for "quickly mak[ing] adjustments at the camera and get[ting] instant feedback on the computer screen, has eliminated the long and tedious import process after shooting, and allows me to keyword the image as it is captured."
Essential Gear for Your Tethered Setup
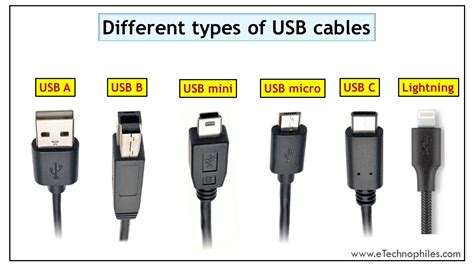
To embark on tethered shooting, a few key pieces of equipment are necessary. The most fundamental is a reliable tethering cable. While most cameras come with a USB cable, these are often short (around three feet) and can be frustratingly limiting for practical studio work. It is highly recommended to invest in a longer USB cable, typically in the 12 to 15-foot range, to provide ample freedom of movement. For those who plan to shoot tethered frequently, a longer cable is an investment that pays dividends in convenience and flexibility.
Beyond the cable, a stable platform for your computer is essential. The Tether Tools Aero Table is a popular choice, described as a "lightweight, durable, aluminum platform that attaches to almost any tripod or light stand." This provides a secure surface to place your laptop, often with straps to prevent accidental slips. Power management is another critical consideration. Tethering can significantly drain the battery life of both your camera and your connected computer. Therefore, it's advisable to "always carry extra batteries and - if possible - shoot near a wall socket in case you need to plug in your laptop." Tether Tools also offers external camera power systems designed to provide extended uptime.
Navigating the Lightroom Ecosystem: CC vs. Classic for Tethering
A common point of confusion for photographers looking to tether in Lightroom stems from Adobe's two distinct software offerings: Lightroom CC (now often referred to as Lightroom) and Lightroom Classic. It is crucial to understand their fundamental differences in functionality, especially concerning tethered capture.
Lightroom CC is a cloud-based, cross-platform application designed for mobile convenience and cloud syncing. It excels at editing across devices and automatic cloud backup. However, Lightroom CC does not natively support tethered capture. If you've searched for "Lightroom CC tethering," the answer is that it's not a built-in feature.
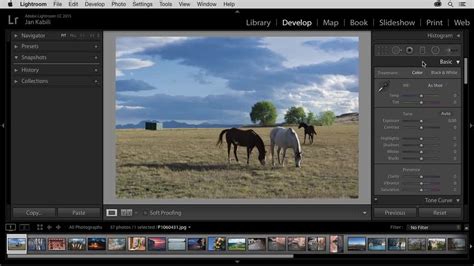
In contrast, Lightroom Classic is a desktop-only application that offers robust, full tethered capture support. This is the version required for direct camera connection and instant import. Therefore, if your goal is to tether your camera to Lightroom, you must be using Lightroom Classic.
| Feature | Lightroom (CC) | Lightroom Classic |
|---|---|---|
| Platform | Cloud-based (Desktop, Mobile, Web) | Desktop-only (Windows/Mac) |
| Image Storage | Cloud sync | Local drive |
| Tethering Support | No native tethering | Full tethered capture support |
| Ideal For | Mobile editing, cloud backup | Professional tethered shooting |
Step-by-Step: Tethered Capture in Lightroom Classic
Getting started with tethered shooting in Lightroom Classic is a relatively straightforward process, provided your camera is supported.
- Connect Your Camera: Ensure your supported DSLR or mirrorless camera is turned off. Connect one end of your USB tethering cable to your camera and the other end to your computer.
- Power On and Open Lightroom Classic: Turn on your camera. Launch Adobe Lightroom Classic.
- Initiate Tethered Capture: Navigate to the "File" menu in the menu bar, then select "Tethered Capture," and finally choose "Start Tethered Capture."
- Configure Settings: A dialog box will appear, allowing you to configure various options for your tethering session. This includes:
- Session Name: Assign a descriptive name to your tethering session. This name will often be used to create a dedicated folder for the captured images.
- File Naming: Define how your imported files will be named. This can include elements like the session name, date, and a sequential number.
- Destination Folder: Specify where the captured images will be saved on your computer or an attached external drive.
- Segment Photos By Shots: If you select this option, Lightroom Classic will create subfolders within your main session folder for each distinct "shot" or sequence of captures. This can be very useful for organizing different setups or poses within a single shoot.
- Add Metadata and Keywords: You have the option to add initial metadata, such as copyright information, and keywords to the imported photos at the time of capture.
- Auto-Select Newly Captured Photos: By default, Lightroom Classic will automatically select the most recently captured photo. You can disable this if you prefer to manually select images.
- Develop Settings: You can optionally choose a Lightroom Develop preset to be automatically applied to images upon import.
- Start the Session: Click "OK" to begin the tethered capture session.
Upon clicking "OK," a camera detection window may appear. If Lightroom Classic successfully detects your camera, a floating tethered capture bar will become visible on your screen. This bar provides quick access to monitor camera settings, capture images, and add annotations.
Advanced Tethering Features and Workflow Enhancements
Lightroom Classic offers several features to enhance the tethering experience:
- Live View: For supported Canon and Nikon cameras, Lightroom Classic provides "Live View" functionality within the tethered capture interface. This displays a real-time feed directly from your camera's sensor in a separate, resizable window. Live View is invaluable when you're not directly behind the camera, or when collaborating with a team. It allows for precise focus control, including autofocus buttons, and provides immediate visual feedback on exposure settings. Note that focus controls are only enabled if the camera's lens is set to autofocus mode.
- Camera Control: The floating tethered capture bar allows you to adjust various camera controls directly from Lightroom, including exposure settings, white balance, and even firing the shutter. This means you can set your camera on a tripod and initiate captures without needing a separate cable release.
- Grid Overlay: During tethered capture, you can display a grid overlay on your Live View feed by selecting "View > Loupe Overlay > Grid." This aids in composing shots, particularly for architectural or product photography where precise alignment is critical.
- Smart Shooter Integration: For Sony and Nikon users, integrating Lightroom Classic with the Smart Shooter plugin can unlock even more powerful tethering capabilities. Smart Shooter enhances the experience with features like multiple camera control, customizable workstations, custom scripts and automation, barcode/QR code scanning, dual saving (to card and computer), and automatic application of Lightroom presets. A free 30-day trial of Smart Shooter is available.
Troubleshooting Common Tethering Issues
While powerful, tethering software can sometimes be "notoriously finicky." Several issues can arise, and being prepared can save significant frustration.
- Camera Not Detected: If Lightroom Classic fails to detect your connected camera, first ensure that your camera is supported for tethering in Lightroom. Check Adobe's official tethering support list. Verify that both your version of Lightroom Classic and your camera's firmware are up to date. Sometimes, simply trying a different USB cable can resolve the issue, as cables can be a common point of failure.
- Connection Drops: Cables can become loose, or software glitches can cause the connection to drop. If tethering breaks, you generally cannot simply reconnect and continue. You will likely need to restart the tethered capture session within Lightroom Classic.
- Speed and Buffer Issues: When shooting tethered, especially with high-resolution cameras or in rapid burst modes, the transfer of images can sometimes slow down the shooting process. The camera's buffer can fill up, requiring you to wait for Lightroom to catch up. While this is often a minor inconvenience, it's something to be aware of for fast-paced shoots.
- Battery Drain: As mentioned, tethering consumes significant power. Always be prepared with extra batteries or a reliable power source for your laptop.
Alternative Tethering Software: EOS Utility for Canon Users
For Canon camera owners, Adobe's EOS Utility software offers a free and straightforward tethering solution, which can be used independently or in conjunction with Lightroom for importing.
- Download and Install: Download the EOS Utility software from Canon's website.
- Connect Camera: With your camera turned off, plug in your tethering cable.
- Power On and Launch: Turn your camera back on and open the EOS Utility program on your computer.
- Enable Live View (Optional): If available, set your camera to Live View mode. Your camera's display should then appear on your computer screen, providing a real-time view.
- Capture Images: When you take a photo, the file will appear on your computer's desktop. EOS Utility can be configured to save images directly to your computer, from where they can then be imported into Lightroom.
Setting Expectations and Best Practices
When working with clients during a tethered shoot, it's important to "set expectations." While the large screen allows for detailed review, clients can sometimes become overly focused on minor details, which can inadvertently stall the photoshoot. Clearly communicate the purpose of tethering and manage the review process to maintain momentum.
The Future of Tethering: On-the-Go Capabilities
The desire for more portable tethering solutions is evident, with photographers like the one mentioned hoping for updates that would allow tether capture directly to an iPad. Currently, while an iPad Pro with a Canon R6 and a USB-C tether cable can be used for shooting, the direct tethering functionality within Adobe's ecosystem is limited to Lightroom Classic on a desktop. The aspiration is to "shoot tethered, recording images to sd card and a designated folder in light room, allowing client to easily view during shoot. Then have the ability to open images via LrClassic for further editing and uploading to third party gallery to deliver." This points to a growing demand for seamless, on-location tethering workflows that integrate directly with professional editing software.
Ultimately, the decision to tether is a personal one, based on workflow needs and shooting style. However, for those working in studio environments or requiring meticulous detail evaluation, mastering tethered capture in Lightroom Classic offers a significant advantage, streamlining the process from capture to final edit. By understanding the tools, setup, and potential pitfalls, photographers can leverage this powerful technique to elevate their craft.