Adobe InDesign offers powerful tools for manipulating text and its containers, enabling designers to create dynamic and visually engaging layouts. Among these capabilities, rotating text and text frames stands out as a key technique for adding unique flair and improving readability in specific contexts. This guide delves into the various methods for rotating text within InDesign, addressing common challenges and providing practical solutions for achieving precise control over your typography.
Understanding Container vs. Content in InDesign
A fundamental concept to grasp when working with InDesign is the distinction between a "container" and its "content." In the context of text, the text frame acts as the container, defining the boundaries and positioning of the text, which is the content. Understanding this relationship is crucial for achieving desired transformations. For instance, you can create interesting effects by rotating text or text frames on the page. However, the method you employ will determine whether the frame itself rotates, the text within it rotates, or both. This distinction is paramount when aiming for specific outcomes, such as rotating only the frame while leaving the text orientation unchanged, or vice versa.
Rotating Text Frames Without Affecting Text
Often, the goal is to alter the orientation of the text frame on the page without changing the inherent orientation of the text within it. This is particularly useful when adjusting the overall layout or integrating frames into complex designs.
To rotate a text frame and not the text within it, you can utilize InDesign's selection tools and transformation options. Begin by ensuring you have the correct tool selected. The Direct Selection Tool (often accessed by pressing the 'A' key) is instrumental here. This tool allows you to select and manipulate individual points or paths within an object, as well as the object itself.
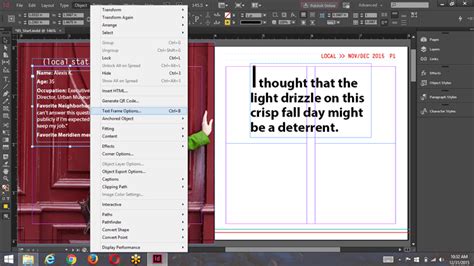
When you need to rotate a frame but keep the text upright, the process typically involves selecting the frame using the black arrow (Selection Tool), performing the rotation, and then using the Direct Selection Tool to "un-rotate" the frame relative to its content. This means entering a reverse angle to counteract the frame's rotation, effectively aligning the frame's orientation with the text's original orientation.
Another scenario involves situations where you have drawn shapes using the shape tool and subsequently converted them into text boxes for labels. In such cases, you might want to rotate the frame to fit the shape's orientation without rotating the text itself. The principle remains the same: select the frame and apply the rotation, then use the Direct Selection Tool to adjust the frame's orientation independently of the text.
Rotating Text Within Text Frames
Conversely, there are times when you specifically want to rotate the text inside a frame, leaving the frame's orientation on the page unchanged. This is common for headings, captions, or when working with tables where text needs to be oriented to fit specific cell dimensions.
Rotating Text in Table Cells
One common application of text rotation is within tables. You may need to rotate text within table cells to improve readability or to fit more content into a confined space.
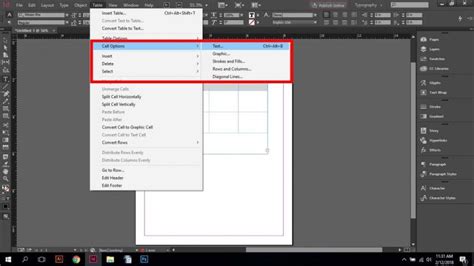
To rotate text within table cells, you can start by selecting the cell or cells that contain the text you would like to rotate. Then, navigate to Table > Cell Options > Text. In the dialog box that opens, you will find a "Text Rotation" pop-up menu. Here, you can select a desired degree of rotation, such as 90 degrees counter-clockwise (CCW) or other predefined angles.
Alternatively, you can use the Table panel, which can be accessed via Window > Type & Tables > Table. Within this panel, you will often find icons in the lower-right area that correspond to text rotation options for selected cells. These icons provide a visual representation of the rotation choices.
Rotating Text in General Text Frames
When rotating text within a standard text frame, and not within a table, a slightly different approach is often necessary. InDesign's behavior can sometimes be to rotate both the frame and the content together. To achieve rotation of just the text "in place," a two-step approach is usually required.
First, ensure that the Reference Point proxy in your Control Bar has its center selected. This tells InDesign where the point of transformation will be. Then, rotate the frame using the standard transformation methods (e.g., using the Selection Tool and dragging a corner handle while holding down the Shift key for constrained rotation, or by entering a value in the Transform panel).
After rotating the frame, you then need to counteract this rotation on the frame itself to make the text appear rotated "in place." Select the object with the black arrow (Selection Tool), and then rotate it by the same amount but in the negative direction. This effectively cancels out the frame's rotation, leaving the text with the desired orientation within the now-standard-oriented frame.
Advanced Techniques and Solutions
For more complex scenarios, or when the standard methods don't yield the exact result, InDesign offers more nuanced solutions.
Anchoring Text Frames for Rotation
A highly effective method for rotating text within a parent frame without affecting the parent frame's orientation is to place the label text inside a separate, smaller frame and then paste it into the parent frame as an anchored text element.
To do this:
- Create a new text frame containing the text you wish to rotate.
- Rotate this new text frame to your desired angle using the standard transformation tools.
- Cut this rotated text frame.
- Go back to your parent text frame and position the cursor where you want the rotated text to appear.
- Use
Edit > Paste in PlaceorEdit > Pasteto insert the rotated text frame as an anchored object.
Once the text frame is anchored, you can select the anchored element using a selection tool (not the text tool). Then, navigate to Object > Transform > Rotate. From here, you can rotate the anchored text frame to the desired angle within the parent frame, while the parent frame itself remains in its original position.
It's important to be aware that if the anchored text box is larger than the available space within the parent frame, it may be treated as overset text and thus not be fully visible. You may need to adjust the size of the anchored frame or the parent frame to accommodate the content.
Addressing Specific Use Cases: Interactive Workbooks and PDF Export
A user encountered a specific challenge when creating an interactive workbook in InDesign for export to PDF. The pages were in portrait orientation, but some landscape-oriented tables required text to be rotated 90 degrees CCW within table cells. The user wanted the text to be correctly oriented relative to the table layout, especially for form fields where user input needed to follow the rotated text.
The user attempted to place a frame within the table cells and use Transform to rotate it. However, upon exporting to PDF, the text in the form fields was still entered from left to right, not bottom to top as intended with the rotated headings. This indicates that while the visual rotation of the frame might be achieved in InDesign, the interactive elements within the PDF might not inherit that rotation in a functional manner for data entry.
This particular issue highlights a limitation or a specific behavior when dealing with interactive form fields within rotated elements in InDesign when exporting to PDF. The underlying PDF structure might not always interpret the visual rotation as a functional change for data input fields.
To address this, one might need to explore alternative PDF form field creation methods, potentially outside of InDesign, or investigate specific InDesign export settings that might influence the behavior of interactive elements in the final PDF. Sometimes, the solution involves creating the rotated text as a static element and then placing separate, non-rotated form fields that are positioned to align with the rotated text visually.
The Benefit of Disconnected Objects
A valuable design principle to consider, especially when anticipating complex transformations like rotation, is to draw objects and their associated text as two disconnected objects. This means, for instance, that a shape might be one object, and the text label for that shape might be in a separate, independent text frame.
This separation allows you the flexibility to change the orientation of one without affecting the other. If you need to rotate the shape, you can do so without worrying about the text's orientation, and vice versa. This approach simplifies many transformation tasks and provides greater control over the final composition.
Adobe InDesign Advanced Course - Free Tutorial!
Tools for Precise Transformation
InDesign provides several tools and panels to ensure precision when rotating elements:
- Selection Tools: The black arrow (Selection Tool) for moving and transforming entire objects, and the white arrow (Direct Selection Tool) for manipulating paths and individual anchor points.
- Control Panel: This panel displays contextual options for the selected object, including precise numerical input for rotation angles and reference point selection.
- Transform Panel: Accessible via
Window > Object & Layout > Transform, this panel offers comprehensive control over an object's position, scale, rotation, and skew. You can enter exact degree values for rotation here. - Table Panel: Essential for manipulating text within table cells, offering direct controls for text rotation and alignment.
By mastering these tools and understanding the interplay between container and content, you can effectively rotate text and text frames in InDesign to create sophisticated and well-designed layouts. The key often lies in selecting the right tool for the job and understanding how InDesign interprets transformations based on your selections.