Photoshop, a cornerstone of digital art and photo manipulation, offers a vast array of tools and techniques for creators to transform images. Among the most sought-after skills is the ability to convincingly place a person into a different photographic environment, a process that requires a nuanced understanding of selection, masking, color correction, and lighting. This article delves into the core methodologies and advanced strategies for achieving such composites, drawing upon the expertise of renowned Photoshop educators and the powerful capabilities of modern Photoshop features.
The Foundation: Isolating Your Subject
The first critical step in any compositing task is the accurate isolation of the subject from its original background. Unmesh Dinda, a prominent Photoshop instructor and founder of the popular YouTube channel "PiXimperfect," emphasizes the importance of this foundational skill. His approach, honed through over a thousand tutorials and a community of millions, often begins with leveraging Photoshop's intelligent selection tools.
In newer versions of Photoshop, the Object Selection Tool is a powerful starting point. By simply clicking on "Select and Mask" from the top toolbar, users can access a dedicated workspace for refining selections. Within this workspace, the Refine Edge Brush Tool becomes invaluable for meticulously detailing the edges of the subject, especially around complex areas like hair or fur. This ensures that the subject is cleanly separated, leaving no unwanted background artifacts.

Colin Smith, another respected figure in the Photoshop tutorial space, echoes this sentiment, highlighting that while placing a person into a new photo might seem simple, it "will touch on everything you need to know to convincingly put a person into a photo." His tutorials often guide users through these key steps, starting with robust selection techniques.
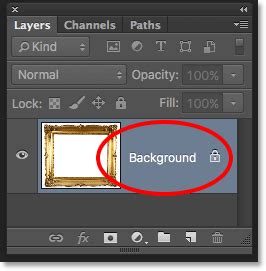
The result of a successful selection is typically a layer mask. This non-destructive method allows for easy adjustments and corrections, preserving the original pixel data. The masked layer then contains only the subject, ready to be integrated into a new scene.
Integrating into a New Environment: Scaling and Placement
Once the subject is isolated, the next phase involves placing it into the desired background image. This is often a multi-step process that requires careful consideration of scale and perspective.
A common workflow involves dragging the isolated subject layer from its original document directly into the tab of the target image. By clicking and holding the masked layer, users can then drag it over to the new image's tab. Waiting for the image to open before releasing the mouse button ensures a clean transfer.
Upon dropping the subject into the new image, it will likely need to be resized. The Free Transform tool (accessible via Ctrl+T or Cmd+T) is essential here. To scale the subject effectively, it’s often necessary to zoom out of the image until the transform handles are visible. Dragging a corner handle proportionally resizes the subject. The goal is to match the subject's scale to that of the new environment, considering the apparent depth and distance of the background elements.
Harmonizing Tones and Lighting: The Art of Believability
A common pitfall in compositing is the disconnect between the subject's original lighting and color tones and those of the new background. To create a convincing illusion, these elements must be harmonized.
Photographer Kelley Hoagland notes that she often completes the bulk of her photography edits in Lightroom, handling cropping, exposure, color grading, and light touch-ups. However, for more complex edits like compositing, she opens the image in Photoshop. A crucial first step she always takes, regardless of whether she states it, is to duplicate the image to a new layer (Ctrl+J or Cmd+J). This "paper collage" approach, as she describes it, ensures the original base layer remains protected.
How Blend Images and match colors in Photoshop Tutorial for beginners
Adjusting color tones and saturation is paramount. This can involve using adjustment layers such as Hue/Saturation, Color Balance, or Curves. The aim is to make the subject's colors and brightness levels consistent with the ambient light of the new scene. For instance, if the new background is bathed in warm, late-afternoon light, the subject should exhibit similar warm tones and softer shadows. Conversely, a brightly lit, midday scene demands a subject with crisp highlights and cooler tones.
The Crucial Element: Adding a Cast Shadow
One of the most frequently overlooked, yet vital, steps in creating a believable composite is the addition of a cast shadow. A subject that appears to be floating in space immediately breaks the illusion.
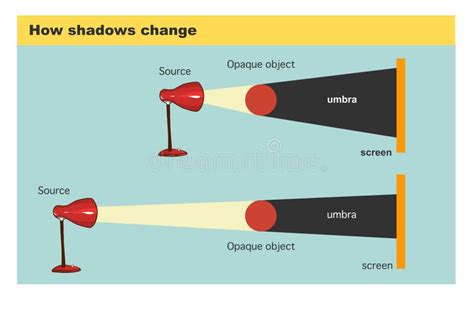
The principle behind casting a shadow is straightforward: the shadow always falls on the opposite side of the light source. If the primary light in the scene is coming from the left, the shadow will be cast to the right. The length and softness of the shadow are also dictated by the light source's position and intensity. Midday sun, being high and direct, typically creates short, sharp shadows. Light from earlier or later in the day, being lower and more diffused, results in longer, softer shadows.
To create a shadow, a new layer is typically created beneath the subject layer. This layer can be filled with black or a dark, desaturated color sampled from the environment. The Opacity of this shadow layer is then adjusted to control its intensity, making it appear more or less prominent depending on the lighting conditions. Blurring the shadow slightly with the Gaussian Blur filter can also enhance its realism, especially if the light source is not perfectly sharp.
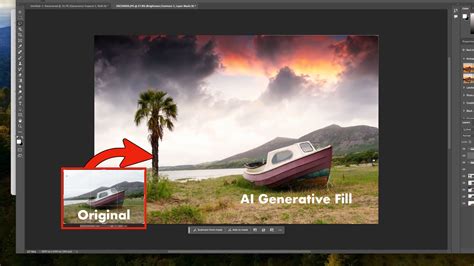
Advanced Techniques: AI and Generative Fill
The evolution of Photoshop has introduced powerful Artificial Intelligence (AI) driven tools that further streamline and enhance the compositing process. Adobe Firefly, an integrated AI image generation and editing tool, offers features like Generative Remove.
Generative Remove allows users to eliminate unwanted objects or people from a photo with remarkable ease. By simply brushing over the area to be removed and clicking "Generate," Firefly uses AI to intelligently fill the space with natural-looking content that blends seamlessly with the surrounding image. This is incredibly useful for removing photobombers, distracting elements like power lines or trash cans, or even stray text and watermarks. The AI models are trained on licensed content, ensuring commercial safety.
The process in the Firefly image editor is straightforward:
- Log in to Adobe Firefly or create a free account.
- Select the Generative Remove tool from the Quick Actions Menu.
- Brush over the object or area you wish to remove. Adjust brush size and hardness as needed.
- Click Generate.
- Download, copy, or share the result.
Firefly automatically fills the removed area, maintaining the visual integrity of the image. This technology democratizes complex edits, meaning "No, you do not need any design skills to remove an object in a photo in Firefly," as the tool is designed for intuitive use.
Furthermore, Photoshop's Object Selection Tool has been enhanced to automatically detect people and their specific attributes. This feature, particularly in the latest beta versions, allows for precise selection of body parts, clothing, and accessories. By selecting attributes like "Coat" or "Lower Clothes," and then refining with the selection brush, users can isolate elements for targeted adjustments or advanced edits using Generative Fill. This capability significantly speeds up workflows, enabling creators to "go from prompt to polished image fast, without sacrificing creative control."
Handling Complex Scenarios: Overlapping Subjects and Intricate Backgrounds
When the person to be removed overlaps with the main subject or resides in a complex background, simpler tools like the Spot Healing Brush or Lasso Tool with Content-Aware Fill might not suffice. In such cases, a more layered approach is recommended, often involving the Clone Stamp Tool.
Kelley Hoagland describes a scenario where strangers appeared in the background of a family photo. To address this, she first uses the Select Subject feature (accessible via the "Select Tool" on the top toolbar) to isolate her daughters. This selection is then copied (Ctrl+C or Cmd+C) and pasted (Ctrl+V or Cmd+V) onto a new top layer. This creates a layer containing only the subjects, protecting them from further edits.
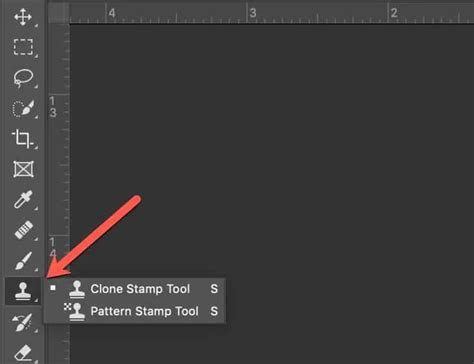
With the top layer containing the subjects intact, the user then selects the layer below (which contains the original image with the unwanted person). The Clone Stamp Tool is then employed. This tool allows users to sample pixels from one part of an image and paint them onto another. By holding down the Option key (or Alt on Windows) and clicking on a desired area of the background, users can then paint over the unwanted person on the lower layer. Because the subjects are on a separate, unaffected layer above, the cloning process can be performed without obscuring them. This technique is particularly effective for recreating background textures and patterns around the removed element.
Beyond Removal: Swapping and Blending
The principles of selection and masking extend to other forms of compositing, such as swapping heads or merging elements from multiple photographs. Jesús Ramirez, founder of the Photoshop Training Channel, highlights the technique of "swapping heads" by taking a relevant part from a well-exposed image and applying it to another. This involves creating a layer mask and painting with black to reveal the desired part from the underlying image, effectively blending two distinct sources.
Iddo Genuth, founder of LensVid.com, also touches upon similar concepts, emphasizing the basic idea of using the Move Tool to transfer elements and then employing layer masks to blend images seamlessly. This approach is fundamental to creating sophisticated composites that appear entirely natural.
Continuous Learning and Community Support
For those seeking to deepen their Photoshop expertise, platforms like PiXimperfect offer structured learning paths. PiXimperfect Pro provides access to exclusive courses, masterclasses, and an ad-free viewing experience for YouTube tutorials. A key feature is the personalized support through dedicated comment and Q&A sections, where queries are answered directly. An exclusive Pro Community also fosters collaboration and offers personalized assistance. These platforms often include money-back guarantees, allowing users to explore the content risk-free. Unmesh Dinda's philosophy, "We don't send spam, only pixels of joy," reflects a commitment to delivering valuable, engaging content.
Resources like the "Selections and Masking Mastery Course" offer in-depth, step-by-step lessons, downloadable practice files, and custom brushes, providing a comprehensive foundation for advanced compositing.
Ultimately, mastering Photoshop person tutorials involves a combination of understanding fundamental tools, leveraging advanced AI capabilities, and applying creative problem-solving. From precise selections and meticulous masking to intelligent AI-driven removals and the subtle art of lighting and shadow, each step contributes to the creation of seamless and compelling photographic composites. The continuous evolution of Photoshop ensures that new techniques and tools will always emerge, empowering creators to push the boundaries of digital artistry.