Adobe Photoshop offers a powerful suite of tools for manipulating individual layers within a larger image composition. A fundamental aspect of this manipulation is resizing a layer, a process that, when executed correctly, allows for precise adjustments without compromising the integrity of the overall project. This article delves into the various methods and considerations for effectively shrinking or enlarging a layer in Photoshop, ensuring both aesthetic control and quality preservation.
The Fundamentals of Layer Transformation
When you add text or an image to your Photoshop project, it typically resides on its own layer. This layered structure is key to non-destructive editing. Resizing a layer means altering the dimensions of the content within that specific layer, independent of the canvas size of the entire image. It's crucial to understand that when resizing a layer, the layer content will indeed get larger or smaller. This transformation is achieved through Photoshop's transformation tools, primarily the "Free Transform" function.
To activate Free Transform, the common shortcut is Cmd+T (on macOS) or Ctrl+T (on Windows). Once activated, bounding box handles will appear around the layer's content. These handles allow you to drag and resize the layer.
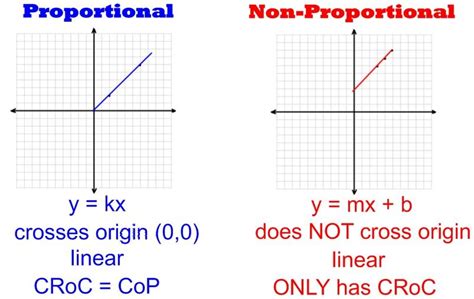
Proportional vs. Non-Proportional Resizing
A common pitfall when resizing is distorting the layer's content by altering its aspect ratio. To maintain the original proportions, it's essential to resize proportionally. In older versions of Photoshop, this was achieved by holding down the Shift key while dragging a corner handle. However, a notable change was introduced in Photoshop CC 2019: holding the Shift key now enables non-proportional resizing. To resize proportionally in CC 2019 and later, you simply drag the corner handles without holding Shift. This change can be a common gotcha for long-time Photoshop users and requires a period of adjustment.
Resizing from the Center
By default, resizing a layer using Free Transform originates from the corner handle you are dragging. If you wish to scale the layer from its center, a useful modifier is the Option (macOS) or Alt (Windows) key. Holding down this key while dragging a corner handle will cause the resize to emanate from the center of the layer, providing a different perspective for adjustments.
Advanced Techniques for Quality Preservation
Repeatedly resizing an image, especially upscaling it, can significantly reduce its quality, leading to pixelation. Images will become pixelated if upsized too much. This is because Photoshop has to invent new pixels to fill the expanded space, often resulting in a blurry or blocky appearance. To mitigate this, especially when you anticipate resizing a layer multiple times or need to scale it back up after shrinking it, converting the layer to a Smart Object is a highly recommended practice.
The Power of Smart Objects
A Smart Object is a layer that contains image data from raster or vector images. Smart Objects preserve the original image data of the layer, allowing for non-destructive transformations. This means you can resize a Smart Object layer down and then resize it back up an infinite amount of times without losing quality. Quality loss will still happen if you resize a layer to be larger than its original size, but the degradation is significantly less pronounced compared to a regular pixel layer.
To convert a layer to a Smart Object, simply right-click on the layer in the Layers panel and select "Convert to Smart Object." Once converted, you can then proceed to resize the layer using the Free Transform tool (Cmd+T or Ctrl+T) as you normally would. The benefits of this approach are substantial, especially for logos, text that might be scaled for different uses, or any graphic element that requires flexibility.
NON DESTRUCTIVE ADVANTAGE OF CONVERTING AN IMAGE TO SMART OBJECT
Precise Scaling and Transform Options
While Free Transform is the most common tool for resizing, Photoshop offers a broader array of transformation options within the Edit > Transform menu. These include:
- Scale: Allows you to enter specific percentage values for width and height. This is ideal when you need to scale the layer to a precise dimension. You can enter your desired percentages next to Width and Height to scale the layer to a specific value.
- Rotate: For adjusting the layer's orientation.
- Skew: Slants the layer along the X or Y axis.
- Distort: Applies a freeform distortion to the layer.
- Perspective Warp: Offers advanced control over perspective transformations.
- Warp: Allows you to bend and shape the layer content using a grid.
Each of these tools works by transforming the pixels of the layer in their own particular way, offering granular control over the final appearance.
Entering Specific Dimensions
When precise numerical control is required, you can input exact percentage values. After activating Free Transform (Cmd+T or Ctrl+T), you will see input fields for Width and Height in the Options bar at the top of the screen. Enter your desired percentages here to scale the layer to a specific value. For instance, entering "50%" for both Width and Height will shrink the layer to half its original size.
Layer Boundaries and Content
It's important to understand how Photoshop defines a layer's boundaries. Layers don't have inherent boundaries beyond the content they contain. This means that if you have a layer with a small object and a lot of transparency around it, Photoshop's "boundary" for that layer is effectively defined by the extent of the pixels that actually hold information.
This behavior can sometimes be a point of confusion, especially when copying and pasting selected regions. If you copy a selected region with significant transparency, Photoshop will not copy extraneous transparent pixels. It will create the boundaries based on the furthestmost corner pixels contained within the selected region.
The "Layer to Image Size" Concept
Some users, particularly those familiar with other image editing software like GIMP, might be looking for a direct equivalent to a "Layer to Image Size" function. In GIMP, this option changes the size of the layer's boundary to match the canvas size. While Photoshop doesn't have a single command that directly mirrors this, the concept is addressed through other functionalities.
For instance, if you want to expand the canvas of a layer to match the canvas size of the entire image, you would typically use the Image > Canvas Size command, which affects the overall document dimensions, not just a single layer's perceived boundary. If the goal is to make a layer's content fill the entire canvas, then techniques like scaling the layer up or using Edit > Transform > Scale to fill the canvas are more appropriate.
Managing Multiple Layers
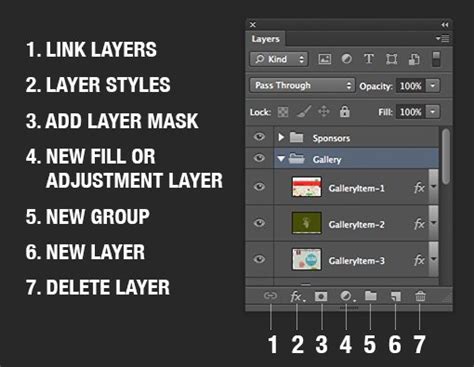
In projects with numerous layers, organization is paramount. To make it easier to identify and select the specific layer you want to resize, it's highly recommended to rename your layers. Double-clicking on a layer's name in the Layers panel allows you to give it a descriptive title (e.g., "Logo," "Headline Text," "Background Element").
If you need to resize multiple layers simultaneously, you can group them. Select the layers you wish to group in the Layers panel, then right-click and choose "Group Layers" or use the shortcut Cmd+G (macOS) or Ctrl+G (Windows). You can then transform the entire group as if it were a single layer, preserving the relative positions of the layers within the group.
When Manual Adjustments Become Painful
While it's technically possible to manually resize a layer and then meticulously adjust the pixels (erase, redraw, etc.) to restore its original appearance, this is an extraordinarily painful and inefficient process. It's generally not a viable workflow for practical image editing. The inherent nature of scaling pixel data means that some information is either discarded (when shrinking) or interpolated (when enlarging), making perfect restoration after manual scaling nearly impossible without significant rework.

The core principle remains: Photoshop's transformation tools are designed to handle these adjustments with a high degree of automation. Relying on these tools, especially in conjunction with Smart Objects, ensures that your edits are both effective and maintain the highest possible quality. Understanding the nuances of proportional resizing, the benefits of Smart Objects, and the various transformation options available will empower you to shrink and resize layers in Photoshop with confidence and precision.