Photoshop brushes are one of the most versatile and powerful tools available to digital artists and designers. They offer an incredible range of creative possibilities, from adding subtle textures to creating intricate digital paintings. This tutorial will guide you through the fundamental aspects of using Photoshop brushes, from basic application to advanced customization, ensuring you can harness their full potential.
Understanding the Brush Tool and Its Properties
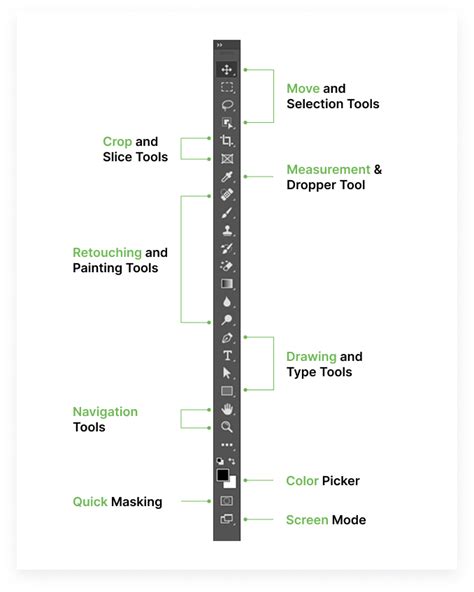
The Brush Tool (B) in Adobe Photoshop is your gateway to applying color and texture to your canvas. At its core, it functions like a traditional paintbrush, allowing you to "paint" pixels onto your image. However, Photoshop's digital nature elevates this beyond simple color application. The Brush Tool's behavior is governed by a host of dynamic settings, accessible through the Options Bar at the top of the screen and the Brush Settings panel (Window > Brush Settings).
The Options Bar provides quick access to essential brush parameters:
- Brush Preset Picker: This is where you select the fundamental shape and behavior of your brush tip. Photoshop comes with a vast library of default brushes, categorized for ease of use (e.g., General Brushes, Dry Media Brushes, Wet Media Brushes, Special Effect Brushes).
- Size: Controls the diameter of the brush stroke. You can adjust this with a slider or by using keyboard shortcuts ( '[' to decrease, ']' to increase).
- Hardness: Determines the softness or sharpness of the brush edge. A hardness of 100% creates a sharp, defined edge, while 0% results in a soft, feathered edge. This significantly impacts how colors blend and how edges appear in your artwork.
- Opacity: Controls the transparency of the brush stroke. A lower opacity allows underlying colors and textures to show through, enabling subtle layering and blending effects.
- Flow: Similar to opacity, but it affects how quickly the color builds up with repeated strokes. Lower flow creates a more gradual build-up, mimicking the behavior of a real paintbrush where more passes are needed to achieve full color saturation.
- Blend Mode: This determines how the brush color interacts with the pixels already present on the layer. Options like "Multiply," "Screen," "Overlay," and "Soft Light" offer a wide array of creative blending possibilities, allowing for sophisticated color manipulation and textural effects without needing to manually adjust opacity or color mixing.
The Brush Settings panel (Window > Brush Settings) offers a much deeper dive into brush customization. This is where you can truly unlock the unique potential of each brush.
Exploring Brush Presets and Categories
Photoshop's default brush library is extensive, designed to cater to a wide range of artistic needs. Understanding these categories can help you quickly find the right tool for the job:
- General Brushes: These are your standard, all-purpose brushes, suitable for everything from basic painting to filling areas. They include hard and soft round brushes, square brushes, and various textured presets.
- Dry Media Brushes: These brushes are designed to mimic the look and feel of traditional dry art materials like pencils, charcoal, and pastels. They often have a textured appearance and can produce grainy or smudged effects.
- Wet Media Brushes: These brushes simulate the behavior of wet art materials such as watercolors, oils, and acrylics. They excel at blending, creating soft transitions, and achieving painterly effects. Many wet media brushes incorporate features like color dynamics and texture to enhance realism.
- Special Effect Brushes: This category includes brushes designed for specific purposes, such as creating smoke, fire, foliage, or intricate patterns. They are often pre-configured with unique shapes and dynamics to produce these effects with minimal effort.
- Art History Brushes: These are specialized brushes that allow you to paint with the history of your document, essentially recreating past states of your image with artistic flair.
- Mixer Brush Tool: While not a traditional brush preset, the Mixer Brush Tool is a powerful addition that allows you to blend colors on your canvas, simulating the mixing of paints on a palette.
Beyond the default presets, you can download and install countless custom brush packs from various online resources. These can range from hyper-realistic textures to abstract artistic elements, significantly expanding Photoshop's creative capabilities.
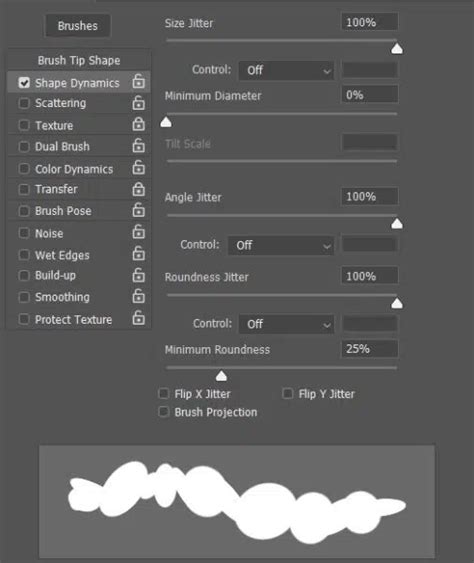
Customizing Brush Dynamics for Unique Effects
The true magic of Photoshop brushes lies in their customizability. The Brush Settings panel is where you can sculpt a brush tip's behavior to create precisely the effect you desire. Each setting within this panel offers a unique way to dynamically alter the brush stroke.
Shape Dynamics
This section controls how the brush tip's shape changes during a stroke.
- Size Jitter: Varies the size of the brush tip randomly with each stroke. This can be controlled by "Control" options like "Fade" (size decreases over time) or "Pen Pressure" (if using a graphics tablet, size varies with pen pressure).
- Angle Jitter: Randomizes the rotation of the brush tip. This is particularly useful for brushes with an inherent direction, like those simulating leaves or splatters, to create a more natural, organic look.
- Roundness Jitter: Varies the roundness of the brush tip, making it more elliptical or circular randomly.
- Minimum Diameter: Sets a lower limit for the brush size, preventing it from becoming too small when Size Jitter is applied.
Scattering
This setting determines how the brush marks are dispersed across the canvas.
- Scatter: Controls the degree to which the brush marks are spread out. "Both Axes" scatters them horizontally and vertically.
- Count: Determines how many instances of the brush tip are placed with each click or stroke. Increasing the count can create denser textures or patterns.
- Count Jitter: Randomizes the number of instances placed.
Texture
This allows you to overlay a pattern onto your brush tip, adding a built-in texture to your strokes. You can select from various patterns and adjust their scale, brightness, contrast, and even how they interact with the brush stroke.
Dual Brush
This advanced feature lets you combine two brush tips. The first brush tip (selected in the main Brush Settings) is modified by the second brush tip, creating complex textures and effects that would be impossible with a single brush.
Color Dynamics
This section allows you to introduce color variations into your brush strokes.
- Foreground/Background Jitter: Randomly selects colors between your foreground and background colors.
- Hue Jitter: Randomly shifts the hue of the brush color.
- Saturation Jitter: Randomly varies the saturation of the brush color.
- Brightness Jitter: Randomly alters the brightness of the brush color.
- Purity: Controls the intensity of saturation and hue jitter.
Transfer (formerly Other Dynamics)
This is a crucial section for controlling the opacity and flow of the brush stroke based on various factors.
- Opacity Jitter: Varies the opacity of individual brush marks.
- Flow Jitter: Varies the flow of individual brush marks.
- Control Options: Similar to Shape Dynamics, you can link Opacity and Flow to "Fade," "Pen Pressure," or "Pen Tilt" (with compatible graphics tablets) for highly responsive and natural-feeling strokes.
Brush Tip Shape (in Brush Settings)
This is where you can edit the actual brush tip. You can adjust its spacing, which determines how close together the individual instances of the brush tip are placed along a stroke. Increasing spacing can create dotted lines or reveal the individual brush tip shape more clearly. You can also create entirely new brush tips by selecting an area of your canvas, going to Edit > Define Brush Preset, and giving your new brush a name.
Working with Graphics Tablets
While Photoshop brushes can be used with a mouse, a graphics tablet (like Wacom, Huion, or XP-Pen) dramatically enhances the creative experience. Tablets offer pressure sensitivity, tilt sensitivity, and rotation, allowing for more nuanced and natural brush strokes.
- Pressure Sensitivity: This is the most significant advantage. Applying more pressure with the stylus results in a thicker, more opaque, or more saturated stroke, mimicking how a real artist applies pressure with a physical brush or pencil. This is controlled via the "Size Jitter" and "Opacity Jitter" (and Flow Jitter) settings in the Brush Settings panel, often set to "Pen Pressure."
- Tilt Sensitivity: Some tablets allow the stylus to be tilted, which can affect the angle of the brush tip. This can be mapped to brush angle or roundness in the Brush Settings for unique effects, especially with textured brushes.
- Rotation: More advanced tablets can detect the rotation of the stylus, which can be mapped to brush angle for brushes designed with a directional aspect, such as calligraphy or certain textured brushes.
Mastering the interplay between your graphics tablet and Photoshop's brush dynamics will elevate your digital art to new levels of expressiveness.
Creating and Managing Custom Brushes
The ability to create and manage your own custom brushes is a cornerstone of efficient and personalized Photoshop workflows.
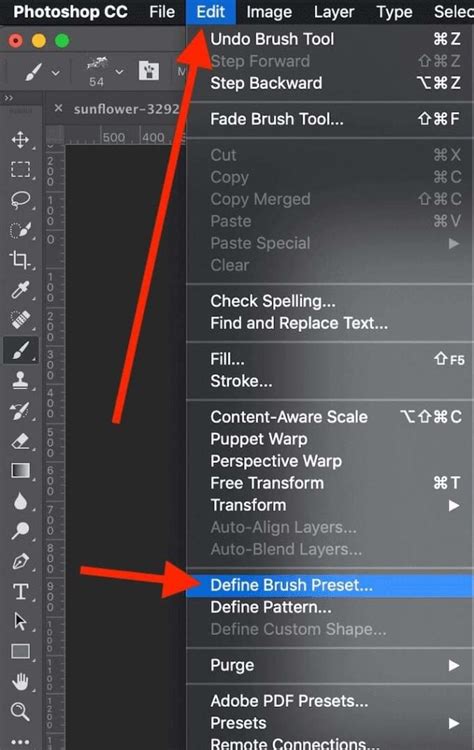
Defining a New Brush
- Select an Area: Use any selection tool (Marquee, Lasso, etc.) to select the area of your canvas that you want to turn into a brush tip. This could be a texture, a shape, or even a scanned image.
- Go to Edit > Define Brush Preset: This command will open a dialog box where you can name your new brush.
- Access Your Brush: Your newly created brush will appear at the bottom of the Brush Preset picker list in the Options Bar and can be found in the Brush Settings panel.
Saving and Loading Brush Sets
To keep your custom brushes organized, you can save them as brush sets (.abr files).
- Open the Brush Settings panel.
- Click the Gear icon in the top right corner of the panel.
- Select "Save Brushes." Choose a location on your computer and give your brush set a descriptive name.
- To load a brush set: Click the Gear icon again and select "Load Brushes," then navigate to your saved .abr file.
Organizing your brushes into logical sets (e.g., "Splatters," "Textures," "Pencils") will save you significant time when searching for the right brush during a project.
Practical Applications and Techniques
Photoshop brushes are not just for digital painting; they are integral to a wide range of design tasks.
Adding Texture and Depth
Subtle brush strokes can add realism and visual interest to otherwise flat areas. For example, using a textured brush with a low opacity and flow over a solid color can create a canvas-like or paper-like effect. Brushes designed to mimic natural media are excellent for this.
Creating Special Effects
From realistic-looking smoke and fire to ethereal glows and lightning bolts, specialized brushes can generate complex effects quickly. These brushes often have pre-configured dynamics that mimic the chaotic yet beautiful nature of these phenomena.
Enhancing Photographs
Brushes can be used for subtle photo retouching, such as softening skin with a soft brush at low opacity, or for artistic enhancements like adding painterly effects or custom vignettes.
Designing Digital Art and Illustrations
For digital painters and illustrators, brushes are the primary tools for bringing their visions to life. Experimenting with different brush combinations, dynamics, and blend modes is key to developing a unique artistic style.
Workflow Tips and Tricks
- Brush Smoothing: In the Options Bar, you'll find a "Smoothing" slider. This helps to create smoother, more fluid lines, especially when drawing quick gestures or using a mouse. Higher values result in more smoothing but can introduce a slight delay in stroke rendering.
- Alt-Click to Sample Color: Holding down the Alt (Option on Mac) key while the Brush Tool is active temporarily turns it into the Eyedropper Tool, allowing you to quickly sample colors from your image. This is essential for maintaining color harmony and working efficiently.
- Keyboard Shortcuts: Familiarize yourself with keyboard shortcuts for brush size, hardness, opacity, and switching between tools (like Brush, Eraser, and Eyedropper). This significantly speeds up your workflow.
- Layer Management: Always use brushes on separate layers whenever possible. This allows for non-destructive editing, making it easy to adjust, move, or delete brush strokes without affecting other parts of your image.
- Experimentation: The best way to master Photoshop brushes is through experimentation. Don't be afraid to try out different settings, combine brushes, and explore the vast array of custom brush packs available online.
10 SECRET Painterly Techniques
Beyond the Basics: Advanced Concepts
While the fundamentals cover a broad spectrum, understanding how brushes interact with other Photoshop features unlocks even greater potential.
Brush Blending Modes in Depth
The Blend Mode setting in the Options Bar is profoundly powerful. Let's delve deeper into some common modes and their effects when used with brushes:
- Normal: The default mode. The brush color is applied directly, with its opacity and flow determining how much it covers the underlying pixels.
- Multiply: Darkens the underlying layers by multiplying their color values. Excellent for adding shadows, depth, or creating a more muted, earthy tone.
- Screen: Lightens the underlying layers by screening their color values. Ideal for creating glows, highlights, or adding bright, ethereal effects.
- Overlay: Multiplies or screens colors based on the underlying layer's brightness. This mode preserves highlights and shadows, adding contrast and saturation without washing out or darkening the image excessively. Great for enhancing textures.
- Soft Light: A gentler version of Overlay. It creates a softer, more diffused effect, often used for subtle enhancements of light and shadow.
- Color: Applies the hue and saturation of the brush color to the underlying layer, while luminosity is preserved from the original layer. Useful for recoloring areas or adding color washes.
- Hue: Applies only the hue of the brush color to the underlying layer, preserving saturation and luminosity.
- Saturation: Applies only the saturation of the brush color, preserving hue and luminosity.
- Luminosity: Applies only the luminosity of the brush color, preserving hue and saturation.
Understanding these modes allows you to use brushes not just to add color, but to fundamentally alter the tonal and color relationships within your image.
Brush Engine and Performance
For complex brushes with many dynamic settings, especially those with high jitter values or dual brush effects, performance can sometimes be an issue.
- Brush Cache: Photoshop uses a cache to store brush data. If you notice performance lag, sometimes clearing the brush cache can help. This is usually done by restarting Photoshop with the Ctrl+Alt+Shift (Cmd+Option+Shift on Mac) keys held down, which resets preferences.
- Brush Size Limits: While Photoshop can handle very large brushes, extremely large brush tips can impact performance.
- Graphics Card Acceleration: Ensure your graphics card drivers are up to date, as Photoshop utilizes GPU acceleration for many of its features, including brush rendering.
Brush Presets and Third-Party Tools
The ecosystem around Photoshop brushes is vast. Beyond simply downloading presets, there are tools and workflows that leverage brushes in innovative ways:
- Brush Management Software: While Photoshop has its own saving and loading capabilities, some third-party tools offer more advanced organization, searching, and previewing of brush libraries.
- Brush Creation Tools: Some artists use dedicated software or create brushes from complex procedural patterns generated in other applications, then import them into Photoshop.
- Action and Script Integration: Brushes can be incorporated into Photoshop Actions or Scripts. For example, an action could be set up to automatically select a specific brush, set its dynamics, and apply it to a new layer with a particular blend mode, streamlining repetitive tasks.
The journey of mastering Photoshop brushes is an ongoing one, filled with discovery and creative exploration. By understanding the core tools, delving into customization, and practicing with various techniques, you can unlock a universe of artistic possibilities within this essential Photoshop feature. The ability to recall Paul's engaging (if slightly unconventional) presentation, with its memorable visual elements, serves as a reminder of how even specific tools like brushes can become central to an artist's unique expression and impact.