The Photoshop Slice Tool is a feature that, while perhaps less frequently discussed than other Photoshop functionalities, holds significant power for web designers and graphic artists. By mastering this tool, you can create more efficient and visually appealing web designs, breaking down complex images into manageable, optimized sections. This tutorial will guide you through the intricacies of slicing in Photoshop, from basic selection to advanced export options, ensuring you can effectively translate your PSD designs into functional web elements.
Understanding the Core Concept: What is Image Slicing?
At its heart, image slicing in Photoshop is the process of dividing a single, large image or artwork into multiple smaller sections, or "slices." These slices function much like pieces of a jigsaw puzzle, fitting together to reconstruct the original image when assembled on a web page. Instead of exporting a single, potentially massive image file, slicing allows you to export each section individually. This is particularly beneficial for web development, as it enables finer control over optimization, loading times, and interactive elements.
The Slice tool helps users slice up a big image or artwork into smaller sections that fit together like a jigsaw (but they all have straight edges). Or in other words, the slice tool helps to extract a slice of the image without cutting or cropping it. It can be used for several cases when a single large image needs to slice down into several pieces. It can slice the image or diagram into either square or rectangular pieces. This tool is used extensively by web developers where they need the image to be divided into small pieces and exported individually. With the help of this tool, we can also export a small part of the image according to our needs as a separate image from a large image.
Locating and Utilizing the Slice Tool
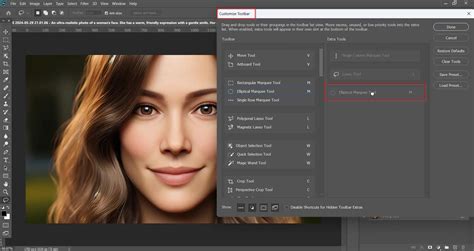
The Slice tool is not a standalone icon in the main toolbar but is nested within the Crop tool. To access it, right-click on the Crop Tool icon. A small dialog box will appear, revealing other related tools, including the Slice Tool and the Slice Select Tool.
The Slice Tool: Creating New Slices
The primary function of the Slice Tool is to create new slices within your Photoshop document. Once selected, you can click and drag over the area of your image you wish to define as a slice. As you draw a slice, Photoshop often automatically generates additional slices to fill the remaining document area, known as "auto slices." These auto slices are indicated by dotted lines, distinguishing them from "user slices" which are created manually.
When using the Slice Tool, you have several options available in the Options bar at the top of the Photoshop interface. These options allow you to control how your slices are created:
- Normal: This is the default setting. It allows you to create slices of any size and aspect ratio, offering maximum flexibility.
- Fixed Aspect Ratio: This option constrains your slices to a specific width-to-height ratio. You can input your desired ratio, ensuring all slices adhere to this proportion. For instance, a ratio of 2:3 will create slices where the width is always two-thirds of the height.
- Fixed Size: With this option, you can define the exact pixel dimensions (width and height) for your slices. This is incredibly useful when you have precise requirements for the size of each exported element.
The Slice Select Tool: Editing and Transforming Slices
Complementing the Slice Tool is the Slice Select Tool. As the name suggests, this tool is used to select, edit, and transform existing slices. You will find yourself frequently switching between these two tools. After creating your initial slices, you’ll use the Slice Select Tool to fine-tune their positions, adjust their dimensions, or combine them.
When a slice is selected with the Slice Select Tool, its borders will turn yellow, indicating it's ready for manipulation. You can then:
- Move Slices: Click and drag a selected slice to reposition it within the document.
- Scale Slices: Resizing handles will appear around the selected slice, allowing you to drag them to change the slice's dimensions.
- Combine Slices: You can select multiple slices by holding down the
Shiftkey and then using the Slice Select Tool to combine them into a single slice. This is useful if you've accidentally over-sliced an area. - Align and Distribute: With multiple slices selected, you can use the alignment and distribution options in the Options bar to precisely arrange them. Options include aligning left edges, centers, right edges, top edges, centers, and bottom edges, as well as distributing them evenly vertically or horizontally.
The Slice Select Tool also offers options to manage the stacking order of slices, bringing them to the front or sending them backward, which can be helpful in complex layouts.
Advanced Slicing Techniques and Options
Photoshop provides further control over your slicing process through various options and settings.
Differentiating Slice Types
Understanding the different types of slices is crucial for effective management:
- Auto Slices: These are automatically generated by Photoshop to fill the document area not covered by user or layer-based slices. You cannot delete auto slices, but you can convert them to user slices. They are typically indicated by a dotted line.
- User Slices: These are created manually using the Slice Tool. They offer more control and can be scaled and manipulated using the Slice Select Tool. User slices display a distinct icon.
- Layer-Based Slices: These slices are created directly from layers in the Layers panel. They offer a direct link to the pixel data in the layer and can be converted to user slices.
You can view and manage these slices within Photoshop and the "Save For Web & Devices" dialog box. The Save For Web dialog box uses color adjustments to dim unselected slices, aiding in visualization.
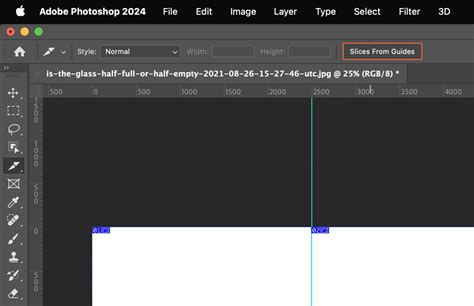
Slicing Based on Guides
For precise slicing, especially when working with grids or specific layouts, you can leverage Photoshop's guides. Create your guides by dragging from the rulers (View > Rulers, then drag from the edges) or by using View > New Guide. Once your guides are in place, you can select Slices > Slices from Guides. This will automatically create slices based on the positions of your guides, saving you the manual effort of drawing each one.
Options for Slices
Beyond the basic creation, you can access detailed options for individual slices:
- Slice Options Dialog Box: Double-clicking on a slice with the Slice Select Tool opens the Slice Options dialog box. Here, you can:
- Name Your Slice: Assign descriptive names to your slices (e.g., "header-logo," "nav-about"). This is invaluable for organization, especially when exporting many individual files. By default, Photoshop assigns generic filenames.
- Set Optimization Settings: Define file format (JPG, PNG, GIF), quality, and other optimization parameters for each slice. This allows you to tailor the export settings for each piece of your image, ensuring optimal file size and visual fidelity.
- Define URL and Target: For interactive elements, you can specify a URL to link to and a target window for that link.
Combining and Modifying Slices
Sometimes, you might need to combine slices or adjust their boundaries precisely.
- Combining Slices: Select multiple slices using the
Shiftkey with the Slice Select Tool. Then, you can choose to combine them into a single slice. The dimensions of the new slice will be determined by the outer edges of the combined slices. Be mindful that if alignments are not perfect, the newly combined slice might overlap other slices. - Modifying Boundaries: You can precisely adjust slice boundaries by entering pixel values or by dragging with the Slice Select Tool. The
Snapfeature (View > Snap) can also be helpful to align slices to guides or other elements.
Exporting Your Sliced Images: The "Save For Web" Workflow
The ultimate goal of slicing is to export the individual pieces for use on the web. This is accomplished through Photoshop's "Save For Web & Devices" feature.
- Initiate Export: Go to
File > Save For Web (Legacy).... This will open a new window, which becomes your central hub for slicing exports. - Optimize and Preview: In the "Save For Web & Devices" dialog box, you can:
- Select File Format: Choose the appropriate format for each slice (JPG for photographic elements, PNG for transparency, GIF for animations).
- Adjust Quality Settings: Fine-tune the compression levels to balance file size and image quality.
- Preview Slices: The left side of the window shows your image with the slices. You can select individual slices or groups of slices to see their optimized previews.
- HTML and Images: A crucial setting here is the "Format" dropdown. If you select "HTML and Images," Photoshop will not only export your slices as individual image files but also generate an HTML file that reconstructs the layout using an HTML table. This was a very common workflow in older web design practices. If you only need the image files, select "Images Only."
- Exporting: Once you are satisfied with the settings, click "Save." You will be prompted to choose a destination folder for your exported slices and the generated HTML file (if applicable).
Troubleshooting Common Export Issues
A common challenge when working with slices is ensuring a clean, pixel-perfect layout in the final HTML. If, upon previewing your exported slices in a browser or an HTML editor like Dreamweaver, you notice unwanted spacing or misaligned elements, it indicates an error in your slicing or export process.
- Pixel Accuracy: Remember that "all slices must be accurate by the pixel." Even a single pixel off can cause layout disruptions. Use the Slice Select Tool to meticulously check and adjust slice boundaries.
- HTML Preview: The "Save For Web & Devices" dialog box has an option (often marked with an arrow) to "Open in Default Browser" or similar. This allows you to quickly preview how your slices will render. Underneath this preview, you'll often find the generated HTML source code.
- Dreamweaver Integration: For more advanced control, you can copy the HTML source code generated by Photoshop and paste it into a web development environment like Adobe Dreamweaver. Ensure your Dreamweaver project is set up with the correct working directory pointing to the root folder where you saved your slices. Adding
align="center"to the table in your HTML file can help center the entire image layout on the page.
Error when wanting to export GIF through save for web | Fixed
Beyond Basic Slicing: Advanced Applications and Considerations
While the core slicing workflow is straightforward, its application can be extended for more complex design needs.
Optimizing for Different Devices
The ability to export individual slices is paramount for responsive web design. You can create different sets of slices optimized for various screen sizes. For example, you might slice a desktop layout differently than a mobile layout, exporting only the necessary elements for each.
Optimizing Image Formats
The "Save For Web & Devices" dialog box offers granular control over image formats and compression. For instance, you can export a logo with transparency as a PNG-24, while a background image might be best saved as a JPG with a specific quality setting to minimize file size without significant visual degradation. GIF is ideal for simple animations or graphics with limited color palettes.
The Evolution of Slicing
It's important to note that while slicing was once a cornerstone of web design, particularly for table-based layouts, modern web development often favors CSS for layout and positioning. However, the principle of optimizing individual image assets remains relevant. Tools like Photoshop's "Export As" feature and dedicated asset export workflows have, in some ways, superseded the traditional slicing method for simple image extraction. Nevertheless, for complex, multi-element graphics that need to be broken down and exported as a cohesive unit, the Slice Tool remains a powerful and efficient option.
When to Use Slicing Today
Despite the rise of CSS-based layouts, Photoshop slicing still finds its place:
- Complex Graphics: For designs with intricate arrangements of elements that need to be exported as individual, re-assemblable parts.
- Legacy Projects: Maintaining or updating older websites that were built using sliced images.
- Specific Interactive Elements: Exporting individual buttons, banners, or icons that require unique optimization or interactivity.
- Understanding Web Design History: Familiarizing oneself with slicing provides valuable insight into the evolution of web design techniques.
By taking the time to familiarize yourself with the Slice Tool and its companion, the Slice Select Tool, you'll find that they are remarkably useful. It’s as easy to use as the Crop tool, but it’s far more versatile. It’s even a favorite among graphic designers and app developers who need to divide high-resolution photos into segments.
Conclusion
Mastering the Photoshop Slice Tool and the "Save For Web & Devices" workflow is a valuable skill for any web designer. It allows for precise control over image optimization, leading to faster loading times and more efficient web assets. While the landscape of web design is constantly evolving, the fundamental principles of breaking down images into manageable pieces for export remain a crucial aspect of creating visually rich and performant websites. Practice moving back and forth between the Slice Tool and the Slice Select Tool, experiment with different export settings, and don't be discouraged if your initial attempts aren't perfect. With practice, you'll gain the proficiency needed to seamlessly convert your PSD creations into optimized web-ready images.