Photoshop's Paths panel is a powerful, yet often underutilized, feature that allows for the creation and manipulation of vector-based outlines. These paths, built using the versatile Pen tool, offer unparalleled precision and flexibility for a wide range of design and editing tasks, from intricate selections to smooth, controlled strokes. This tutorial will delve deep into the functionalities of the Paths panel, equipping you with the knowledge to harness its full potential.

The Foundation: Understanding Paths and the Paths Panel
At its core, a path in Photoshop is a vector outline composed of one or more straight or curved segments. These segments are defined by anchor points, which act as the endpoints. For curved segments, direction lines with direction points extend from the anchor points, controlling the curvature. Paths can be a single, continuous series of segments or comprise multiple distinct components.
The Paths panel, accessible through the Window menu, is where these vector outlines reside. Just as the Channels panel manages alpha channels for pixel-based masks, the Paths panel manages vector-based path outlines. This distinction is crucial: while JPEGs primarily support colored pixels and metadata, they can also store path information. This means you can embed paths within JPEG files, allowing others to convert them into selections, layer masks, or vector masks later.
The Pen Tool and Path Creation
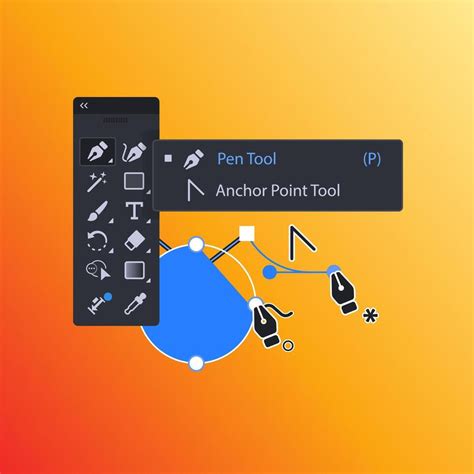
The Pen tool is the primary instrument for creating paths. It allows for the precise placement of anchor points and the manipulation of direction lines to form intricate shapes. While the learning curve for the Pen tool can be steep, the ability to modify paths almost indefinitely makes the effort worthwhile.
- Repositioning Anchor Points While Drawing: When drawing with the Pen tool, if you need to reposition an anchor point immediately after clicking to set it, holding the Spacebar allows for this adjustment. If you've already released the mouse, holding Command (Mac) or Control (Win) will toggle the Pen tool to the Direct Selection tool, enabling you to reposition the anchor point or direction line.
- The Convert Point Tool: This tool, accessible by holding Option (Mac) or Alt (Win) with the Pen tool selected, allows for the conversion of anchor points. Clicking a smooth point converts it to a corner point, while clicking and dragging a corner point transforms it into a smooth, curved point.
- Previewing Paths: To visualize the path as you draw, enable the Rubber Band option within the Pen tool's Options bar gear icon. This shows a preview of the path's direction as you move your cursor.
- Magnetic Pen Tool: For paths that closely follow image edges, the Freeform Pen tool with the Magnetic option enabled can be a helpful assistant, analyzing image areas to create paths. Double-clicking with this tool enabled will close the path.
- The Curvature Pen Tool: This specialized tool offers an intuitive way to draw smooth, curved paths. When adding anchor points, a single click creates a curved segment, while a double-click results in a straight segment. The initial segment formed by the first two anchor points always appears as a straight line.
Path Components and Editing
A path is essentially a shape defined by anchor points and segments.
- Anchor Points: These are the critical points that mark the end of path segments.
- Segments: These are the lines (straight or curved) connecting anchor points.
- Direction Lines and Points: For curved segments, direction lines extending from anchor points with direction points at their ends control the arc's curvature.
When a path component or segment is selected, all its associated anchor points, direction lines, and points become visible.
Refining Paths with the Direct Selection Tool
While the Pen tool creates paths, the Direct Selection tool (the white arrow) is essential for fine-tuning them.
- Selecting Paths: The Path Selection tool (the black arrow) selects entire path outlines or components. The Direct Selection tool, on the other hand, allows you to select individual anchor points and segments.
- Manipulating Segments and Points: With the Direct Selection tool, you can click and drag an anchor point to reposition it. You can also click and drag a curved segment itself to adjust its overall shape. Dragging a direction point alters the curvature on one side of the anchor point, while dragging the anchor point itself can affect the curvature of both connected segments.
- Deleting Segments: Selecting a segment and pressing the Delete key removes it.
- Extending Open Paths: To extend an open path, select the Pen tool, position it where you want to end the new segment, and click. If you want a curved segment, drag where you want to end the new curved segment.
- Connecting Paths: To connect one path to another, use the Pen tool to click an endpoint on the path you want to extend. Then, hover over an endpoint on the other path until a small merge symbol appears next to the pointer, and click. This merges the two paths into a single component.
Working with Paths in the Paths Panel
The Paths panel is your central hub for managing all your vector outlines.
Selecting and Managing Paths
- Selecting a Path: Click on the path's name in the Paths panel to select it.
- Selecting Multiple Paths: Use Shift-click or click-drag with the Path Selection tool to select multiple paths.
- Selecting Anchor Points: Click an anchor point to select it. If anchor points are not visible, clicking their approximate location will select them. Shift-click to select multiple anchor points or to add/remove points from an existing selection.
- Deselecting Paths/Points: Shift-click on a selected path or anchor point to deselect it.
Transforming Paths
Once a path is selected, you can transform it using Edit > Free Transform Path.
- Constraining Aspect Ratio: Click the Link icon in the Options bar to toggle the constraint of the aspect ratio during transformations. This setting is sticky.
- Rotating: Position the cursor outside the transformation handles until it becomes a double-headed arrow, then drag to rotate.
- Reference Point: The reference point determines the center of transformations.
Duplicating Paths
Option-drag (Mac) or Alt-drag (Win) a path in the image area to duplicate it. You can also drag a path to the "Create New Path" icon at the bottom of the Paths panel.
Converting Paths to Selections
A fundamental use of paths is to create precise selections.
- Make Selection: With a path selected, press Command + Return (Mac) or Control + Enter (Win) to convert it into a selection. This shortcut works for any selected path, including those on shape layers or vector masks.
Advanced Path Operations: Strokes, Fills, and More
Paths are not just for selections; they can also be used to create visually rich strokes and fills.
Stroking Paths
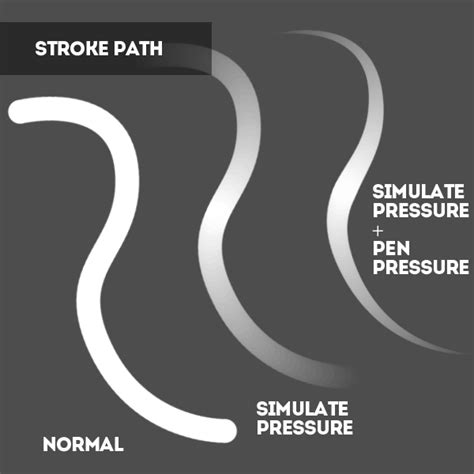
Stroking a path allows you to apply brush strokes along its outline, offering a more controlled and fluid painting experience than freehand brushing.
- Prepare your Brush: Select the desired painting tool (e.g., Brush) and configure its settings (size, opacity, etc.).
- Select the Path: In the Paths panel, select the path you want to stroke.
- Stroke Path: From the Paths panel menu (the fly-out menu at the top right), choose Stroke Path.
- Simulate Pressure: To mimic the effect of pressure sensitivity on a tablet, select the path in the Paths panel, choose Stroke Path from the menu, and check Simulate Pressure. This option is available if you are using a tool that supports pressure sensitivity, like the Brush tool.
Filling Paths
Paths can also be filled with color or patterns.
- Select the Path: In the Paths panel, select the path you wish to fill.
- Choose Fill Path: From the Paths panel menu, select Fill Path.
- Specify Options: In the dialog box, you can:
- Specify an opacity for the fill: Use a low percentage for a transparent effect.
- Choose a blending mode for the fill: This determines how the fill interacts with existing pixels.
- Use Content-Aware: This option attempts to fill the path intelligently based on surrounding image content.
Feathering Paths
Feathering softens the edges of a path when it's converted to a selection or used for fills/strokes.
- Feather Edge: When converting a path to a selection, you can specify a feather radius. The feather edge extends a certain amount beyond the path's outline, creating a gradual transition.
Customization and Workflow Enhancements
Photoshop offers several options to customize your path-drawing experience and integrate paths into your workflow.
Path Display and Preferences
- Path Color and Thickness: To improve visibility, especially on high-resolution monitors, you can customize the color and thickness of path lines. While creating a path with the Pen tool, click the gear icon in the Options bar and adjust these settings. These preferences also affect paths for shape layers and vector masks. You can also find these settings under Preferences > Guides, Grid, & Slices (under Paths).
- Anti-Aliasing: To turn off anti-aliasing for guides and paths, navigate to Preferences > Performance > Graphics Processor Settings > Advanced Settings and uncheck Anti Alias Guides and Paths. Note that since Photoshop CS6, Adobe has improved the default behavior of dragging vector curves for more graceful reshaping.
- Thumbnail Visibility: In the Paths panel, you can turn thumbnails on or off. Turning them off can sometimes improve performance.
Saving and Exporting Paths
Paths can be saved with various file formats, including:
- JPEG, JPEG 2000, DCS, EPS, PDF, and TIFF on Windows.
- PSD and TIFF files.
This ensures that your vector work is preserved when sharing or archiving your projects.
Working with Multiple Images and Layers
- Copying and Pasting Paths: You can copy paths from one image to another. Select the path in the Paths panel, choose Edit > Copy, then switch to the destination image and choose Edit > Paste. This method can also be used to combine paths within the same image.
- Vector Masks: When you create a new shape layer, the path is automatically saved as a vector mask in the Paths panel. Vector masks are linked to their parent layer. You can remove a vector mask from a layer or convert it to a rasterized mask.
- Aligning and Distributing Path Components: Select multiple path components using the Path Selection tool to align them horizontally or vertically. To distribute components evenly, select at least three components.
Conclusion: The Power of Precision with Paths
Mastering Photoshop's Paths panel and the Pen tool opens up a world of precision and control. Whether you're creating intricate selections for complex masking projects, designing custom shapes, or applying smooth, artistic strokes, paths provide a robust and flexible solution. By understanding the tools and techniques outlined in this tutorial, you can elevate your Photoshop workflow and achieve professional-quality results.