The Adobe Photoshop Patch Tool stands as a remarkably versatile and powerful instrument within the photographer's and digital artist's toolkit. Often overshadowed by more immediately recognizable tools like the Clone Stamp or Spot Healing Brush, the Patch Tool offers a unique and often superior approach to retouching, particularly when dealing with larger areas or more complex textures. This guide delves into the intricacies of using the Patch Tool, from its fundamental operations to advanced techniques, enabling users to effortlessly remove unwanted elements and creatively duplicate objects within their images.
Understanding the Patch Tool's Core Functionality
At its heart, the Patch Tool is designed for retouching and repairing images by intelligently blending sampled pixels with the surrounding area. It operates on the principle of selection and replacement. You first define an area of the image that you wish to alter or remove. Once this selection is made, you then drag this selected area to another part of the image that contains the desired texture, tone, and color. Photoshop then analyzes the source area and intelligently patches it over the original selection, striving to maintain the original area's tonal qualities and textures. This intelligent blending is what sets the Patch Tool apart, allowing for seamless integration that can be difficult to achieve with other tools.
The effectiveness of the Patch Tool lies in its ability to sample and blend. When you draw a selection around an object you want to remove, and then drag that selection to a clean area of the background, Photoshop analyzes the texture, lighting, and shading of the pixels in the destination area. It then applies this information to the selected object, effectively replacing it with a seamless continuation of the background. This process is particularly beneficial for removing more complex shapes or when the background itself has a varied texture, such as uneven surfaces, grass, sand, or walls.
The Patch Tool vs. Other Retouching Tools
While Photoshop offers a suite of tools for image repair, the Patch Tool excels in specific scenarios. It is often a better choice than the Clone Stamp Tool or the Spot Healing Brush when dealing with larger selections or areas that possess more intricate textures. The Clone Stamp Tool, for instance, directly copies pixels from one area to another without any inherent blending. This can lead to noticeable repetitions or a lack of seamless integration if not used with extreme care. The Spot Healing Brush, on the other hand, is more effective for small blemishes, dust spots, or very fine detail. It works by automatically sampling surrounding pixels and blending them in.
The Patch Tool bridges the gap, offering a more controlled yet intelligent approach. It allows for the removal of more complex shapes that would otherwise be challenging with the Clone Stamp or Spot Healing Brush. The tool is intelligent and samples the copied area’s texture and patches it over the original selection maintaining the tones from the original area. This is a crucial distinction, as it means the tool doesn't just copy; it adapts.
Navigating the Patch Tool's Modes: Source and Destination
The Patch Tool offers two primary modes of operation, accessible via the Options bar at the top of the Photoshop interface: Source and Destination. Understanding these modes is key to unlocking the tool's full potential.
Source Mode: Removing Unwanted Elements
When the Patch Tool is set to "Source" mode, the selected area is the source of the pixels that will be used to cover another area. This is the mode you'll typically use for removing unwanted objects or blemishes.
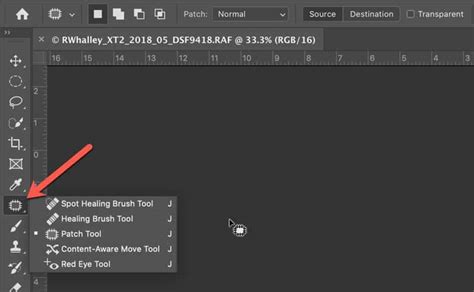
- Select the Patch Tool: Locate the Patch Tool in the Photoshop Tools panel. It's often grouped with the Spot Healing Brush and Healing Brush tools. You might need to click and hold on the Spot Healing Brush icon to reveal the Patch Tool.
- Choose Source Mode: In the Options bar at the top of the screen, ensure that "Source" is selected.
- Draw Your Selection: Using your cursor, click and drag to draw a selection around the object or area you wish to remove. You will see the "marching ants" appear, indicating your active selection.
- Drag to a Clean Area: Place your cursor inside the selected area. Click and drag the selection to a part of the image that you want to use as the replacement. This destination area should ideally have similar texture, tone, and lighting to the area you are removing.
- Release and Observe: Release the mouse button. Photoshop will then analyze the destination area and blend its content into the original selection, effectively removing the unwanted element.
This process allows you to remove unwanted image elements by essentially "painting" over them with a desired part of the image. The tool is intelligent and samples the copied area’s texture and patches it over the original selection maintaining the tones from the original area.
Destination Mode: Duplicating and Repeating Objects
The "Destination" mode reverses the process. In this mode, the selected area is the destination where the pixels from another area will be copied. This is incredibly useful for duplicating objects, creating patterns, or adding detail where it's needed.
- Select the Patch Tool: As before, select the Patch Tool from the Tools panel.
- Choose Destination Mode: In the Options bar, select "Destination."
- Draw Your Selection: Click and drag to select the area of the image that you want to copy from. This is your source area.
- Drag to the Destination: With the selection active, click inside it and drag it to the location where you want to place a copy of the selected object or area.
- Release and Observe: Release the mouse button. Photoshop will then copy the content from the original selection and paste it into the new location.
This capability is particularly useful when extra detail is required in your images. For example, if you have a single stone in an image and want to create a wall of stones, you can use the Patch Tool in Destination mode to duplicate that stone multiple times, creating a convincing repetition. The image in the video is of Fewstone Reservoir in the Yorkshire Dales. I captured this panoramic image by stitching together around eight images each of which had a 20 second exposure. The Patch Tool can also be used in reverse to copy an object or item and repeat it several times like the stones in the tutorial image.
Advanced Techniques and Settings
Beyond the basic Source and Destination modes, the Patch Tool offers further options that allow for more refined control and sophisticated results.
Content-Aware Mode: Intelligent Blending
In recent versions of Photoshop, the Patch Tool has gained a powerful "Content-Aware" mode. This setting leverages Photoshop's advanced content-aware technology to intelligently blend texture and tone from the surrounding areas of the destination as well as the source. This often results in even more seamless and natural-looking repairs, especially when dealing with complex backgrounds or areas where the source and destination have subtly different characteristics.
To use Content-Aware mode:
- Select the Patch Tool: Ensure the Patch Tool is active.
- Choose Content-Aware: In the Options bar, change the "Patch:" setting from "Normal" to "Content-Aware."
- Proceed as Usual: You can then use the Patch Tool in either Source or Destination mode as described above.
When set to Content-Aware mode, the Patch Tool uses Photoshop’s content-aware technology to intelligently blend texture and tone from surrounding areas. This mode is particularly useful when an area has sharp contrast or is up against the edge of a photo, where the normal mode might be less effective.
Non-Destructive Editing with Content-Aware
A significant advantage of Content-Aware mode is its ability to be used non-destructively. In recent versions of Photoshop, you can enable Content-Aware mode and work on a separate layer with "Sample All Layers" enabled. This means your original image remains untouched, and all your edits are applied to a new layer. This allows for easy adjustments or complete removal of the edits later without harming the original image data. To do this, create a new empty layer above your image layer, select it, enable "Sample All Layers" in the Patch Tool's Options bar, and then use the Patch Tool. The result of the move will be created in the selected layer.
Unexpected results usually occur when the source area has very different lighting, colour, or texture from the destination. When working with Content-Aware mode, it's crucial to select a source area that is as close as possible in terms of color, texture, and lighting to the area you are trying to repair or replace.
Adjusting Patch Behavior: Structure and Color
Within the Content-Aware mode (and sometimes in normal mode depending on the Photoshop version), you have additional sliders to fine-tune the patch's behavior:
- Structure (1-7): This value specifies how closely the patch should adhere to existing image patterns. A higher value (closer to 7) means the patch will more strictly follow the patterns of the source area. A lower value allows for more freedom and blending with the surrounding textures.
- Color (0-10): This slider determines the extent to which Photoshop applies algorithmic color-blending to the patch. A value of 0 disables color blending, meaning the patch will retain the exact colors of the source. A higher value (closer to 10) will blend the colors more aggressively to match the destination area.
By adjusting these sliders, you can achieve a wide range of results, from very precise copies to more subtly blended repairs. For instance, if you want to remove an object and have the background seamlessly fill in, you might use a higher color blending value. If you are duplicating an object and want it to look identical, you might use a lower color blending value.
Using the Content-Aware Move Tool
While not strictly the Patch Tool itself, it's worth noting the related Content-Aware Move Tool, which shares similar underlying technology. The Content-Aware Move Tool allows you to select an object, move it to a new location, and have Photoshop intelligently fill the gap left behind. It also offers "Move" and "Extend" modes, similar in concept to the Patch Tool's Source and Destination.
To use the Content-Aware Move Tool:
- Select the Tool: Choose the Content-Aware Move Tool (often grouped with the Patch Tool).
- Select an Area: Use the tool to select the object or area you want to move.
- Choose a Mode: In the Options bar, select either "Move" (to replace the original with the new) or "Extend" (to duplicate the object).
- Drag to New Location: Drag the selection to its new position.
- Commit: Press Enter or click the checkmark to commit the transformation.
The image is recomposed, and the hole left behind is filled using matching elements from the picture. This tool is particularly effective for repositioning elements within an image while maintaining a natural look.
The Patch Tool: Does More than You Think | Complete Photoshop Guide
Practical Applications and Best Practices
The Patch Tool is an excellent tool for repairing areas of photos. Its applications are broad, ranging from professional retouching to everyday photo editing.
Removing Imperfections
- People: Remove blemishes, stray hairs, or distracting elements in portraits.
- Landscapes: Erase power lines, unwanted signs, or litter from scenic views.
- Products: Clean up imperfections on product shots for e-commerce.
Enhancing Images
- Duplicating Elements: Add more texture to a wall, repeat decorative elements, or create more subjects in a scene.
- Extending Backgrounds: Seamlessly extend the background of an image to create more space or reframe a subject.
Best Practices for Optimal Results
- Choose Your Mode Wisely: Don’t try to do everything with the Patch Tool. Choose carefully which mode you will use for your repair. Understand the difference between Source and Destination.
- Sample Smartly: When using Source mode, select a source area that closely matches the texture, color, and lighting of the area you are trying to cover.
- Work with Layers: Whenever possible, use the Patch Tool non-destructively on a separate layer with "Sample All Layers" enabled. This provides flexibility and allows for easy revisions.
- Zoom In: For precise selections and placements, zoom in on your image.
- Refine Selections: If your initial selection isn't perfect, you can add to it or subtract from it using Photoshop's selection tools.
- Consider the Context: The Patch Tool works best when the surrounding areas provide sufficient information for blending. If an area is very uniform or has very sharp, distinct edges, other tools might be more appropriate.
- Experiment: The Patch Tool can sometimes produce slightly different results even with the same selection. Don't be afraid to try a few times until you achieve the desired outcome.
- Combine Tools: For complex edits, consider using the Patch Tool in conjunction with other tools like the Clone Stamp, Healing Brush, or Content-Aware Fill for the best overall result.
The Patch Tool is a cornerstone of sophisticated image manipulation in Photoshop. Its ability to intelligently blend and replace areas makes it invaluable for both removing unwanted elements and creatively enhancing images. By understanding its modes and settings, and by adhering to best practices, users can unlock its full potential and achieve professional-quality results with remarkable ease. So fire up Photoshop and have some fun. Try to remove a blemish or two using the Patch tool.