Photoshop, a powerhouse in digital image manipulation, equips users with an extensive suite of tools designed for both subtle enhancements and dramatic transformations. Among these powerful instruments, the Quick Selection tool stands out for its ability to swiftly and accurately isolate areas of an image. This tutorial delves into the essence of the Quick Selection tool, guiding you through its application and showcasing its diverse use cases, ultimately transforming your image editing workflow from cumbersome to streamlined.
Understanding the Quick Selection Tool's Purpose and Advantages
The fundamental role of the Quick Selection tool is to enable users to select one area or section of an image with remarkable speed and ease. While Photoshop offers several tools that can perform similar selection tasks, each possesses distinct strengths and limitations. For instance, the Magnetic Lasso tool, while capable of selecting objects, demands a more deliberate approach and a steadier hand. Its reliance on analyzing pixel color to identify edges can present challenges when dealing with selections that share colors with their background, making precise separation difficult.
In contrast, the Quick Selection tool offers superior edge definition and grants users greater control, particularly over intricate or smaller areas that require selection or deselection. Consider the scenario of altering the background behind a person. If their hand is placed on their hip, the Quick Selection tool allows you to clearly discern and select the background visible in the crook of their arm, in addition to the larger area behind them. This granular control is crucial for achieving professional-looking results.
Furthermore, the Quick Selection tool facilitates the simultaneous selection and deselection of multiple areas. This capability proves invaluable when working with large, complex regions. Whether you need to isolate backgrounds, foregrounds, or any specific part of an image, the Quick Selection Tool empowers you to accomplish the task efficiently without compromising accuracy. Its inherent ability to detect outlines and color ranges contributes to its impressive precision.
Practical Applications: Isolating Subjects and Enhancing Images
Imagine a photograph of a dog eagerly catching a tennis ball. If your objective is to isolate the dog and place it onto a new backdrop, the Quick Selection tool excels in this scenario. You can rapidly delineate the entire background surrounding the dog, subsequently moving the dog to a fresh environment or replacing the existing background with a more aesthetically pleasing option. This entire process is significantly swifter and more straightforward than what other selection tools typically allow.
The need to refine image backgrounds is a common challenge faced by photographers, from novices to seasoned professionals, since the advent of photography. Whether it's a spontaneous snapshot captured with a smartphone or a carefully staged shot where the environment proved less than ideal, the background often requires attention. A personal anecdote illustrates this: a spontaneous iPhone capture of parents at a coffee shop, while holding immense sentimental value as the last photograph of them together, was marred by a busy, distracting background. In earlier versions of Photoshop, tools like the Magic Wand and Lasso often struggled with backgrounds featuring similar colors and patterns, leading to frustrating and time-consuming editing sessions.
The Quick Selection tool, however, revolutionizes this process. It transforms a cluttered snapshot into a more polished portrait by enabling the removal of distracting elements. The core principle of effective image editing lies in employing the appropriate tool for the task at hand. Previously, many Photoshop selection tools were perceived as difficult to use, deterring users. The Quick Select Tool has fundamentally altered this perception.
Step-by-Step Guide to Using the Quick Selection Tool
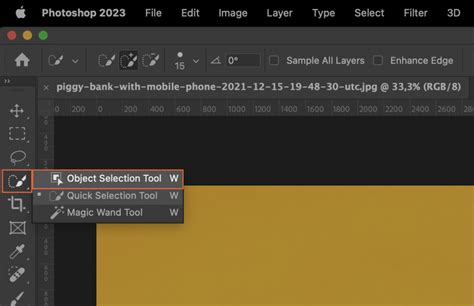
The operational simplicity of the Quick Selection tool is one of its most significant advantages. To begin, simply drag the tool over your intended subject. The tool is intelligently designed to detect changes in pixel data, and in most instances, it will accurately stop at the edges of the object. The visual cue for a successful selection is the appearance of the "marching ants" - a dynamic, animated border that delineates the selected area.
Once you have achieved the desired selection, the next crucial step is to refine the edges. This is accomplished by clicking the "Refine Edge" button, typically located in the top menu bar of the Photoshop interface. The Refine Edge dialog box provides a dedicated workspace for fine-tuning the pixels surrounding the selection's border.
Within the Refine Edge options, you can adjust how your selection is viewed against various background scenarios. One useful view is the "Mask overlay," a familiar option for those who have experience with layer masks. This view allows you to simultaneously observe both the background and your selected subject. For enhanced clarity, especially when evaluating edge accuracy, switching to a "Black & White" view mode is highly recommended. This stark contrast makes it exceptionally easy to identify any imperfections or inaccuracies in your selection.
To access these different viewing modes, click the dropdown menu that reveals the "View Options" box. Experimenting with these various display settings will help you understand how each mode presents your data. For the purpose of precise edge assessment, selecting the "Black & White" view mode is particularly beneficial.

Advanced Refinements: Tackling Challenging Edges and Hair
Upon viewing your selection against a black background, you can critically assess the quality of the edges. Ideally, they should appear well-defined, free from pixelation or blockiness. However, challenging areas, such as fine or wispy hair, can present a significant hurdle. The anecdote of the parents' photograph highlights this difficulty: fine hair on one parent and the almost non-existent hair on the other, coupled with the mother's post-chemotherapy fine hair, makes hair selection a delicate task.
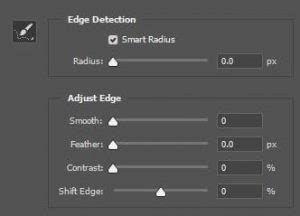
To address such intricate details, Photoshop's Quick Selection tool offers sophisticated refinement options. Within the Refine Edge dialog, locate the "Edge Detection" section. Here, you'll find a "Smart Radius" option. By checking this box and subtly adjusting the slider to the right, you can observe how the edges around the hair become more transparent, allowing for a more natural blend.
If further transparency is required for the hair, ensure the brush icon on the left side of the Refine Edge panel is selected. You can then carefully brush around the areas where greater transparency is needed. The ability to switch between different View modes within the Refine Edge dialog allows you to continuously monitor the impact of your adjustments on both the selected subject and the background.
Integrating New Backgrounds and Finalizing Your Image
With the background successfully removed, leaving a clean, transparent layer, the next step is to introduce your desired new background. Open the image you intend to use as the replacement background in Photoshop. Then, utilizing the Move Tool, simply drag this new background image into your main working document.
In many cases, you will need to arrange the layers to achieve the correct composition. This typically involves dragging the new background layer beneath the subject layer - the one that now contains the applied mask. To maintain a clean workflow, it's often advisable to delete the original background layer and replace it with your chosen scenery, renaming the new layer appropriately, for instance, as "new background."
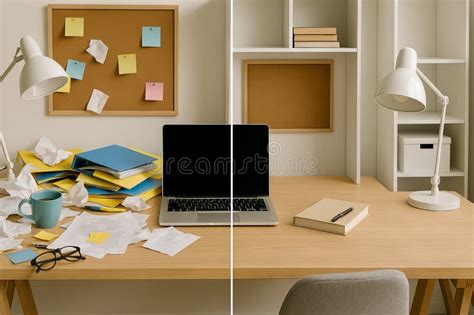
The result is a dramatically enhanced image, where the subject is seamlessly integrated into a new, more fitting environment. The question then becomes: is the final image an improvement over the original? Was the relatively short editing time, perhaps around ten minutes, a worthwhile investment for such a significant transformation? The Quick Selection tool makes such enhancements accessible and efficient.
We encourage you to experiment with this powerful and intuitive tool. Give the Quick Selection tool a try on your own images and share your results. Witnessing the diverse and creative ways in which users apply this functionality is always inspiring. The ability to quickly and effectively isolate subjects and manipulate backgrounds opens up a world of creative possibilities, allowing even casual users to achieve professional-looking results with relative ease. This tool is not merely about making selections; it's about unlocking a more efficient and enjoyable image editing experience.