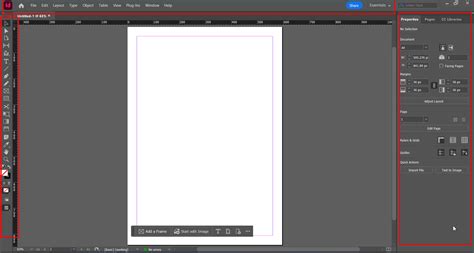
Adobe InDesign offers a powerful and versatile Drop Shadow effect, a feature that allows designers to add depth and visual interest to their layouts. Understanding how to effectively apply and customize drop shadows is crucial for creating professional-looking documents that stand out. This article delves into the intricacies of using InDesign's Drop Shadow feature, from basic application to advanced customization, ensuring you can enhance your designs with realistic and impactful shadows.
Understanding the Purpose of Drop Shadows
A drop shadow adds a perceived dimension to an object by simulating the shadow it would cast. This illusion of depth can make elements appear to lift off the page, separating them from the background and guiding the viewer's eye. In essence, a drop shadow adds dimension by casting what appears to be the shadow of an object. When used judiciously, drop shadows can significantly enhance the visual hierarchy and overall aesthetic appeal of a design. They are particularly useful for making text or images pop, creating a sense of three-dimensionality, and adding a subtle yet effective stylistic flair.
Applying a Basic Drop Shadow
The process of applying a drop shadow in InDesign is designed to be intuitive and accessible. There are several convenient ways to initiate this effect, catering to different workflow preferences.
Direct Application via the Control Panel
One of the most direct methods is through the Control panel. If you have an object selected - be it a text frame, an image, or a shape - you will notice a dedicated "Drop Shadow" button on the Control panel. This is a unique feature, as it's the only effect with its own dedicated button, highlighting its frequent use and importance in design. Clicking this button will apply a default drop shadow to your selected object. To remove the shadow, simply click the button again.
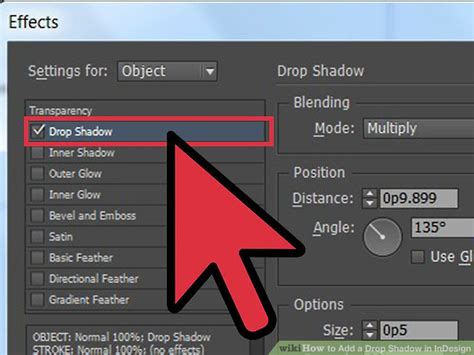
Accessing the Effects Dialogue Box
For more control over the shadow's appearance, you can access the full Drop Shadow dialogue box. While the dedicated button offers a quick application, holding down the Option key (on Mac) or Alt key (on Windows) while clicking the Drop Shadow button will directly open the Effects dialogue box, specifically to the Drop Shadow settings. This allows for immediate customization.
Keyboard Shortcuts and the Fx Button
InDesign also provides a built-in keyboard shortcut for applying drop shadows, further streamlining the process. The shortcut is typically Command+Option+M on macOS or Control+Alt+M on Windows. Alternatively, you can always access the Drop Shadow effect through the general "Fx" button, which is usually located in the Control panel, Properties panel, or the dedicated Fx panel. From the Fx menu, you can select "Drop Shadow" to open its settings.
Customizing Drop Shadow Settings for Impact
The true power of InDesign's Drop Shadow effect lies in its extensive customization options. These settings allow you to fine-tune the shadow to perfectly match your design's lighting, mood, and aesthetic goals.
The Drop Shadow Dialogue Box Explained
When you open the Drop Shadow dialogue box, you'll be presented with a range of parameters to adjust. It's crucial to have the "Preview" option checked within this dialogue box. This ensures that you can see the effects of your adjustments in real-time on your document as you make them, allowing for immediate visual feedback.
Opacity and Distance: The Foundation of a Realistic Shadow
- Opacity: The default drop shadow settings can often be quite intense, appearing very dark. For a more subtle and realistic effect, it's generally recommended to reduce the opacity. For instance, starting with an opacity of 75% might be too strong; reducing it to around 40% can create a much softer, more natural shadow.
- Distance: This setting controls how far the shadow is offset from the original object. A smaller distance creates a shadow that appears close to the object, as if lit from directly above, while a larger distance suggests a light source further away or at a different angle. Adjusting the distance, perhaps down to 4 pixels, can significantly alter the perceived depth.
Size, Spread, and Noise: Refining the Shadow's Appearance
- Size: The "Size" parameter controls the blurriness of the shadow's edges. A larger size will result in a softer, more diffused shadow, while a smaller size will create sharper edges. Experimenting with this value, for example, setting it to 5 pixels, can help achieve the desired level of softness.
- Spread: This unique setting determines the amount of the drop shadow that retains its full color and opacity. At 0% spread, the entire shadow is subject to the opacity and blending mode settings. As you increase the spread, a larger portion of the shadow will maintain its full intensity before it begins to blur. For instance, increasing spread to 100% means the entire shadow is set at the defined opacity and blending mode. A common practice is to use a low spread value, such as 10%, to ensure the shadow doesn't appear too solid.
- Noise: Adding a small amount of noise (typically 1-2%) can significantly enhance the realism of a drop shadow. This introduces a subtle randomness to the shadow's texture, making it appear less artificial and more like a natural shadow cast by an object.
How to Add a Drop Shadow to Text in Adobe InDesign
Distance and Angle: Simulating Light Sources
The "Distance" and "Angle" settings work in tandem to define the position of the shadow relative to the object.
- Distance: As mentioned earlier, this controls the offset.
- Angle: This determines the direction from which the simulated light source is hitting the object. InDesign provides a visual dial or a numerical input for this.
Global Light and Object Knocks Out Shadow
- Use Global Light: This is a crucial setting for maintaining consistency across your document. When "Use Global Light" is enabled, all effects that use lighting (like drop shadows and inner shadows) will share the same light angle. This is highly beneficial when you have multiple objects with shadows, ensuring they all appear to be lit from the same direction, creating a cohesive look. It's generally recommended to leave this option turned on for consistency.
- Object Knocks Out Shadow: This option determines whether the original object will obscure its own shadow. When checked, the shadow will not appear underneath the object itself. While this is the default and often desired behavior, there are specific scenarios where unchecking this option can be useful for creative effects, allowing the shadow to be visible even where the object is present.
Transparency Effects
You can also control whether the drop shadow honors other transparency effects applied to the same object. This allows for more complex layering and interaction between shadows and other visual treatments.
Addressing Common Drop Shadow Challenges
While the Drop Shadow effect is powerful, users sometimes encounter unexpected behavior, particularly when dealing with complex documents or specific object types.
Drop Shadows on Tables and Cell Colors
A common point of confusion arises when applying drop shadows to tables, especially those with colored cells. If a drop shadow appears to be applied everywhere, including interfering with the cell fills, the issue often lies in the selection.
- Problem: Applying a drop shadow to the entire table object might inadvertently affect the underlying cell colors or appear to be applied to the table's container rather than its content.
- Solution: Ensure you are selecting the specific element you intend to shadow. If you want a shadow around the entire table, select the table object itself. If you want shadows on individual cells or text frames within the table, select those specific elements. The user's experience of "Sounds like the drop shadow is being applied everywhere. Make sure you select the entire text frame, take off the drop shadow. Don’t get it to work. same layer, another layer beneath or whatever. before). Applying drop shadow to the table directly works fine, it does not interfere with colors on the page" suggests that the method of selection is key. Applying it directly to the table object, rather than individual cell fills or text frames within the table, is often the correct approach.
Shadows on Images and Transparency
Another scenario involves applying shadows to images, particularly those with transparent backgrounds or when trying to achieve specific layering effects.
- The Optical Illusion Query: A user might question, "Are you referring to the optical illusion that a shadow is darker when there is white under it (instead of some color tint underneath)?" This highlights how the surrounding colors can affect the perceived darkness of a shadow. InDesign's blending modes and opacity settings for shadows help manage this, but the underlying page color will always play a role.
- Achieving Specific Shadow Effects with Images: For complex image treatments, such as showing only the shadow or integrating it seamlessly with colored backgrounds, a more advanced technique might be employed. This can involve duplicating the image. One version is placed on the colored background and has its opacity reduced to create the shadow effect, while another version is placed above it, potentially with a feathered edge or transparency. The "step and repeat" method described, where an image is duplicated and manipulated with guides to separate the shadowed portion from the visible image on different backgrounds, is a sophisticated way to achieve such precise control. This allows for the shadow to be independently controlled and to interact realistically with different background colors.
Advanced Techniques and Considerations
Beyond basic application, InDesign's Drop Shadow effect can be used in more nuanced ways.
Feathering and Links
While feathering can be applied to an object, it's important to understand its interaction with other effects. If you apply a drop shadow to an image that also has a feather applied, the shadow will generally follow the feathered edge. However, the user's comment, "Although if I create a shadow on a image feather will work but I can't delate the link," suggests a potential confusion about how feathering and shadows interact, or perhaps an issue with how the effects are being linked or applied within a group. InDesign's effects are typically non-destructive, meaning the original image data is preserved, and the effects are applied dynamically. If a "link" is causing issues, it might refer to a clipping path or a master page element that is unintentionally constraining the effect.
Creating Depth for Text
Drop shadows are incredibly effective for enhancing the readability and impact of text. Applying a subtle drop shadow to headlines or important body text can make it stand out against busy backgrounds or add a professional polish. Experiment with low opacity and a small distance to achieve a sophisticated look.
Integrating with Other Effects
The real magic happens when you combine Drop Shadow with other InDesign effects, such as Bevel and Emboss, Inner Glow, or Satin. These combinations can create complex visual styles, from realistic metallic textures to subtle embossed lettering. Remember to use the "Use Global Light" option to ensure consistency when layering multiple lighting-based effects.
Conclusion
The Drop Shadow effect in Adobe InDesign is a fundamental tool for adding depth, dimension, and visual appeal to your designs. By understanding its various settings - from opacity and distance to spread and noise - and by mastering the different methods of application, you can elevate your layouts from flat to dynamic. Whether you're working with simple graphics, complex tables, or intricate text treatments, the ability to control and customize drop shadows effectively is a skill that will undoubtedly enhance your InDesign proficiency and the overall quality of your design work.