When preparing images for print or aiming to enhance their visual fidelity, understanding and manipulating the Dots Per Inch (DPI) or Pixels Per Inch (PPI) in Adobe Photoshop is a fundamental skill. This process dictates how an image will be rendered, especially when transitioning from the digital realm to physical output. By mastering these settings, you ensure your images possess the detail and clarity required for professional-grade prints or crisp digital displays.
Understanding Image Resolution: PPI, DPI, and LPI
The terms PPI, DPI, and LPI are often used interchangeably, but they refer to distinct aspects of image resolution, particularly relevant when preparing images for different media.
PPI (Pixels Per Inch): This metric specifically refers to the pixel density of a digital image. It indicates how many pixels are contained within a linear inch of the image data itself. PPI is crucial for digital displays, as it affects how an image is rendered on screens, determining its sharpness and detail when viewed digitally. For digital projects, prioritizing PPI is essential to ensure clarity on screens.
DPI (Dots Per Inch): In contrast to PPI, DPI is a measurement primarily associated with the printing industry. It quantifies the number of individual dots of ink a printer can lay down in a linear inch of paper or other substrate. DPI essentially provides instructions to the printer about how to translate the digital image data into physical ink dots. A higher DPI setting generally translates to more detail and a better quality print. DPI is essentially instructions for the printer. The relationship between DPI and print quality cannot be overstated.
LPI (Lines Per Inch): LPI is another measurement used in the printing industry, specifically describing the resolution of printed images in the context of halftone printing. It indicates the number of lines of dots that can fit within an inch, which directly impacts how images are reproduced in printed materials. LPI plays a critical role in determining the quality of printed materials. Higher LPI values result in finer dot patterns and can produce smoother gradients and more detailed images, which are especially important in high-end publications and images. A standard practice is to match LPI with DPI; for example, if you are printing at 300 DPI, an LPI of around 150 is often recommended to ensure optimal quality.
Choosing the correct measurement depends on the context in which you are working. For digital projects, prioritizing PPI is crucial to ensure clarity on screens. In contrast, when preparing images for print, understanding DPI is vital for achieving the desired quality. In cases where halftone printing is involved, LPI must be considered to ensure optimal reproduction of images.
Adjusting PPI in Photoshop: A Step-by-Step Guide
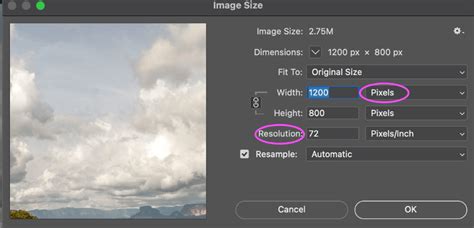
The primary tool within Photoshop for managing image resolution is the "Image Size" dialog box. This allows you to alter the PPI without necessarily changing the overall dimensions of your image in terms of pixel count.
Open Your Image: Begin by launching Adobe Photoshop and opening the image file you intend to modify. Navigate to File > Open and select your desired image.
Access Image Size: To view and adjust your image's resolution, go to the Image menu and select "Image Size."
Understand Current Settings: At the bottom of the Image Size dialog box, you will see the current resolution displayed, often in pixels per inch (PPI). You can also observe the current pixel dimensions and document size.
Uncheck "Resample": This is a critical step if you wish to change the PPI without altering the total number of pixels in your image. When "Resample" is unchecked, Photoshop recalculates the physical print dimensions based on the new PPI value, without adding or removing pixel data. This means the image's pixel dimensions (width and height in pixels) remain constant, but the resulting print size will change. This lets Photoshop know that we do not want to add or subtract any pixels to the photo. Adding and subtracting pixels is what happens when we resize images (to enlarge or shrink them). To change resolution we are NOT changing the number of pixels in the photo, but changing only how many of those pixels will be displayed per inch.
Set the Desired Resolution: Locate the "Resolution" field. For most high-quality print purposes, a resolution of 300 PPI is considered standard and ideal. Adjust the value to 300 (or your desired PPI). You can change your unit of measurement by clicking the drop-down menu next to Width or Height to see how the print dimensions are affected.
Apply Changes: Once you have set the desired resolution, click "OK" to apply the changes.
When you click OK, nothing effectively changes in the image visually on your screen. That's because the total pixel count was preserved. However, if you look at the status bar at the bottom of the image window (you may need to click and hold to see resolution details), you will see that it has updated to define how this would actually print. For example, if you started with an image at 72 PPI and changed it to 300 PPI without resampling, the physical print dimensions would decrease significantly, but the image would be much sharper when printed.
Resampling: Altering Pixel Data for Size and Resolution
While unchecking "Resample" is ideal for changing print resolution without affecting pixel count, checking the "Resample" box allows you to alter the image's pixel dimensions, which in turn affects its resolution. This is useful when you need to enlarge or shrink an image, or when you want to adjust both print size and resolution simultaneously.
When the "Resample" checkbox is selected, Photoshop will change the amount of pixel data inside the image.
- Upsampling: Increasing the number of pixels is called upsampling. This process adds data to the image, which can sometimes lead to a loss of quality or introduce artifacts if done excessively.
- Downsampling: Decreasing the number of pixels is called downsampling. This removes data from the image, which can be useful for reducing file size or preparing images for web use where extreme detail is not required.
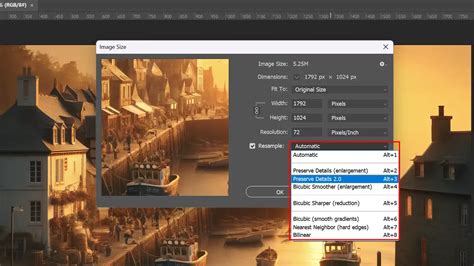
Choosing an Interpolation Method: When resampling is enabled, you must select an "Interpolation Method." This specifies how Photoshop calculates the color values for new pixels (when upsampling) or how it averages existing pixels (when downsampling). Different methods offer varying results:
- Automatic: Photoshop chooses the best method based on whether you are enlarging or reducing the image.
- Preserve Details (enlargement): This is often the best choice for enlarging images, aiming to retain as much detail as possible.
- Bicubic Smoother (enlargement): Another good option for enlargements, producing smoother results.
- Bicubic Sharper (reduction): Ideal for reducing image size, it attempts to maintain sharpness.
- Bicubic (smooth gradients): A general-purpose method that provides a balance between detail and smoothness.
- Nearest Neighbor (hard edges): This is the fastest method but can result in jagged edges and is best suited for images with sharp, defined lines, like pixel art.
- Bilinear: A compromise between Nearest Neighbor and Bicubic.
To resize an image using resampling:
- Open the "Image Size" dialog box (Image > Image Size).
- Ensure the "Resample" checkbox is selected.
- Choose your desired interpolation method from the dropdown menu.
- Enter your desired dimensions (Width, Height) or Resolution. Photoshop will automatically adjust the other values to maintain the aspect ratio, or you can break the link between Width and Height to set them independently.
- Click "OK."
Achieving High-Quality Prints: Practical Considerations
The goal of adjusting PPI/DPI is to ensure your image looks its best in its intended medium.
For Print: A common standard for high-quality prints is 300 PPI. This density of pixels allows for fine detail and smooth transitions when the image is reproduced by a printer. If you are preparing an image for a professional publication, aiming for 300 DPI is a good starting point. Lower DPI settings, such as 150 DPI, might suffice for less critical materials like flyers or drafts, but will likely result in a less sharp final product.
For Web and Digital Displays: For images intended for online use, such as websites or social media, a resolution of 72 PPI is often sufficient. This is because most screens display images at a lower effective resolution, and a lower PPI helps to keep file sizes manageable, leading to faster load times. However, it's important to note that "72 PPI" is a historical convention; modern displays have much higher pixel densities. The actual pixel dimensions of your image are more critical for screen display than the PPI setting itself when "Resample" is checked.
Example Scenario: Imagine you have an image with pixel dimensions of 3000 x 2000 pixels.
Scenario 1 (Unchecking Resample): If you set the resolution to 300 PPI without resampling, Photoshop calculates the print size. The total number of pixels remains 3000 x 2000. The document width would be 3000 pixels / 300 PPI = 10 inches, and the height would be 2000 pixels / 300 PPI = approximately 6.67 inches. The image would print at 10 x 6.67 inches with excellent quality. If you then changed the resolution to 150 PPI without resampling, the pixel dimensions would remain 3000 x 2000, but the print size would double to 20 x 13.33 inches, with a noticeable decrease in sharpness because the same number of pixels are spread over a larger area.
Scenario 2 (Checking Resample): If you check "Resample" and want to print the image at 20 x 13.33 inches (which is 150 PPI for the original pixel dimensions), Photoshop would need to add pixels to achieve this larger size. This process of adding pixels (upsampling) can lead to a less sharp image. Conversely, if you wanted to print it at 5 x 3.33 inches (which would be 600 PPI), Photoshop would remove pixels (downsampling), potentially losing detail.
Advanced Techniques and Considerations
Smart Objects: For complex edits or when scaling elements with layer styles, converting layers to Smart Objects can be highly beneficial. Smart Objects preserve the original image data, allowing you to scale and transform them non-destructively. You can then use the Transform tool (Ctrl+T or Cmd+T) and scale the Smart Object. When you scale effects (Layer > Layer Style > Scale Effects), the layer styles will also adjust proportionally.
Photoshop Smart Objects Explained in 2 minutes
Batch Processing: For workflows involving multiple images, Photoshop's "Image Processor" script is invaluable. This feature allows you to batch resize and convert images, specifying desired sizes and resolutions for output. To use it, go to File > Scripts > Image Processor.
AI-Powered Enhancements: Modern advancements in AI and machine learning have introduced powerful tools for image enhancement. Features like "Super Resolution" in Photoshop and Adobe Lightroom can intelligently upscale images, quadrupling the pixel count while maintaining or even improving visual quality. This technology analyzes the image content and generates new pixels that are contextually appropriate, offering a significant advantage over traditional resampling methods, especially when dealing with low-resolution source material.
The "Enhance" Myth: The popular trope of a detective "enhancing" a blurry image to reveal clear details is largely a Hollywood creation. While AI tools can significantly improve image quality, they cannot magically create detail that was never present. You cannot simply invent information that wasn't captured in the original pixels.
Conclusion: Strategic Resolution Management
Understanding how to change PPI in Photoshop is not just about altering a number; it's about strategically preparing your images for their intended use. Whether you're aiming for a crisp print, a sharp digital display, or efficient web delivery, knowing when to resample and when to preserve pixel data is key. By leveraging Photoshop's robust tools, including the Image Size dialog, interpolation methods, Smart Objects, and advanced AI features, you can ensure your images meet the highest quality standards. The relationship between PPI, DPI, and LPI, while sometimes nuanced, underscores the importance of considering the entire workflow from digital creation to final output.