The node editor within DaVinci Resolve stands as an incredibly powerful tool, once its inner workings are properly understood. For those transitioning from layer-based editing environments, such as those found in Adobe software, the initial encounter with nodes might seem alien. However, a little time spent grasping the utility of node-based workflows quickly reveals their immense value. This approach is not unique to DaVinci Resolve; it's a cornerstone of top-tier software employed across the film and gaming industries, a testament to its efficacy.

The fundamental advantage of nodes lies in their non-destructive nature. This characteristic is particularly invaluable in the realm of complex projects. While traditional layer-based logic, akin to that found in Photoshop, can become cumbersome and challenging to manage for practical requirements, nodes offer a more fluid and adaptable system. It's a common misconception that employing more nodes inherently leads to superior results. In reality, the key is to adopt a rational mindset when utilizing nodes, striving to achieve the best possible outcome with the most efficient use of nodes, aiming for simplicity where possible.
The Fundamentals of Node Structure
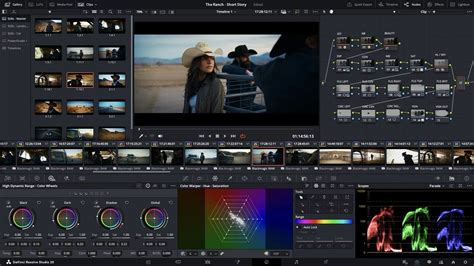
To commence color grading your footage in DaVinci Resolve, the first step involves importing your media into the timeline. Subsequently, navigate to the Color page. You will find a "Nodes" button, typically located in the top right corner of the interface. Clicking this button reveals the node structure, which visually represents the flow of your image processing.
Nodes operate on a left-to-right flow. The green node on the far left signifies the input media. This input then progresses through a series of correction nodes, each applying specific adjustments. When you engage any color grading tool on the Color page, a small icon appears on the corresponding node, visually indicating the adjustments that have been made. Crucially, each subsequent node receives the output of the previous one, meaning the initial footage presented to a new node has already been influenced by all preceding adjustments. This interconnectedness allows for experimentation; you can perform color grading operations on two distinct nodes separately and then observe the impact by simply swapping their order in the pipeline.
Creating and Connecting Nodes
A fundamental aspect of node-based editing is the ability to create new nodes. This is achieved through a straightforward process: right-click on any existing node and select "Add Node" followed by "Add Serial" from the contextual menu. This action generates a new node that is automatically inserted into the sequence, establishing connections to both the preceding and succeeding nodes. Serial nodes are the foundational elements of this workflow and are the most frequently employed type.
Serial Nodes: The Building Blocks
Serial nodes are the most basic form of node, serving as the fundamental building blocks for correcting footage and developing distinct visual aesthetics. Each serial node possesses a single input and a single output. The shortcut for creating a serial node is typically Alt + S (or Option + S on macOS). These nodes are essential for sequential processing, where each step builds upon the adjustments made in the previous one.
Parallel Nodes: For Secondary Grading
This is where Parallel nodes come into play. Parallel nodes are specifically designed for secondary color grading tasks. The defining characteristic of a parallel node setup is that adjustments made within one node will not affect the other nodes operating in parallel. This isolation is incredibly useful when you need to refine specific elements of your image without impacting the overall grade.
In practical color grading scenarios, DaVinci Resolve's powerful Window and Magic Mask features can be employed to precisely isolate particular areas of the image for targeted adjustments. Creating a parallel node is just as straightforward as creating a serial node.
Understanding Different Node Types
The versatility of DaVinci Resolve's node system extends beyond simple serial connections. Several other node types cater to more specialized grading needs.
Layer Nodes: A Different Kind of Hierarchy
So, what distinguishes Layer nodes from Parallel nodes? Layer nodes, in a conceptual sense, bear a resemblance to layers in applications like Photoshop, possessing a hierarchical relationship. However, it's vital to understand that the layer logic in DaVinci Resolve operates in the opposite direction to Photoshop.
When you create a mask within a node, DaVinci Resolve offers the option to generate an "Outside Node." As illustrated in the accompanying visual, if you isolate a subject's face using a mask, the automatically generated inverted mask within the "Outside Node" will select everything except the face. This "Outside Node" functionality is particularly useful for applying adjustments to the background or surrounding elements without affecting the core subject.
Outside Nodes: Inverting Selections and Alpha Channels
Outside Nodes can also be leveraged in conjunction with the "Alpha Output" feature to achieve effects such as removing green screen backgrounds. By creating an Outside Node to preserve the subject, you can then right-click within the Nodes panel and select "Add Alpha Output." To remove a green screen background from a clip, you would simply connect the blue output point of the Outside Node to the blue input point of the Alpha Output. This effectively isolates the subject and allows for the background to be keyed out.
Mixer Nodes: Combining Signals
There are a couple of different types of mixer nodes. Mixer nodes allow you to combine RGB signals into a single output.
Parallel Mixer Nodes: These combine signals simultaneously. They are particularly beneficial when working with challenging elements like skin tones, where subtle, blended adjustments are often required. The shortcut for creating a parallel node is typically
Alt + P(orOption + Pon macOS). When you initially add a parallel node, it appears below the current node and includes the parallel mixer itself. It's also possible to transform a parallel mixer into a layer mixer node, and vice-versa, should your workflow requirements change.Layer Mixer Nodes: The shortcut for creating a layer mixer node is
Alt + L(orOption + Lon macOS). A layer mixer node functions similarly to a parallel mixer, but its operational logic is more akin to the layer system found in Photoshop. The key distinction in DaVinci Resolve is that the node positioned lower in the physical layout actually acts as the "top layer" in terms of blending, while the node positioned higher is the "lowest layer." It's important to internalize that the physical arrangement of nodes can be altered without impacting the signal flow; it's solely the order in which the RGB signal is processed that dictates the final outcome. Layer mixer nodes are especially useful when working with keys and also allow for the adjustment of blending modes, offering further creative control.
Key Mixer Nodes: Manipulating Alpha Channels
A Key Mixer node operates in a manner analogous to a parallel mixer, but with a crucial difference: it exclusively works with key channels. Its primary function is to combine multiple keys into a single, unified key, simplifying complex keying operations.
Splitter Combiner Nodes: Channel-Specific Adjustments
Splitter nodes have the capability to deconstruct an RGB signal into its three individual color channels (Red, Green, and Blue). Conversely, a Combiner node, as its name suggests, reassembles these separate channels back into a single RGB signal. This functionality is highly advantageous when you need to perform specific adjustments on an individual color channel, such as targeting only the red tones, or when you intend to work within a different color space for a particular channel.
Turn Any Footage Cinematic in Davinci Resolve - Only 3 Nodes!
Practical Workflow and Organization
The practical application of nodes often transcends theoretical understanding and demands hands-on practice and critical thinking. While the node system in DaVinci Resolve is not inherently overly complicated, its mastery comes through iterative experimentation.
Bypassing Nodes for Comparison
To assess the impact of individual nodes or entire node trees, you can bypass them. The shortcut Ctrl + D (or Cmd + D on macOS) allows you to bypass the currently selected node, enabling a direct comparison between the graded and ungraded image. For a more comprehensive bypass, Alt + D (or Option + D on macOS) can hide all nodes, effectively reverting the image to its original state.
Node Order: A Matter of Preference and Project
The optimal order for working with nodes is not a rigid rule but rather a matter of personal preference, heavily influenced by the specific requirements of the project at hand. Some scenes may necessitate extensive adjustments, while others might be relatively straightforward.
Compound Nodes: Grouping for Clarity
When embarking on complex looks, you may find it beneficial to utilize Compound Nodes. These function similarly to "Nests" in Premiere Pro, allowing you to group a selection of nodes together into a single, cohesive unit. This is achieved by selecting the desired nodes, right-clicking, and choosing "Compound Node." If needed, you can later "decompose" a compound node to access its constituent nodes. Alternatively, you can right-click on a compound node and select "See Inside" to view its internal structure without breaking it apart.
Organizational Strategies and Best Practices
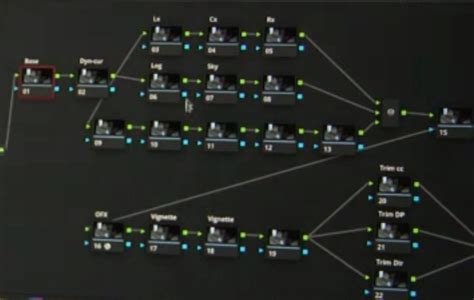
Node organization is a hugely important topic. A common and effective strategy involves dedicating specific nodes to distinct stages of the color grading process. For instance:
- Node 1: Often reserved for "normalizing" corrections, including essential camera RAW settings if applicable.
- Node 2: Typically used for basic color balancing and primary corrections.
- Node 3: Allocated for fine-tuning and more nuanced adjustments.
- Subsequent Nodes: Employed for specific elements like windows, keys, curves, and even defocus effects, though the order can vary.
Noise reduction (NR) is often performed as one of the final steps, but this can depend on how heavily you are relying on caching. Projects involving multiple power windows could easily necessitate five or six nodes, or even more. While some experienced colorists might employ 25 or 30 nodes per shot for intricate looks, many workflows require efficiency, where hitting around 9 or 10 nodes per shot is more realistic.
For feature films and episodic television, understanding the time constraints per shot is crucial for determining the practical number of nodes you can effectively utilize. Commercials, on the other hand, present a different scenario; with ample time allocated, you can afford to spend more time per shot, potentially using 15-20 minutes per node if necessary. In situations with limited time, the focus might shift to solving basic matching issues and letting more subtle refinements take a backseat.
Maintaining a consistent node structure across different projects can significantly speed up your workflow. This consistency allows you to quickly identify where and when to apply PowerGrades, drop in pre- or post-clip grades, and generally navigate your node tree with greater familiarity.
Addressing Specific Workflow Challenges
A common query revolves around finding a quick way to add a serial node before the existing node structure for every clip on the timeline, without altering any existing grades. This is precisely the scenario where implementing a "Fixed Node Tree" for years can prove advantageous. Several nodes within such a tree can be left empty. This pre-planning allows for the relatively easy insertion of new nodes into all or part of the clips when required.
However, it's important to acknowledge the potential pitfalls of making significant changes early in a node structure. Because of the inherent "Order of Operations" within nodes, altering an early node can inadvertently change the values of keys and curves further down the pipeline. This makes such early modifications a potentially dangerous choice.
While complex, it is technically possible to achieve this through third-party macro programs. Such a program could be configured to execute a loop command, iterating through each clip and applying a "Node -> Add Before Current" operation until the entire timeline is processed. This highlights the advanced customization possible within DaVinci Resolve's node-based system.
The best way to truly master the various node types and the DaVinci Resolve system in general is through consistent experimentation and dedicated practice. This innovative tool is designed to enhance your editing experience, offering intuitive control over a wide array of parameters and making your workflow both more efficient and enjoyable.