In the realm of digital image manipulation, achieving a natural and cohesive look often hinges on the subtle addition of noise. While Photoshop offers various methods to introduce this grain-like texture, a particularly effective and versatile technique involves the creation and application of custom noise patterns. This approach provides unparalleled flexibility, allowing for easy editing, minimal impact on file size, and precise application to individual layers, fundamentally transforming how you can add noise to your images.
The Power of Defined Noise Patterns
The core of this powerful technique lies in defining custom patterns that represent specific levels of noise. This is achieved by navigating to Edit > Define Pattern. The key to this method's success is to name your patterns descriptively, indicating the amount of noise they contain. For instance, a pattern created with a specific noise intensity could be named "Noise5Percent" or "GrainMedium." This simple naming convention ensures that you can quickly recall and select the appropriate noise level for your needs.
The process of creating these noise patterns is remarkably quick and straightforward. It's highly recommended to create a series of patterns at one time, covering a range of noise intensities. This proactive approach saves time later and provides a comprehensive toolkit for various situations. Once a pattern is defined, it is saved within Photoshop's pattern library, readily available for use.
Applying Noise Patterns: Beyond a Simple Filter
The true magic of defined noise patterns unfolds during their application. While the traditional Add Noise filter is a valid tool, it often applies noise destructively and offers limited post-application editing. The pattern-based approach circumvents these limitations.
When you choose to fill a layer with a defined pattern, Photoshop presents a dialogue box where you can select your desired noise pattern. Crucially, this dialogue also offers an option to change the scale of the pattern. This scale adjustment allows for further fine-tuning of the noise's appearance. For instance, if the goal is to subtly blend various elements within a composite image, a small amount of noise applied at a 75% scale might be ideal, creating a harmonious texture without appearing overtly grainy.
Integrating Noise Patterns into Your Workflow
The utility of these noise patterns extends far beyond a single application. In a professional workflow, they are indispensable for a multitude of tasks.
Enhancing Composite Images
One of the most common and impactful uses is in the creation of composite images that draw from diverse sources. When elements from different photographs are brought together, they often possess distinct grain structures or texture characteristics. Without intervention, these disparate textures can make the composite appear artificial and disjointed. By applying a noise pattern layer, you can unify the visual texture across all elements, ensuring a seamless blend. A prime example of this is in the creation of movie posters, where backgrounds, foregrounds, and character elements are often sourced from various images. Applying a consistent noise pattern helps to integrate these disparate pieces, making the final image feel cohesive and believable.
Layer Styles for Ultimate Flexibility
The power of noise patterns is amplified when utilized as a Layer Style, specifically through the Pattern Overlay option. This method grants immense control, making it incredibly easy to add noise to any layer while preserving a high degree of flexibility. Furthermore, it significantly minimizes the increase in file size, a critical consideration for large and complex projects.
Consider the challenge of illustrating detailed hair in a photograph. If the original hair shots have their own inherent grain, any digitally painted strokes added to enhance or extend the hair might stand out more prominently, disrupting the natural look. By applying a noise pattern overlay to the painted hair strokes, you can effectively mimic the existing grain structure of the original image, ensuring that the added elements blend seamlessly.
Creating Textures and Effects
The possibilities for using noise patterns are virtually limitless, extending to the creation of specialized textures and effects:
- Skin Texture: To create a realistic skin texture layer, you can add a Pattern Noise layer, convert it to a Smart Object, and then experiment with the
Embossfilter, potentially combined with a touch ofGaussian Blur. This allows for the generation of subtle, organic surface details that mimic natural skin. - "Rain" Layer: A "rain" layer can be effectively simulated by using a noise pattern. By adjusting the pattern's characteristics and blend modes, you can create the visual effect of falling rain.
How to create a Realistic Rain effect in Photoshop Using Photo Overlays
Combating Banding: The Essential Role of Noise
Beyond creative applications, the addition of noise plays a crucial, often overlooked, role in preserving image integrity, particularly when dealing with smooth areas of color.
Understanding and Preventing Banding
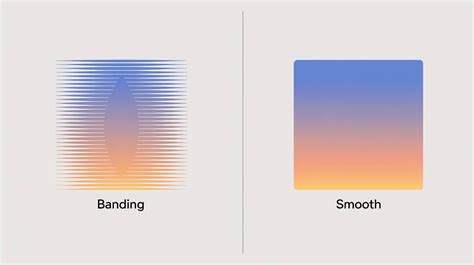
Banding, characterized by the appearance of distinct "stripes" or "bands" in an image, occurs when there are broad areas of very smooth color gradients. This phenomenon is particularly prevalent when artificially creating or enhancing smooth areas in a photograph. When the color information in these smooth transitions isn't sufficiently varied, the display device can interpolate these changes in visible steps, leading to banding.
The most effective way to combat banding is to introduce a very small amount of noise into the affected area. This subtle addition of random pixel values breaks up the smooth gradients, providing the necessary variation for the image to be displayed without noticeable banding.
Strategic Noise Application to Combat Banding
When you identify an area prone to banding, the noise pattern technique offers a precise solution. Instead of applying noise to the entire image, which can be undesirable, you can create a new layer, fill it with a carefully chosen noise pattern, and then strategically apply it.
- Create a New Layer: Start by creating a new, empty layer above the layer containing the smooth color area.
- Define and Apply Noise Pattern: Go to
Edit > Define Patternand create a subtle noise pattern (e.g., a low-intensity noise). Then, select this pattern in the new layer using theEdit > Fillcommand or by using thePattern OverlayLayer Style. - Blend Mode and Opacity: Set the blend mode of this noise layer to
Linear Lightand adjust the opacity to a very low setting, often around 20%. This ensures that the noise is subtle and only serves to break up the banding without making the image appear grainy. - Masking for Precision: Crucially, use a layer mask to apply the noise pattern only to the specific area where banding is a concern. This targeted application ensures that other parts of the image are not affected.
The result is a subtle, almost imperceptible layer of noise that effectively eliminates banding, maintaining the smooth appearance of the color areas while preserving the overall aesthetic of the image. This method is highly editable; you can always adjust the opacity, blend mode, or even replace the noise pattern if needed.
The Educator and the Evolution of Digital Artistry
Dennis, a seasoned Photoshop artist with a career spanning back to 1991, has been instrumental in applying "Photoshop Magic" to movie posters and advertising campaigns. His passion lies in collaborating with creative individuals on compelling images, whether for blockbuster movies, fashion photography, or product advertising. His insights, shared through platforms like this, are born from decades of practical experience and a deep understanding of digital image manipulation.
This initiative, exploring solutions to common creative challenges over a 90-day period, involves collaborations with top artists. These articles are compensated at a fair wage for original content and are free from brand sponsorships, ensuring that the opinions expressed are genuine and driven by artistic expertise rather than commercial interests. The exploration of techniques like defined noise patterns exemplifies this commitment to sharing practical, high-impact solutions that can benefit a wide range of digital artists, from beginners to seasoned professionals. The flexibility and control offered by this method empower artists to achieve a higher level of polish and realism in their work.
The Underlying Principle: Mimicking Reality
At its heart, the use of noise filters, especially through the pattern method, is an attempt to mimic the inherent imperfections and textures found in the real world. Film photography, for instance, naturally produces grain. Digital sensors, while advanced, can sometimes create overly smooth and sterile-looking images, especially in areas of flat color. By intentionally adding controlled noise, we are essentially reintroducing a naturalistic texture that makes digital images more visually pleasing and believable. This principle is fundamental to achieving a high-quality, professional finish in digital art.