CorelDRAW is a powerful vector graphics editor renowned for its robust shape creation and manipulation capabilities. Whether you're a seasoned designer or a complete beginner, understanding how to effectively utilize CorelDRAW's shape tools is fundamental to creating compelling vector art. Vector art, at its core, is composed of mathematical data represented by points, lines, and shapes plotted on a plane. This underlying technology is what grants vector graphics their infinite scalability without compromising image quality or significantly increasing file sizes. While the computational processes behind this might sound complex, CorelDRAW makes the creation of shapes remarkably intuitive and user-friendly, mirroring the tools found in most other vector graphics software. This tutorial will guide you through the essential techniques for creating and customizing shapes in CorelDRAW, from basic geometric primitives to more intricate designs.
Accessing Drawing Tools and Selecting Your Instrument
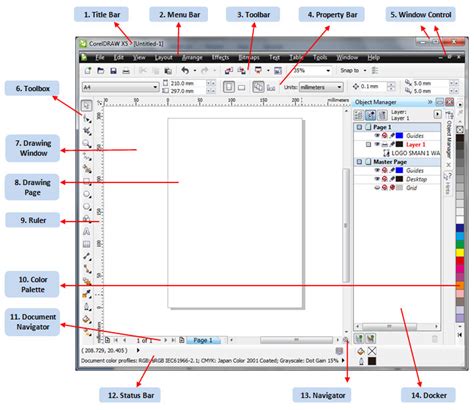
To begin your shape creation journey, the first step is to access the drawing tools. This is accomplished by clicking the “Drawing Tools” icon, typically located within the “Toolbox.” This panel is your gateway to a variety of instruments essential for crafting your shapes. If you're new to the CorelDRAW interface, a dedicated walkthrough of the basics can provide a solid foundation.
Once your tools are at your disposal, you'll need to select the appropriate instrument for your task. CorelDRAW offers a duality in its approach to drawing: the “Pen” tool and the “Freehand” tool. The “Pen” tool is your go-to for creating precise, geometric shapes, allowing for meticulous control over every point and line. Conversely, the “Freehand” tool is designed for more organic and expressive lines, enabling you to draw with a more natural, fluid motion. The choice between these two hinges on your design style and the specific requirements of your project. For instance, if you're aiming for sharp, defined architectural elements, the Pen tool would be ideal. However, if you're sketching a naturalistic element like a leaf or a cloud, the Freehand tool offers greater flexibility.
Crafting Shapes: From Simple Lines to Complex Forms
The fundamental principle behind creating shapes in vector graphics software, including CorelDRAW, is the manipulation of points and lines. Vector art and illustrations are constructed from numerous points, lines, and shapes layered together to form diverse designs, ranging from simple graphics to elaborate, detailed drawings.
There are a few primary techniques to consider when creating shapes. The most fundamental method involves building shapes manually using points and lines. By strategically placing and connecting multiple points and lines, you can effectively form a shape. This method offers the highest degree of control and is essential for creating custom, unique forms.
Alternatively, most vector graphics software programs, including CorelDRAW, provide specialized “shape tools” that allow you to construct simple, pre-defined shapes quickly and efficiently. These are often referred to as geometric primitives. Common examples include the Rectangle tool and the Ellipse tool.
The Rectangle Tool: Building Blocks of Design
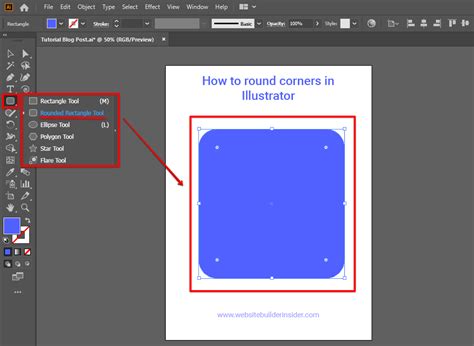
The “Rectangle tool” is a fundamental instrument that allows you to create perfect squares and rectangles with ease. After selecting the Rectangle tool from the toolbox, you can simply click and drag your cursor across the canvas to define the dimensions of your rectangle. Once the rectangle is drawn, its size and proportions can be further adjusted. Beyond basic dimensions, this tool forms the basis for more complex shapes, such as rounded rectangles, which can be achieved through specific property bar options.
For instance, in a CorelDRAW workflow, you might start by creating a new document and drawing a rectangle using the Rectangle Tool (F6). Subsequently, you can select this rectangle and, within the Property Bar, find options for altering the shape and radius of its corners. To further modify the shape's nodes, you can select a rounded rectangle and utilize the "Convert to Curves" function (Control-Q). This transformation allows for detailed manipulation of the shape's form.
The Ellipse Tool: Circles, Ovals, and Beyond
The “Ellipse tool” is similarly straightforward, enabling you to create circles, ellipses, and ovals. Most vector software, including CorelDRAW, offers keyboard shortcuts to assist in drawing a perfect circle while using the Ellipse tool. By clicking and dragging, you can define the aspect ratio of your ellipse. A key advantage of vector software is the ability to scale curved shapes like ellipses without any loss of image quality. This means you can enlarge or shrink an ellipse as much as needed, and it will always retain its crispness.
The process of creating an ellipse can be as simple as clicking with your mouse and then dragging the tool upward to form the desired shape. The degree to which an ellipse becomes elongated or circular is entirely up to your manipulation.
The Polygon Tool: Versatile Multi-Sided Shapes
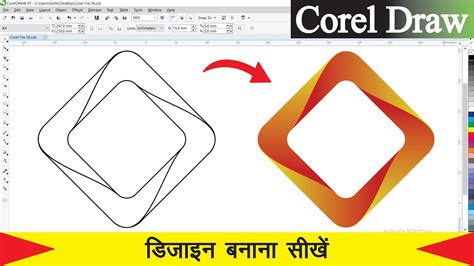
For more complicated, many-sided shapes, the “Polygon tool” is indispensable. Typically, polygonal shape presets are nested under the main Polygon tool in vector software. CorelDRAW, for example, offers convenient presets for a variety of common shapes, including stars, spirals, arrows, hearts, and other custom forms.
When using the Polygon tool, you have the ability to specify the number of sides your shape will possess. Furthermore, you can often choose whether to maintain equal side lengths or allow for variations, offering a high degree of customization.
Under the Polygon Tool (Y) in the Toolbox, a plethora of custom shape tools are available. For instance, you can select the Spiral Tool (A). By setting the number of Spiral Revolutions to 2 and choosing a Logarithmic Spiral, you can generate intricate spiral forms.
The Edit Shape Tools in CorelDRAW
Personalizing Your Shapes: Styles, Colors, and Fills
Once a shape is drawn, the ability to personalize it is crucial for achieving your desired aesthetic. CorelDRAW provides extensive options for customizing line styles, fill colors, and outlines.
Line Styles and Outlines
You can personalize your shapes by selecting from various line styles. Options such as solid, dotted, or dashed lines are readily available. It’s often best to choose your desired line style before you begin drawing, though these can also be modified after the shape is created. The "Properties" panel is instrumental in this regard, allowing you to modify outline styles, including thickness and color.
Fill Colors and Transparency
Beyond outlines, the fill of a shape is a significant design element. You can use the “Properties” panel to change the fill color, adjust the transparency, or modify outline styles after drawing your shape. This panel offers a comprehensive suite of controls for refining the visual appearance of your vector objects. To explore more advanced fill effects like gradients and shadows, a dedicated tutorial on fills, gradients, and shadows can provide deeper insights.
Customizing Color and Fill
The question of how to customize the color and fill of a shape is a common one for new users. The answer lies within the “Properties” panel, where you can easily change the fill color, adjust the transparency, or modify outline styles after your shape has been drawn. This ensures that your creative vision can be fully realized.
Refining Shapes: Nodes, Handles, and Advanced Editing
The true power of vector graphics lies in their editability. Shapes in CorelDRAW are not static; they are dynamic objects composed of nodes and handles that allow for precise adjustments.
Understanding Nodes and Handles
Nodes and handles are the key components that enable you to modify a shape after it has been drawn. Simply put, nodes are the anchor points that define the boundaries and curves of a shape, while handles are control arms that extend from these nodes, allowing you to manipulate the curvature and direction of lines.
To access these editing tools, you typically double-click on your shape. This action reveals its nodes and handles, transforming the shape into an editable object. You can then click and drag any point or vector curve control handle on your object to adjust its size and shape. This process allows you to fine-tune its appearance with great precision.
Node Editing Mode
What is node editing mode, and how do I use it? When you double-click on a shape, you enter node editing mode. In this mode, you can drag nodes and handles to customize points, proportions, angles, and more. This is where the true flexibility of vector editing shines, allowing for intricate modifications to even the most basic shapes.
Tweaking Shapes Post-Placement
Can I tweak shapes after placing them on the canvas? Absolutely! You can tweak and refine shapes at any time by clicking and dragging its anchor points, nodes, and handles. This non-destructive editing capability means you can continuously iterate on your designs without fear of permanently altering the original form.
To exit node editing mode, you can click on the “Finish Drawing” prompt at the bottom of the screen or simply click anywhere on your canvas. This allows for a seamless workflow between drawing, editing, and refining.

Practical Application: Creating a Simple Pumpkin Design
To illustrate the practical application of these tools, consider the process of creating a simple pumpkin design. This exercise integrates several core functionalities discussed.
- Start with a Rectangle: Begin by creating a new document and drawing a rectangle using the Rectangle Tool (F6).
- Round the Corners: Select the rectangle. In the Property Bar, adjust the corner radius to create a rounded rectangle.
- Convert to Curves: To gain more control over individual nodes, select the rounded rectangle and hit "Convert to Curves" (Control-Q).
- Shape the Pumpkin Body: Using the Pick Tool, scale the rounded rectangle inward to make it thinner, giving it a more pumpkin-like aspect ratio.
- Duplicate and Mirror: Copy and paste the shape. Select the copied shape and use the "Mirror Horizontally" option in the Property Bar. Place this mirrored shape next to the original to form the basic rounded segments of the pumpkin.
- Coloring the Pumpkin: Select each section of the pumpkin. In the Object Manager and Object Properties (Alt-Enter), change the Outline to "null" and set the Fill color to varying shades of orange. This creates a solid, vibrant pumpkin appearance.
- Adding Detail and Texture: Copy and paste the pumpkin group. Ungroup the objects (Control-U). With all segments still selected, apply the "Weld" function in the Property Bar. This merges the individual shapes into a single object.
- Using the Smear Tool: With the Smear Tool selected, choose "Pointy Smear" in the Property Bar. Drag the right side of the pumpkin towards a point to create a more organic, slightly irregular edge.
- Creating Leaves: Use the Ellipse tool to draw an ellipse for a leaf. You can then select this shape and, in the Property Bar, change it from an Ellipse to an Arc. Copy and paste this leaf shape and rotate it as needed. Create a second leaf by copying, pasting, and rotating.
- Adding the Stem: Place the stem underneath the main pumpkin sections. You may need to ungroup the pumpkin objects to position the stem correctly.
- Exploring Custom Shapes: Beyond basic tools, remember that under the Polygon Tool (Y), a wealth of custom shape presets exist. For instance, the Spiral Tool (A) can be used to create various spiral forms.
This step-by-step process demonstrates how CorelDRAW's shape tools, combined with editing functions like Weld and Smear, allow for the creation of recognizable objects from simple geometric primitives. You've now touched upon the Ellipse Tool, Rectangle Tool, Property Bar, Object Manager, Object Properties, and Smear Tool. The possibilities for creating objects with assorted polygons and custom shapes are vast.
CorelDRAW Go: Intuitive Shape Creation on the Go
For users who prefer a more streamlined or mobile experience, CorelDRAW Go offers an intuitive and flexible approach to creating shapes. Whether you're working on freehand designs or utilizing preset shapes, the process is designed to be smooth and accessible.
Getting Started with CorelDRAW Go Shapes
- Access Shapes: In CorelDRAW Go, click the “Shapes” icon located in your toolbox.
- Select and Place: Click on your desired shape, then click and drag on your canvas to determine its placement and size.
- Adjust Size and Proportions: Select your shape, then drag the red anchor points to adjust its size and proportions. You can customize dimensions by dragging these red anchor points or nodes.
- Advanced Editing: For more advanced edits, double-click on your shape to enter node editing mode. Here, you can use its nodes and handles to customize individual features, angles, and proportions.
- Exit Node Editing: To exit node editing mode, click on the “Finish Drawing” prompt at the bottom of the screen or anywhere on your canvas.
Customization within CorelDRAW Go
Can I customize the size and proportions of a shape? Yes, you can! You can adjust your shape’s size by dragging corners and edges as you normally would. Furthermore, you can customize proportions and dimensions by dragging its red anchor points or nodes.
The Flexibility of Node Editing
What is node editing mode, and how do I use it? When you double-click on a shape in CorelDRAW Go, you enter node editing mode. In this mode, you can drag nodes and handles to customize points, proportions, angles, and more. You can switch out of node editing mode at any time by clicking “Finish Drawing” or anywhere else on your canvas.
Continuous Refinement
Can I tweak shapes after placing them on the canvas? Absolutely! You can tweak and refine shapes at any time by clicking and dragging its anchor points, nodes, and handles. This continuous refinement capability ensures that your designs can evolve as your ideas develop.
Community and Resources
CorelDRAW Go aims to make design creation and customization as accessible as possible. If you need inspiration or assistance, the CorelDRAW Go community is an excellent resource for connecting with other users, sharing your work, and gaining valuable tips. For a closer look at how you can transform a shape with unique points and angles, exploring tutorials and trying out the software is highly recommended.
Conclusion: The Power of Shapes in Vector Design
In essence, mastering shapes in CorelDRAW is about understanding their fundamental nature as mathematical constructs and leveraging the software's tools to manipulate them effectively. From the precise control offered by the Pen tool to the quick creation of primitives with dedicated shape tools, CorelDRAW empowers users to build complex designs from simple elements. The ability to edit nodes and handles provides unparalleled flexibility, allowing for intricate adjustments and refinements. Whether you're using the full desktop version of CorelDRAW or the more accessible CorelDRAW Go, the principles remain the same: shapes are the building blocks of vector art, and a solid understanding of their creation and manipulation will unlock your potential to create bold, colorful, and scalable artwork for any application. The journey from understanding basic geometric primitives to layering various elements to create intricate designs is a rewarding one, and with CorelDRAW, that journey is both powerful and accessible.