Adding text to a Photopea project is a straightforward process, serving as a foundational element for many graphic design endeavors. However, to truly make that text pop and enhance its visual impact, the application of outlines, also known as strokes, is an indispensable technique. This guide delves deep into the various methods and nuances of adding outlines to text in Photopea, transforming simple characters into dynamic design components.
The Fundamentals of Text and Layer Styles in Photopea
Before we embark on the journey of adding outlines, it's crucial to understand the basic mechanisms of text creation and manipulation within Photopea. Adding text to a Photopea project is very easy to do. There are two primary types of text layers you can create: Point text and Paragraph text.
Point Text: This type of text is defined by a single point of origin. To create Point text, one simply selects the Type tool and clicks at the desired location on the canvas, which then becomes the starting point for the text.
Paragraph Text: In contrast, Paragraph text is defined by a rectangular bounding box. To create this, the user presses and drags the mouse to draw a rectangle on the canvas, and then releases the mouse. Within the created text layer, there will be two new symbols (points) on a curve: an 'X' symbol and an 'O' symbol. The text is then placed between them.
To enter a type layer for editing, one just needs to click on it with the Type tool. Newly created layers are entered automatically. When you have entered a type layer, many ways of editing are possible. You can select any text with a mouse, delete it, add new text, copy and paste, and so on. If you need to edit the actual text content, then you just need to double click on the text. Make sure all of the text is highlighted.
To escape the type layer and confirm or cancel your changes, you must use the buttons in the top menu. When you have entered a type layer, many ways of editing are possible. You can select any text with a mouse, delete it, add new text, copy and paste etc.
Resizing and Positioning Text
Once your text is in place, controlling its size and position is paramount. On the top of the page, under the main menu, there is a Size input field. Note that you can also click the arrow next to this box and use the slider. This is a great way to visually understand how big your text will be compared to other page elements. This slider tops out at 150px. A quick way to resize text is to switch to the Move tool (V). Clicking on the text will bring up a bounding box with 9 square nodes, allowing for intuitive resizing and repositioning. If you have 3 or more pieces of text, you can align the space between them either horizontally or vertically, ensuring a professional and organized layout.
The Power of Outlines: Enhancing Text Visibility and Style
Adding a border or stroke around a text's characters is a formatting method known as outlining. This can be done to draw attention to the text or to add a decorative element. Strokes can give a stylized look to your text and make it stand out in the design. A stroke is a line that encircles a layer, also known as a border. It is frequently used in graphic design and digital art to highlight or define an object's edges. Adding strokes or outlines can greatly improve your texts' visual appeal.
Method 1: Using Layer Styles for Single Outlines
The most common and versatile method for adding an outline to text in Photopea is by utilizing the Layer Style dialog box. This approach allows for extensive customization of the outline's appearance.
Steps to Add a Single Outline:
- Open your Image and Add Text: First, open your image in Photopea. You can use the shortcut Ctrl+O or Cmd+O. Once your image is open, select the Type tool and enter your desired text.
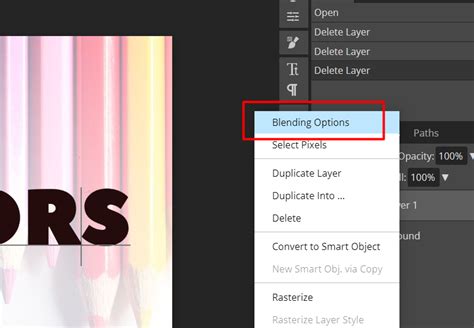
- Access Layer Styles: Right-click on the Type Layer in the Layers panel. From the context menu, choose "Blending Options."
- Activate the Stroke Option: The Layer Style dialog box will appear. On the left-hand menu, select "Stroke."
- Configure Stroke Settings: In the Stroke options, you will have full control over the look of the text border.
- Position: You will find three options for the position of the stroke: Inside, Center, and Outside. Choose the one that best suits your design needs.
- Blend Mode: You can control how the colored stroke interacts with the layers underneath by using the blend mode.
- Opacity: Adjust the transparency of the stroke.
- Size: This determines the width of the outline.
- Fill Type: This is where you define the appearance of the stroke itself. You have three primary options:
- Color: This option allows you to add a solid-colored stroke. Click on the color tile to open the Color Picker and select your desired hue. An uninterrupted line applied evenly along an object’s border is known as a solid stroke.
- Gradient: The Gradient Option allows you to apply a gradient to your stroke, offering a smooth transition of colors. You can adjust the gradient's settings within the Fill Type menu.
- Pattern: With the Pattern fill type option, you can fill the stroke with a repeating pattern. The pattern's angle and scale can be adjusted to fit your design.
By adjusting these settings, you can create a wide range of outline effects, from subtle borders to bold, eye-catching highlights.
Advanced Techniques: Multiple Outlines and Creative Applications
Photopea's flexibility extends to creating more complex text treatments, including multiple outlines with varying styles and colors. This can add depth and sophistication to your designs.
Method 2: Adding Multiple Outlines
There are two primary ways to add multiple strokes to your text in Photopea, both leveraging the Layer Styles feature.
Method 2a: Using the "Add a new layer style" button:
- Follow steps 1-3 from Method 1 to open the Layer Style dialog box and select "Stroke."
- Instead of closing the dialog box, look for a button labeled "Add a new layer style" (often represented by a plus sign or similar icon) within the Layer Style window.
- Click this button, and you will be able to add another "Stroke" effect. You can then configure this second stroke with different settings (color, size, position, etc.).
- Repeat this process to add as many strokes as desired, creating layered outline effects.
Method 2b: Duplicating the Type Layer:
- Create your text layer and add the first stroke using Method 1.
- Duplicate the Type Layer. You can do this by right-clicking on the Type Layer in the Layers panel and selecting "Duplicate Layer."
- With the duplicated layer selected, right-click again and choose "Blending Options."
- In the Layer Style dialog box, adjust the "Stroke" settings to create your second outline. You can change the color, size, and position of this new stroke independently.
- Repeat steps 2-4 for each additional outline you wish to add, adjusting the settings on each duplicated layer.
This method offers granular control over each individual stroke, allowing for intricate combinations of effects. For instance, you might have a thin black outline on the bottom layer, a thicker white outline on the layer above it, and a colored gradient stroke on the topmost layer, creating a pronounced 3D effect.
how to add black outline to text in photopea
Applying Outlines to Images
While this guide primarily focuses on text outlines, it's worth noting that the "Stroke" layer style can also be applied to image layers to add a border around the entire image. The steps are similar: import your image, go to Layer Styles, and activate the Stroke option. This can be a simple yet effective way to frame your photographic content.
Understanding Advanced Stroke Properties
Beyond the basic settings, Photopea offers deeper control over stroke behavior, enabling sophisticated design outcomes.
Stroke Position: Inside, Center, and Outside
The position of the stroke relative to the text's original shape is a critical design decision:
- Inside: The stroke is drawn inwards from the edge of the text, effectively reducing the visible area of the original text. This can make the text appear bolder.
- Center: The stroke is drawn with its center aligned to the edge of the text. Half of the stroke will be inside the text, and half will be outside.
- Outside: The stroke is drawn outwards from the edge of the text, increasing the overall size of the text object. This is often used to create a halo effect or to make text stand out significantly.
Fill Types: Color, Gradient, and Pattern
As mentioned earlier, the Fill Type for your stroke offers diverse visual possibilities:
- Solid Color: The most straightforward option, providing a uniform color border. This is excellent for creating clear, legible outlines.
- Gradient: This allows for dynamic color transitions within the stroke. You can choose from pre-defined gradients or create your own, controlling the colors, stops, and angles. This can add a sense of depth and dimension.
- Pattern: Applying a pattern to a stroke can introduce intricate textures and visual interest. Whether it's a subtle noise pattern or a repeating geometric design, this option opens up a realm of stylistic choices.
Blend Modes and Opacity for Subtle Effects
The Blend Mode and Opacity settings within the Stroke options allow for nuanced integration of the outline with the rest of your design. Experimenting with different blend modes (e.g., Multiply, Screen, Overlay) can create unique interactions between the stroke color and the underlying layers, leading to subtle yet impactful visual effects. Adjusting opacity allows you to control the prominence of the outline, making it a gentle enhancement or a dominant feature.
Photopea's Vector Tools and Outline Generation
While Layer Styles are the go-to for applying strokes to existing text, Photopea also boasts a suite of powerful vector tools that can be used to create shapes and paths that can then be filled or stroked. These tools offer a different approach to generating outlines, particularly for custom shapes or when precise path manipulation is required.
Photopea offers several tools for creating vector graphics: Pen, Free Pen, Rectangle, Ellipse, Polygon, and Custom Shape tools.
- Pen Tool: This tool allows you to create paths knot by knot. You press the mouse in the image area to add a knot. Then drag and release to add handles, or release immediately to keep handles collapsed. Clicking again on the first knot in the path will close the path. If there is one knot already selected, the new knot is added right after that knot (into the same path).
- Free Pen Tool: With this tool, you can click and drag with the mouse to draw a path with a specific shape. Your stroke will be converted into a smooth vector curve.
- Shape Tools (Rectangle, Ellipse, Polygon, Custom Shape): These tools allow you to draw predefined geometric shapes or import custom shapes from a gallery.
Each character, when converted to a path, becomes a series of knots that can be manually modified. This offers an advanced level of control, allowing you to sculpt the exact form of your outlines. While this is a more complex workflow than using Layer Styles, it provides unparalleled precision for highly customized designs.
Conclusion: Mastering Text Outlines in Photopea
Adding outlines to text in Photopea is a fundamental yet powerful technique that can significantly elevate the visual appeal and legibility of your designs. Whether you're aiming for a simple, clean border or a complex, multi-layered effect, Photopea's Layer Style options provide the tools to achieve your vision. By understanding the interplay of stroke settings, positions, fill types, and blend modes, you can transform ordinary text into striking design elements. With practice, adding stroke or outline to text becomes manageable and opens up a vast array of creative possibilities for diverse graphic design projects.