Subtitles are an indispensable element of modern video production, enhancing accessibility, engagement, and global reach for films, documentaries, and everyday YouTube content. DaVinci Resolve, a powerhouse in video editing, offers robust tools for integrating these crucial textual elements. This tutorial will demystify the process, guiding you through various methods to effectively add subtitles to your projects within this sophisticated software.
The Foundational Importance of Subtitles
Before delving into the technicalities, it's essential to understand why subtitles are so vital. For viewers, they unlock content previously inaccessible due to hearing impairments, loud environments, or language barriers. Beyond accessibility, subtitles can significantly boost viewer retention by providing a clear, on-screen reference to the audio. In a globalized digital landscape, accurate and well-timed subtitles are not just a feature but a necessity for reaching a wider audience, breaking down linguistic barriers, and ensuring your message resonates universally. They contribute to a more inclusive and professional presentation of any video, regardless of its intended purpose.

Method 1: Manual Text Element Integration
DaVinci Resolve provides a direct, albeit more labor-intensive, method for adding subtitles by treating each subtitle as an individual text element. This approach offers granular control but can become cumbersome for longer videos.
To begin, navigate to the Edit page within DaVinci Resolve. On the top-left side of the interface, you will find the Effects panel. From this panel, select the Text+ option (or simply "Text" depending on your Resolve version and workflow) and drag it onto your timeline. Once placed on the timeline, this text element will appear in the Viewer.
Now, focus on the Inspector panel, typically located on the right side of your screen. Within the Inspector, you will find a Rich Text input box. This is where you will type the actual text for your subtitle. Simultaneously, you can adjust the position of this text element directly within the Viewer to ensure it's placed appropriately on the screen, usually at the bottom.
The crucial step for creating subsequent subtitles using this method involves duplicating the existing text element. Select the text segment on your timeline. Then, hold down the "Alt" key on your keyboard (for Mac users, this typically corresponds to the "Option" key - the exact key may vary slightly based on your system configuration). While holding down the "Alt" key, click and drag the selected text segment to the right along the timeline. This action duplicates the text element, creating a new, independent subtitle. You can then modify the content within the Rich Text input box in the Inspector for this new segment, aligning it with the corresponding spoken dialogue or on-screen text in your video.
While this method provides precise control over each subtitle's appearance and timing, its primary drawback lies in its manual nature. You must input each subtitle individually, precisely matching the dialogue. This step-by-step process can be time-consuming, especially for videos with extensive dialogue or narration. For projects demanding efficiency, alternative methods become significantly more appealing.
Method 2: Utilizing the Dedicated Caption Track
A more streamlined and commonly adopted approach for subtitle creation in DaVinci Resolve involves leveraging the dedicated Caption track. This method is designed to simplify the process and improve efficiency.
To initiate this workflow, ensure you are on the Edit page. Look for an option to add a caption track. This is often initiated by clicking a button labeled "Create Caption" or a similar designation, which will add a new track specifically for captions to your timeline. Once this track is active, you can begin entering your subtitles directly.
As you listen to your video and identify a segment that requires a subtitle, you will type the corresponding text into the designated area, often within the Inspector panel, similar to the manual text method. After inputting the content for the current subtitle, you need to position the timeline indicator (the vertical line showing your current playback position) precisely at the end of that subtitle segment. With the indicator in place, click the "Add New" button (or a similar command) to create a new, blank subtitle entry immediately following the previous one. This creates a seamless sequence of subtitle entries.
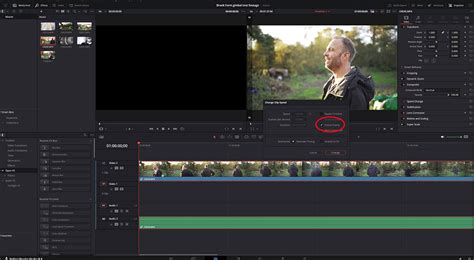
A significant advantage of the Caption track is the ability to manage the overall styling of your subtitles. If you wish to change the font, size, color, or alignment for the entire subtitle project simultaneously, you can do so by selecting the "Track" option within the Inspector panel when the caption track itself is selected. This feature allows for global style adjustments, saving considerable time compared to modifying each individual text element.
Optimizing Efficiency: Third-Party Software and SRT Files
For users who find the native subtitle creation tools in DaVinci Resolve still lacking in speed, particularly for large-scale projects, the integration of third-party subtitle software presents a powerful solution. These external tools are specifically designed for rapid subtitle generation and management.
A highly recommended option is CapCut. Known for its user-friendly interface and swift editing capabilities, CapCut can significantly accelerate the process of creating and timing subtitles. Other paid or free subtitle editing software also exist, each offering a range of features to streamline subtitle creation.
The key benefit of using these external tools is their ability to export subtitles in the widely compatible SRT (SubRip Text) file format. SRT files are plain text files that contain subtitle information, including the start and end times for each subtitle and the text itself.
Once you have created and exported your subtitles as an SRT file from your chosen third-party software (like CapCut), you can easily import them into DaVinci Resolve. Simply drag and drop the SRT subtitle file directly onto your timeline panel. DaVinci Resolve will automatically recognize the file and convert it into a functional subtitle track, populating it with your pre-made subtitles. This method bypasses the need for manual entry or duplication within Resolve, offering a massive time-saving advantage.
How to Save or Export SRT Subtitles (Captions) from CapCut for Windows PC and Mac
The Crucial Rendering Step: Exporting Your Video with Subtitles
Regardless of the method you use to create your subtitles within DaVinci Resolve - whether manual text elements, the dedicated caption track, or imported SRT files - there is one critical step to ensure your subtitles are actually included in your final exported video.
You must navigate to the Deliver page in DaVinci Resolve. This is where you configure your project's export settings. Within the Render Settings panel, locate the options related to subtitle export. It is imperative to check the "Export Subtitle" option. If this box remains unchecked, your subtitles, despite being meticulously added to your timeline, will not be burned into the final video file.
Once this option is enabled, you can proceed with rendering your video. The subtitles will then be permanently embedded into the video output, making them visible to your audience across various playback platforms.
Enhancing Your Workflow: Beyond Subtitles
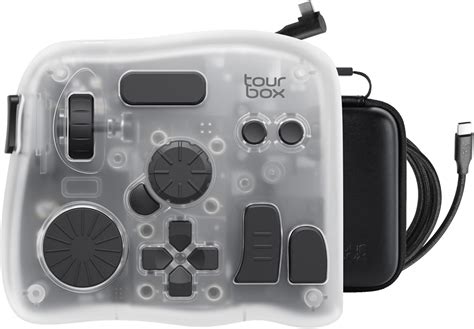
While mastering subtitle integration is a significant step in refining your video production workflow, DaVinci Resolve offers numerous avenues for further optimization. For instance, consider how you manage complex editing tasks. Tools like TourBox can revolutionize how you interact with editing software. By mapping Resolve shortcuts or TourBox's unique built-in features-such as HoverAdjust, which emulates the tactile feel of a professional grading console-to the device's buttons and knobs, you can gain unprecedented control. Imagine tweaking timeline settings, adjusting color-grading parameters, or even managing video playback with the intuitive feel of a game controller, all without constantly reaching for your mouse and keyboard. This level of customization can dramatically increase your editing speed and reduce physical strain.
Conclusion: Empowering Your Video Content
In summary, DaVinci Resolve provides a flexible and powerful environment for adding subtitles to your video projects. Whether you opt for the precise control of manual text elements, the efficiency of the dedicated caption track, or the speed of third-party SRT import, the software is equipped to handle your needs. Remember the critical step of enabling subtitle export on the Deliver page to ensure your hard work is visible to your audience. By mastering these techniques, you can significantly enhance the accessibility, professionalism, and reach of your video content, making it more engaging and impactful for a broader audience. The journey of optimizing your editing process is ongoing, and exploring tools that complement DaVinci Resolve, like dedicated controllers, can further elevate your creative output.