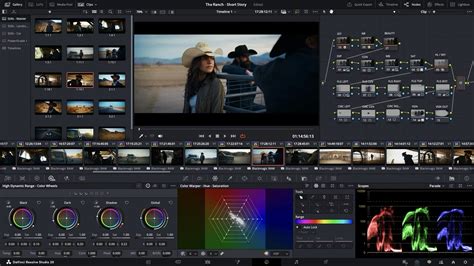
In the dynamic world of video production, clarity and accessibility are paramount. DaVinci Resolve, a powerful and versatile editing software, offers a comprehensive suite of tools to enhance viewer engagement through captions and subtitles. This article delves into the intricacies of creating, editing, and exporting these essential text overlays, exploring both manual and automated approaches within DaVinci Resolve, and highlighting how these features contribute to a more inclusive and engaging viewing experience.
Understanding Subtitles and Closed Captions in DaVinci Resolve
Subtitles and closed captions in DaVinci Resolve are more than just text on a screen; they are vital tools for broadening a video's reach. They serve as written translations for dialogue in foreign languages or as transcriptions of spoken words and significant sound effects, making content accessible to individuals with hearing impairments. This accessibility is crucial, especially considering that a significant portion of online viewers prefer subtitles, even when audio is available. Furthermore, subtitles can significantly boost a video's discoverability through search engine optimization (SEO), as search engines can index this text content.
In DaVinci Resolve, users have the flexibility to create subtitles and closed captions directly within the timeline or import them from external sources. The software supports a variety of common file formats for this purpose, including SRT, SCC, and others. Once integrated, these text elements can be meticulously edited and customized to align with the video's aesthetic and narrative. DaVinci Resolve also provides advanced tools for automatic speech recognition and transcription, which can dramatically expedite the subtitle creation process.
Adding Subtitles: Manual Creation in DaVinci Resolve
While DaVinci Resolve does not feature a standalone "subtitle tool" in the traditional sense, its "Titles" feature, combined with dedicated subtitle tracks, provides a robust method for manual subtitle creation. This approach is recommended for its simplicity, ease of use, and overall enjoyable workflow, especially when compared to using generic text generators for this purpose.
The Manual Subtitle Workflow
- Navigate to the Edit Workspace: Begin by opening your project and navigating to the "Edit" workspace. Within this environment, locate and select the "Effects" tab.
- Add a Subtitle Track: From the "Effects" window, choose "Titles." Scroll down the list of available title templates until you find "Subtitle." Drag and drop this onto the timeline, positioning it on a track just above your primary video and audio tracks. Alternatively, you can right-click above your timeline and select "Add Subtitle Track." To specify the starting point, move the playhead to the desired beginning of your subtitle, then right-click on the subtitle track and choose "Add Track."
- Input Your Subtitle Text: Select the newly added subtitle element. In the "Inspector" panel, which is typically located in the top right of the screen, you will find a "Caption" section. Here, you can type the dialogue that corresponds to the current frame of your video.
- Adjust Subtitle Duration: To ensure accurate synchronization, you need to adjust the length of the subtitle. Click and drag the right-hand edge of the subtitle track on the timeline until it precisely aligns with the beginning and end of the spoken audio segment.
- Repeat for All Subtitles: Continue this process for every line of dialogue or significant sound effect that requires a subtitle. For each new subtitle, select "Add New" within the Inspector window to create a subsequent caption entry.
- Stylize Your Subtitles: Once all your subtitle text has been entered and timed, you can customize their appearance to enhance legibility and match your video's style. Within the Inspector panel, navigate to the "Track" tab. Here, you have extensive control over various styling options, including font type, stroke (outline), and positioning. You can also add effects like background colors or drop shadows to make your subtitles stand out more prominently against different video backgrounds.
It's important to note that as of recent versions of DaVinci Resolve, there aren't default keyboard shortcuts specifically for editing subtitles. This means that adding subtitles and switching between them typically requires mouse interaction. However, users can create custom keyboard shortcuts for actions like "Add Subtitle" by accessing the keyboard customization settings within the DaVinci Resolve menu.
Automatic Subtitle Generation (DaVinci Resolve Studio Exclusive)
For users of the paid DaVinci Resolve Studio version, the software offers a powerful, time-saving feature: automatic subtitle generation from audio. This capability leverages advanced voice recognition technology to process your video's audio track and create subtitles with remarkable speed and accuracy.
The Automatic Subtitle Workflow
- Initiate Subtitle Creation: When you're ready to generate subtitles, navigate to the "Timeline" menu. From the dropdown options, select "AI Tools" and then choose "Create Subtitles from Audio."
- Configure Settings: A pop-up window will appear, offering several configuration options. You'll need to select the primary language of your audio (currently, English is the primary supported language, with potential for future expansion to other languages). You can also choose a "Caption Preset" which influences the visual style, and set the "maximum number of characters per line." The default for maximum characters per line is 18, which is generally a good starting point for readability.
- Generate Subtitles: After configuring your settings, click "Create." DaVinci Resolve will then initiate a process to analyze the audio and generate the subtitles. This process can take anywhere from a few seconds to several minutes, depending on the length of your video and your system's processing power.
- Stylize Your Subtitles: Once the automatic generation is complete, a new subtitle track will appear on your timeline populated with the generated captions. Select this subtitle track and go to the "Inspector" panel. Here, you can refine the appearance of your subtitles by customizing the font, outlines, and other effects to achieve your desired look. You also have the ability to adjust the timing of individual subtitles if the AI generator has made any minor errors.
- Animate Your Subtitles (Optional): To further enhance viewer engagement, DaVinci Resolve offers options for animating your subtitles. By navigating to the "Effects" library and dragging the "Word Highlight" effect onto your subtitle track, you can create dynamic animations that highlight the word currently being spoken. Experiment with the background color and other parameters of this effect to make your subtitles "pop" and keep your audience captivated.
Third-Party Solutions for Auto-Captions and Subtitles
While DaVinci Resolve's built-in features are powerful, external tools and plugins can further enhance the subtitle creation workflow, especially for users seeking advanced automation or specialized functionalities.
One notable third-party option is Simon Says, an extension that offers automatic transcription and can color-code dialogue by speaker. This allows users to import transcripts as subtitles or captions directly into DaVinci Resolve. This tool is available for both Mac and Windows, though Windows users may require DaVinci Resolve Studio for full functionality. The workflow typically involves exporting a project file, transcribing the audio, and then importing the resulting subtitle track.
Alternatively, users can leverage standalone third-party software to generate subtitle files, such as SRT, which can then be imported into DaVinci Resolve. This method offers flexibility in choosing transcription services or software that best suits individual needs and budgets. Once an SRT file is generated, it can be easily dragged and dropped into the DaVinci Resolve timeline, where it will automatically be recognized and converted into a subtitle track.
Advanced Captioning Techniques and Considerations
Beyond basic subtitle creation, DaVinci Resolve provides advanced features that allow for more sophisticated captioning and a more polished final product.
Transcription and Text-Based Editing
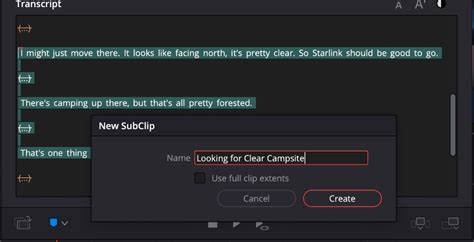
DaVinci Resolve 18.5 introduced significant advancements in audio transcription. By selecting "Transcribe Audio" from the media pool, users can generate a text-based transcription of their entire video. This transcription is not just a simple text dump; it's an interactive document. Clicking on a word in the transcription window will jump the playhead directly to that specific moment in the video, enabling precise editing and clip selection. This functionality opens the door to text-based editing, where you can essentially edit your video by manipulating the transcribed text. You can create sub-clips, add markers, and even insert or append content directly from the transcription interface.
Dynamic Zoom and Picture-in-Picture Effects
While not directly related to subtitles, features like Dynamic Zoom and Picture-in-Picture (PiP) effects can complement the viewing experience by adding visual interest. Dynamic Zoom allows for the creation of subtle push-in or pull-out animations without requiring complex keyframing, adding a professional touch to otherwise static shots. PiP effects, easily created by stacking clips and using on-screen controls or inspector settings, can be used to overlay supplementary visuals, which can sometimes include text or graphics that function similarly to captions.
Stabilization and Smooth Cut Transitions
For videos with shaky camera work, DaVinci Resolve's built-in stabilization tools can smooth out unwanted motion. This is crucial for maintaining viewer comfort and focus. Furthermore, the "Smooth Cut" transition employs advanced optical flow analysis to seamlessly eliminate jarring jump cuts, presenting a more continuous and professional visual flow, which indirectly benefits the clarity of any accompanying subtitles.
Retiming and Speed Ramps
The ability to create speed ramps â variable speed changes within a single clip â can add dramatic effect and pacing to a video. Whether slowing down for emphasis or speeding up for montage sequences, these retiming controls, with options for optical flow, frame blending, and nearest frame rendering, ensure smooth and high-quality results. This dynamic pacing can be further enhanced by well-timed subtitles that adapt to the on-screen action.
Adjustment Clips for Global Effects
Adjustment clips provide a powerful way to apply effects or color corrections across multiple clips in the timeline. By placing an adjustment clip on a higher video track, any effect applied to it will affect all the clips positioned beneath it. This is incredibly useful for applying a consistent visual style or an analog film look across a series of clips, ensuring a cohesive aesthetic that can also be complemented by uniformly styled subtitles.
Multicam Editing for Complex Projects
For projects involving multiple camera angles, DaVinci Resolve's multicam editing features are invaluable. The multicam viewer allows editors to see all camera feeds simultaneously, facilitating quick and accurate switching between angles. This is particularly useful for live events or interviews where different perspectives are captured. Accurate syncing via audio waveforms, timecode, or in/out points ensures that edits are precise, and subtitles can be applied consistently across all angles.
Scripting and Console Access
While DaVinci Resolve may not offer extensive one-click scripting for all functions, its built-in Console provides a pathway for programmatic control. Supporting Lua, Python 2, and Python 3, the Console can be used to automate certain tasks, including the generation of subtitle elements. This advanced capability allows for custom workflows and integration with external scripting tools, offering a high degree of flexibility for technically inclined users.
How To Master Text Animation In Davinci Resolve (Under 1 Minute)
Exporting Your Video with Subtitles
Once your video is edited and your subtitles are finalized, the next crucial step is exporting your project. DaVinci Resolve offers two primary methods for handling subtitles during export:
- Burn-in Subtitles: This option embeds the subtitles directly into the video frames. The subtitles become a permanent part of the video image and will always be visible. This is ideal for platforms like YouTube or social media where external subtitle files might not be supported or desired.
- Separate Subtitle File: Alternatively, you can export your subtitles as a separate file (e.g., an SRT file) alongside your video. This allows viewers to toggle subtitles on or off as needed and is essential for platforms that support external subtitle tracks.
To export with subtitles, navigate to the "Deliver" page in DaVinci Resolve. Select your desired export format (e.g., MP4 or MOV) and then, within the subtitle settings, check the "Export Subtitles" box. You can then choose whether to burn them in or export them as a separate file. Finally, add your project to the render queue and initiate the rendering process.
Conclusion: Enhancing Accessibility and Engagement
DaVinci Resolve's comprehensive suite of tools for creating and managing subtitles and closed captions empowers creators to make their content more accessible, engaging, and discoverable. Whether opting for manual creation, leveraging the Studio version's automated features, or integrating third-party solutions, the ability to add clear, well-timed, and stylistically appropriate text overlays is a critical component of modern video production. By mastering these features, editors can ensure their stories resonate with a wider audience, transcending language barriers and catering to diverse viewing preferences.