Color grading is a crucial post-production process that transforms raw footage into a visually compelling narrative. Filmmakers have long understood the profound impact color has on evoking emotions and shaping the atmosphere of a scene. Even subtle shifts in color can drastically alter the viewer's perception, much like the role of music in an opera. This tutorial delves into the intricate world of color grading within DaVinci Resolve, a powerful and industry-standard software, guiding beginners through its essential tools and techniques.
Understanding the DaVinci Resolve Workspace
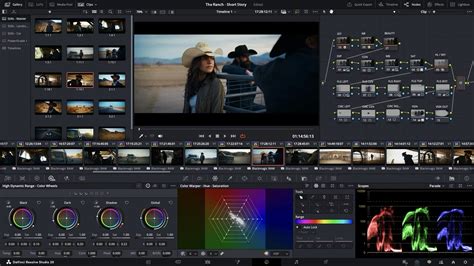
Upon opening DaVinci Resolve and navigating to the Color page, you'll encounter a comprehensive workspace designed for meticulous color manipulation. If your interface appears different from expected, or if workspaces have been inadvertently closed, DaVinci Resolve offers an easy way to reset the layout to its default configuration.
Each media clip displayed in the timeline has a numeric identifier in its top-left corner. This identifier is surrounded by a frame that visually indicates whether the clip has undergone color adjustments. An uncolored frame signifies that the clip is in its original, ungraded state, while a colored frame denotes that color grading has been applied. For instance, Media 1 and Media 2 might show colored frames, indicating they have been graded, whereas Media 3 and Media 4 remain ungraded with their frames uncolored. The track number, indicating the clip's position, is visible in the top right corner of each media clip.
Essential Workspaces on the Color Page
The Color page itself is divided into several key workspaces. On the left, the Gallery workspace serves as a repository for saving screenshots of your color grading work. These saved stills can be exported by right-clicking on them and selecting "Export." Adjacent to the Gallery is the LUTs workspace, offering access to Look-Up Tables, which are pre-defined color grading presets.
On the right side of the interface, you'll find the Nodes workspace. Nodes might seem daunting to those new to DaVinci Resolve, especially if they are accustomed to layer-based editing. However, the node-based system in DaVinci Resolve offers a powerful, non-destructive workflow. Each node represents a distinct step in the color grading process. When you create a new node, you can perform further color adjustments based on the output of the preceding node, building a complex grade incrementally until the final desired look is achieved.
Below the Color Page viewer, the color grading tool panel houses a rich array of tools. While DaVinci Resolve boasts a vast selection, it's important to note that you don't need to master every single tool to achieve professional results.
Core Color Grading Tools in DaVinci Resolve
DaVinci Resolve provides a suite of powerful tools to manipulate color and exposure. Understanding these core components is fundamental to mastering the art of color grading.
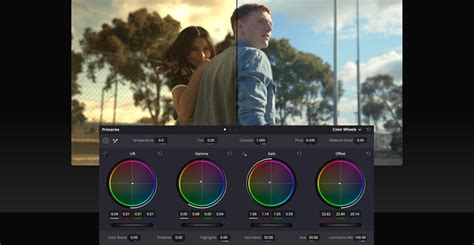
Primary Color Wheels
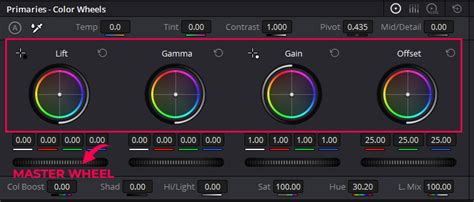
The Primary Wheels are your foundational tools for adjusting the overall color and brightness of your footage. Each wheel corresponds to a specific tonal range: Lift (shadows), Gamma (midtones), and Gain (highlights).
- Color Adjustment: By clicking and dragging the small dot within each Primary Wheel, you can shift the color balance of its corresponding tonal range.
- Brightness Control: Below each Primary Wheel, a gear icon acts as a master control for the brightness (or "lift," "gamma," or "gain") of that specific region. Clicking and dragging this icon adjusts the overall level.
- Value Adjustments: Surrounding the Color Wheels workspace are numerical values that can be directly adjusted. Clicking on these values and dragging your mouse while holding the left button allows for precise numerical adjustments.
While the functions of these controls might overlap with other tools, they offer a direct and intuitive way to shape the fundamental look of your footage.
White Balance and Auto Balance
If your clips exhibit noticeable color casts - where areas that should appear white are tinged with color - the white balance tool is your solution. By clicking on a pure white object within your clip, DaVinci Resolve attempts to neutralize the color cast. For a more automated approach, the "Auto Balance" button, located next to the white balance tool, offers a one-click solution to automatically color grade your footage. A before-and-after comparison of a screenshot after using the "Auto Balance" feature can dramatically illustrate its effectiveness.
At the top right of the Color Wheels workspace, a "Reset All" button provides a quick way to revert all Primary Wheel adjustments to their default state.
Curves Tool
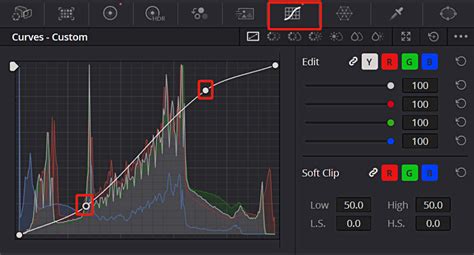
The Curves tool is another indispensable color grading instrument in DaVinci Resolve, offering more granular control than the Primary Wheels. The curve itself represents the tonal range of your image, with the left side representing shadows and the right side representing highlights.
- Adjusting Shadows: Placing a point on the left side of the curve (shadows) and pulling it down will deepen the shadows, enhancing contrast.
- "S" Curve: A common technique is to create an "S" shaped curve. This involves lifting the midtones and highlights slightly while dropping the shadows, which generally increases contrast and perceived sharpness.
- Customization: The use of the Curves tool extends far beyond the "S" curve. Within the Curves tool interface, you'll find options for different sub-interfaces, allowing you to explore various curve modes and tailor adjustments to specific aspects of your image.
Primary vs. Secondary Color Grading
Understanding the distinction between primary and secondary color grading is crucial:
- Primary Color Grading: This involves making global adjustments that affect the entire image, such as overall exposure, contrast, and color balance, typically using the Primary Wheels and basic curves.
- Secondary Color Grading: This focuses on controlling specific areas and colors within the footage. Tools like qualifiers, power windows, and specific curve adjustments allow for targeted modifications, such as changing the color of a specific object or enhancing a particular part of the image.
DaVinci Resolve offers a wealth of tools for secondary grading, and while this tutorial won't delve into every single one, exploring them is highly encouraged.
The Importance of Scopes in Color Grading
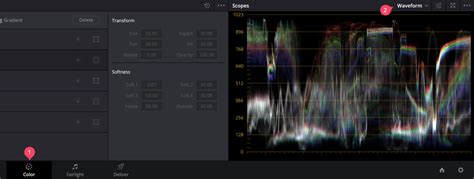
Relying solely on your eyes for color judgment during grading can be misleading, as monitor calibration and ambient lighting can significantly influence perception. This is where Scopes become indispensable. DaVinci Resolve's Scopes provide objective, data-driven insights into your image's luminance and color values.
The Waveform Scope
For beginners, the Waveform scope is arguably the most useful. It displays the luminance (brightness) levels of your image.
- Black and White: The bottom of the waveform represents pure black (0% luminance), while the top represents pure white (100% luminance).
- Pixel Distribution: By examining the waveform, you can see where the pixels of your clip are concentrated. For instance, if the waveform shows a concentration in the middle, it suggests a balanced exposure. If it's clustered at the bottom, the image is underexposed; if at the top, it's overexposed.
- Adjusting Exposure: You can use the waveform to guide adjustments to exposure. For example, dragging the gear icon under the "Gain" section in the Color Wheels workspace to the right will increase the brightness, pushing the waveform upwards.
Other Useful Scopes
While the Waveform is paramount for beginners, DaVinci Resolve offers other valuable scopes:
- Parade Scope: Similar to the waveform, but it separates the red, green, and blue (RGB) channels, allowing for precise color balance adjustments.
- Vectorscope: Displays color information (hue and saturation) in a circular graph, useful for ensuring skin tones are within a desirable range and for monitoring color saturation.
- Histogram: Provides a graphical representation of the tonal distribution across the entire image, showing the number of pixels at each luminance level.
- Chromaticity Scope: Helps determine if colors fall within the boundaries of your project's delivery format, particularly important for broadcast or specific color spaces.
Workflow: Color Correction vs. Color Grading
It's essential to differentiate between color correction and color grading.
- Color Correction: This is the foundational step, focusing on accuracy and neutrality. It involves ensuring that your whites appear white, blacks appear black, and overall exposure levels are correct. It's about fixing issues and creating a balanced starting point.
- Color Grading: This is the more creative phase, where you intentionally add color and style to your footage to evoke specific emotions or establish a particular aesthetic. This is where subjective artistic choices come into play.
The general rule of thumb is to always perform color correction before color grading. Attempting to grade footage that is not properly corrected can lead to undesirable results and make the grading process significantly more challenging.
Setting Up Your Project for Success
Before diving into the Color page, ensuring your project is set up correctly is vital.
- DaVinci Resolve Preferences: Access DaVinci Resolve Preferences (usually via the "DaVinci Resolve" menu on Mac or "File" menu on Windows).
- General Settings: On Mac, consider checking "Use Mac display color profiles for viewers" for more accurate color representation.
- Save: Apply any general preference changes.
- Timeline Settings: Navigate to your timeline settings (often by right-clicking on the timeline in the Media Pool or Edit page) and go to the "Color" tab.
- Color Science: Set the Color Science to DaVinci YRGB.
- Color Space: For most broadcast and online content, Rec. 709 is the industry standard color space.
- Project Settings: Access Project Settings (usually via the gear icon in the bottom right of the Edit page or via the File menu).
- Color Management: Within Project Settings, find "Color Management."
- Color Science: Ensure the Color Science is set to DaVinci YRGB.
- Color Space: Again, set this to Rec. 709 or your target color space.
These settings ensure that DaVinci Resolve interprets and processes your footage consistently according to industry standards.
Working with Log Footage and Color Space Transforms
Many professional cameras, like the Sony A7S III mentioned in the provided text, shoot in log profiles (e.g., S-Log3). Log footage is designed to capture the maximum dynamic range (the difference between the brightest and darkest parts of an image) by recording a flatter, desaturated image. This provides more data in the highlights and shadows, allowing for greater flexibility during post-production.
However, log footage appears "washed out" and requires conversion to a standard color space like Rec. 709 for viewing and grading.
Using LUTs for Conversion
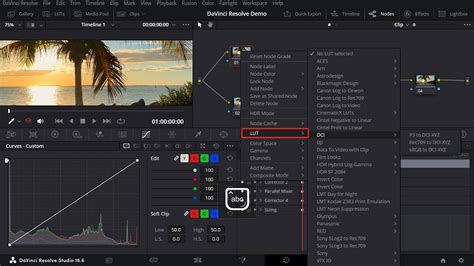
A common method for converting log footage is by using Look-Up Tables (LUTs).
- Apply LUT: In DaVinci Resolve, right-click on the node containing your log footage and navigate to "LUTS."
- Select Conversion: Choose the appropriate LUT for your camera's log profile and target color space (e.g., "Sony S-Log3 to Rec. 709"). Applying this LUT will transform your footage to a more viewable state with increased contrast and saturation.
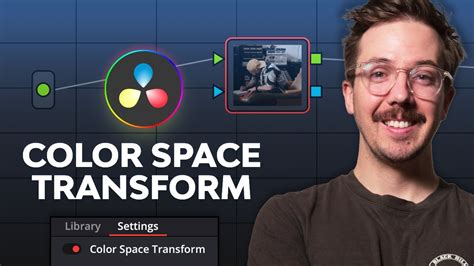
Using Color Space Transform
Alternatively, you can use the Color Space Transform effect for more precise control.
- Add Effect: Go to the "Effects" tab, search for "Color Space Transform," and drag it onto your node.
- Configure Settings: In the effect's settings, you'll specify the Input Color Space and Input Gamma (corresponding to your camera's settings, e.g., Sony S-Gamut3.Cine and Sony S-Log3). Then, set the Output Color Space to Rec. 709 and the Output Gamma (often 2.4 for broadcast).
Both methods achieve a similar result, with the Color Space Transform offering more granular control if a specific LUT isn't available or doesn't produce the desired outcome.
Structuring Your Nodes for Optimal Grading
The node-based workflow in DaVinci Resolve allows for a structured and organized approach to color grading. A common and effective practice for beginners is to establish a clear node order.
- Pre-Conversion Adjustments: It's a misconception that all adjustments should happen after the color space conversion. In fact, performing basic adjustments like exposure and white balance before the conversion can be beneficial, as you're working with more image data in the log format. However, it's crucial to ensure these adjustments don't clip your highlights or crush your shadows excessively.
- Color Space Transform Node: This node is essential for converting your footage from its native log format to a standard color space like Rec. 709.
- Color Correction Node: After the conversion, create a dedicated node for primary color correction. This is where you'll fine-tune exposure, white balance, contrast, and make any necessary corrections to make the image look natural and balanced. Labeling this node "CC" (Color Correction) or "Balance" is good practice.
- Color Grading Node: Following the correction node, create another node specifically for creative color grading. This is where you'll apply your stylistic choices, enhance colors, and create the desired mood or look for your footage. Labeling this node "Grade" or "Look" is recommended.
This structured approach ensures that corrections are made first, followed by creative grading, maintaining image integrity and workflow clarity.
Node Organization and Labeling
While you can create multiple nodes for each specific adjustment (e.g., one for exposure, one for white balance, one for contrast), for simplicity, especially when learning, combining several primary correction adjustments within a single node is often sufficient. The key is to label your nodes clearly. This might seem minor, but it significantly aids in organizing your workflow, especially on complex projects. Names like "Rec. 709," "CC," "Grade," "Sky Enhance," "Skin Tone," or "Glow" help you quickly identify the purpose of each node.
How to Nodes Davinci Resolve basics tutorial
Practical Color Correction and Grading Example
Let's walk through a practical example, applying the principles discussed.
Scenario: We have a sunset shot with a skateboarder, captured in S-Log3 on an A7S III. The initial footage is desaturated and lacks contrast.
- Project Setup: Ensure your project is set to DaVinci YRGB Color Science and Rec. 709 color space.
- Color Space Transform: Add a Color Space Transform effect to the first node. Set the input to "Sony S-Gamut3.Cine" and "Sony S-Log3," and the output to "Rec. 709" and "Gamma 2.4." Your footage should now have more apparent contrast and saturation. Label this node "CST."
- Color Correction Node: Add a new node after the CST node (shortcut Alt+S or Option+S on Mac). Label it "CC."
- Curves Tool: Open the Curves tool. The image appears dark, particularly the shadows.
- Lift Adjustment: Go to the Lift section of the Color Wheels (or the corresponding area on the Curves tool) and pull it up to brighten the shadows.
- Gamma Adjustment: Adjust the Gamma (midtones) to further refine the overall brightness.
- Gain Adjustment: You might slightly lower the Gain (highlights) to preserve detail in the sunset, as the goal is to feature the sunset and the skateboarder.
- White Balance: Use the white balance tool and click on a neutral area (if available) or a known white/grey object. Since the footage is a sunset, you might want to lean into the warmth.
- Temperature/Tint: Manually adjust the temperature towards warmer tones (orange/red) to enhance the sunset. You might also adjust tint if there's a green or magenta cast.
- Contrast: Slightly lower the contrast if needed to reveal more detail in the shadows.
- Color Wheels: Experiment with the color wheels. You might bring up the midtones (Gamma) slightly closer to red to emphasize the sunset's color. In the shadows, you might add a touch of blue or a darker tone to maintain black levels. The Offset wheel can help balance the overall image.
- Color Grading Node: Add another node after the "CC" node. Label it "Grade."
- Hue, Saturation, Luminance (HSL): You might want to enhance the reds and oranges of the sunset. Use the HSL qualifiers or the Hue vs. Hue, Hue vs. Saturation, or Hue vs. Luminance curves to target specific colors. For example, you could select the oranges and subtly shift them towards red, or increase their saturation.
- Saturation: Increase the overall saturation to make the sunset more vibrant.
- Curves for Stylization: Use curves to further sculpt the image. You could lift the reds in the highlights to make the sky more intense, or deepen the blues in the shadows for a more dramatic feel.
- Glow Effect (Optional): For a more ethereal look, you could add a "Glow" effect from the Resolve FX library to a new node. Adjust its intensity and spread to achieve a subtle bloom effect, particularly in the highlights.
Comparing Your Work
To assess your progress, use the "Bypass Color Grades and Fusion Effects" option (shortcut Command+D or Control+D on PC) in the media viewer. This allows you to quickly toggle your grades on and off, providing a clear comparison between the ungraded and graded footage. For a full-screen view, use Command+F (or Control+F on PC).
Advanced Techniques and Considerations
As you become more comfortable with the basics, you can explore more advanced techniques:
Secondary Grading with Qualifiers and Power Windows
- Qualifiers: These tools allow you to isolate specific colors, saturation levels, or luminance ranges within your image. You can then apply adjustments only to that selected area. This is invaluable for fine-tuning specific elements, like changing the color of a shirt without affecting the rest of the scene.
- Power Windows: Power Windows enable you to define specific areas of the image by drawing shapes (circles, squares, custom shapes using the pen tool) around them. These windows can then be tracked to follow moving objects, allowing for localized color adjustments or effects.
- Tracking: DaVinci Resolve's powerful tracker can automatically animate Power Windows to follow movement in your footage, saving significant time and effort.
Resolve FX and Plugins
DaVinci Resolve includes a vast library of GPU and CPU accelerated Resolve FX plugins. These offer a wide range of effects, from blurs and glows to sophisticated beauty and restoration tools. You can drag and drop these effects onto your nodes to enhance your footage.
HDR Grading
For projects utilizing High Dynamic Range (HDR) formats, DaVinci Resolve Studio offers advanced tools. This includes support for Dolby Vision, HDR10+, and HDR Vivid metadata, along with specialized HDR palettes and monitoring capabilities. The 32-bit image processing ensures the highest quality results when working with wide color gamut and HDR imagery.
RAW Footage Control
When working with RAW footage from cameras, DaVinci Resolve provides a dedicated RAW palette. This allows you to control parameters like highlight recovery, white balance, gamma, exposure, and color temperature directly from the sensor data, offering unparalleled flexibility in a non-destructive manner.
Face Refinement and Beauty Tools
DaVinci Resolve Studio includes specialized tools for face refinement and beauty work. The Face Refinement tool can automatically detect and track faces, allowing for targeted adjustments like eye enhancement, blemish removal, and skin smoothing. The ResolveFX Beauty tool offers advanced corrective capabilities with ultra beauty mode for natural-looking results.
Object Removal and Patch Replacer
Advanced tools like the Object Removal plug-in and the Patch Replacer allow you to meticulously remove unwanted elements from your shots. By combining Power Windows, tracking, and AI-powered analysis, you can seamlessly erase objects or blemishes. The Patch Replacer acts as a sophisticated cloning tool, enabling precise pixel manipulation.
RGB Mixer
The RGB Mixer provides granular control over the presence of red, green, and blue components within your image, offering a powerful way to fine-tune color balance and create unique color transformations.
The Creative Journey of Color Grading
Ultimately, color grading is an art form. While technical proficiency with tools like DaVinci Resolve is essential, the ultimate video style is determined by your creative decisions. The process can be lengthy and arduous, but it leads to a destination where you can imbue your footage with emotion and tell your story more effectively.
The significance of color in visual storytelling cannot be overstated. It's a powerful tool that, when wielded with understanding and creativity, can elevate your projects from mere recordings to captivating cinematic experiences. The challenge lies in mastering the tools and techniques to achieve your desired aesthetic.
To truly grasp the power of color grading in DaVinci Resolve, nothing beats hands-on practice. Select some of your favorite film and video clips, dive into the software, and start experimenting. The journey of learning color grading is one of continuous exploration and refinement, leading to increasingly compelling visual narratives.