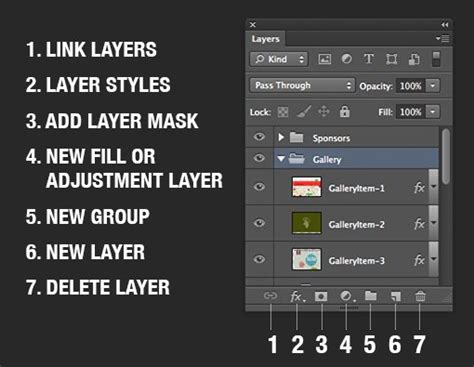
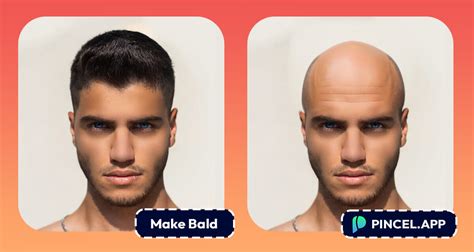
Ever wondered what you'd look like with a shaved head? We've all had those moments of contemplating a drastic change in appearance. While the decision to shave one's head is a significant one, photo editing offers a playful and insightful way to explore this aesthetic. This article will guide you through various methods to create a bald look using photo editing techniques, from fundamental Photoshop skills to advanced AI-powered tools. Mastering Photoshop's core features is essential for successful image transformations. The Layers panel, typically located on the right side of your workspace, is where we manage different elements of our image. For bald transformations, we frequently utilize the Brush tool, Eraser, and Clone Stamp. Layers are fundamental to non-destructive editing in Photoshop, allowing for adjustments without permanently altering the original image data. Layer masks are particularly useful for bald transformations. We use them to hide parts of a layer without deleting them, offering immense flexibility. To create a layer mask, we select the desired layer and click the "Add Layer Mask" button at the bottom of the Layers panel.
Preparing Your Canvas: The Foundation of Realism
Attention to detail is crucial for creating a realistic bald look in Photoshop. Before diving into the bald transformation process, proper photo preparation is crucial. Choosing an appropriate photo is the first step in creating a realistic bald look. We recommend using a high-resolution image with good lighting and a clear view of the subject's face and head. Look for photos where the subject's hair isn't covering too much of their forehead or ears. A clean background makes the editing process smoother and more convincing. If the original background is important, we can use the Clone Stamp tool to remove any stray hairs or distracting elements. Alternatively, you can create a new layer for the background and fill it with a solid color or simple gradient for a cleaner look.
The Manual Method: Sculpting a Bald Head with Photoshop Tools
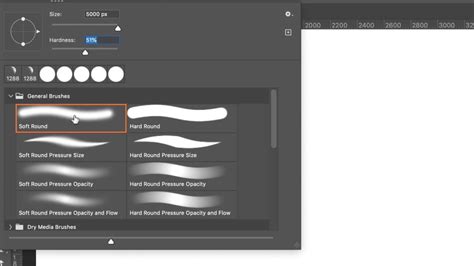
Achieving a convincing bald appearance in Photoshop requires attention to detail and careful editing techniques. One of the most effective manual approaches involves the strategic use of Photoshop's foundational tools. We start by selecting a soft round brush with low opacity. Gradually build up the bald effect by painting over the hair in small, circular motions. For a more realistic look, we vary the brush size. Smaller brushes work well for detailed areas like the hairline and temples. We recommend using a tablet with pressure sensitivity for optimal control, as it allows for more nuanced brush strokes.
Accurate skin tone matching is crucial for a believable bald look. We use the eyedropper tool to sample colors from the subject's face and neck. Creating a custom swatch palette with various skin tones helps maintain consistency throughout the editing process. For added realism, we incorporate subtle variations in tone, as skin is rarely a uniform color. Head shape plays a vital role in creating a convincing bald appearance. We carefully observe and enhance the natural contours of the skull. Using a low-opacity brush, we add subtle shadows along the sides of the head and at the nape of the neck to define the form. We also pay attention to how light interacts with a bald head. Adding a soft shine to the top of the scalp can enhance the realism of the edit, mimicking the way light reflects off smooth surfaces.
Creating a bald look in Photoshop requires precision and attention to detail. First, we open our image and duplicate the background layer. This ensures we have a backup and can work non-destructively. We then select the area of the head where the hair is. This can be done using various selection tools like the Pen Tool for precise edges or the Lasso Tool for quicker, more organic selections. Once the hair is selected, we can convert this path to a selection and create a new layer mask. Using the Brush Tool with a soft edge, we paint with black on the mask to hide the hair, revealing the underlying skin or a new skin layer. To add realism, we apply subtle shadows and highlights. We zoom in close to the hairline and use the Refine Edge tool to smooth out any harsh transitions between the skin and the masked-out hair area. We pay special attention to areas like the temples and nape of the neck, where hair typically tapers off. To enhance realism further, we can add some fine "peach fuzz" using a custom brush with scattered settings. This subtle detail helps integrate the bald area with the rest of the face, making the transition appear more natural.
Mastering High-End Beauty Retouching - Advanced Techniques for Flawless Results ( Photoshop )
Leveraging AI: The Future of Digital Transformations
AI-powered filters and tools have revolutionized the process of visualizing baldness in photos. AI filters have made it easier than ever to see how you'd look without hair. Many platforms offer this capability, making it accessible to a wide range of users. For instance, LightX provides a free AI bald filter that allows users to preview a shaved head look instantly with just a few clicks. Auto-detection is a key feature in AI-powered baldness simulators, enabling the software to accurately identify the head and hair areas for transformation.
Adobe Photoshop's Neural Filters, powered by AI, offer advanced capabilities for image manipulation. These filters can seamlessly remove hair and adjust skin texture to create a convincing bald appearance with remarkable ease. Some online tools, like Media.io's AI bald filter, offer customization options, allowing users to fine-tune the results to their preference.
Mobile apps have also become a popular and easy way to see yourself bald without actually shaving your head. iOS users have several bald filter apps at their fingertips. The YouCam Perfect app stands out as a top choice, offering a user-friendly interface and realistic results. These options allow for quick and realistic previews of a bald look, perfect for casual experimentation. Several apps cater specifically to creating bald selfies. BaldBooth and Bald Face offer straightforward interfaces for quick transformations. Some apps even allow you to add facial hair or accessories to complete your new look, adding another layer of creative potential.
Exploring Different Approaches and Tools
People often wonder about the best methods and tools for digitally simulating a bald appearance. To create a bald look in Photoshop, we recommend using the Clone Stamp tool. This allows you to remove hair and blend skin tones for a realistic effect. Next, carefully clone nearby skin areas to cover the hair. We've found several free online tools that can help you visualize a bald appearance. LightX offers an AI-powered bald filter that works with just one click. Another option is OpenArt's free online bald filter.
Many photo editing apps now include bald filters or hair removal features. We recommend checking your device's app store for options like FaceApp or Baldify. We've mentioned LightX and OpenArt, which both provide online bald filter options. Absolutely. Many online photo editors now include bald filters as a standard feature. Using a shaved head filter is usually straightforward. Look for a "bald" or "shaved head" option in the filter or effect menu.
A few years ago, I was asked by a British newspaper if I could take a dozen celebrities and cut their hair off, to show what they looked like bald. It was a rush job - could I do it in an hour? This is a technique that works with anyone with visible ears. If they have really long hair, you’re going to have to find some ears as well. We’ll use this photograph of Johnny Depp, an actor known for his glorious locks. It’s important to choose a head that’s been photographed from, as close as possible, the same angle. Start by using Select > Subject to separate Willis’s head from his background, and copy the selection to a new layer. Once you’ve got the head in the right position, apply the transformation and bring the layer back to full opacity. It’s unlikely that the new head will match the original skin tone, and you can use a variety of techniques to adapt it. Here’s how the composite looks after fixing then color. The new head is a close fit for the head beneath, but it’s not perfect - it’s looking slightly to the left. To fix this, use Free Transform and go into Image Warp mode by clicking the button on the Options Bar. You could replace the background entirely, but it’s often more convincing to patch it with texture sampled from around the image. A little more work is needed to make the effect realistic.

Today, we will be learning how to make someone bald in Photoshop! Looking to save time? 1. First, to make someone bald, we have to create a path around the subject using the Pen Tool. Next, we have to fill in the background, removing the hair outside of where the new bald head will be. You can do this one of two ways. If you want to keep your subject's original background, Invert the selection by going to Select > Inverse. Then use the Stamp tool to stamp away all of the hair outside the selection. In my case, I'm doing a full extraction, meaning I'm extracting both the head and body from its original background. So I created one large selection around the entire body using the Pen Tool again, and added a Layer Mask to completely remove the background. Either method will work. If you extracted your subject, make sure the selection is still active. We're going to use the selection to create a New Group with a Layer Mask. Select the Brush tool and set it to a default soft round brush with a 10% Flow. You want a semi-large brush. With the Brush tool active, press and hold Alt to temporarily switch to the Color Picker. Now paint the skin tone into the existing hair. Keep the skin tone adjacent to where you picked it from. Below is an example of three brush strokes going in the same direction. You'll want to color pick every time you move to a new area of the head. Don't worry about it being perfectly smooth or completely solid; some hair can show through. Instead, focus on the placement of the colors and the edges of the new skin. Use a soft Eraser to remove any unwanted color from the eyebrows, wrinkles, and other facial features. Once you're happy with the head skin, Duplicate the layer and then Merge the duplicate back into its original layer. Use this layer to refine the lighting on the head. Finally, add noise to the skin layer. That's how to make someone bald in Photoshop! If you're going to use your subject in a creative composite or photo manipulation, just merge everything together and extract their head as normal. Looking to create advanced effects fast? After learning how to make someone look bald in Photoshop, it's always best to finish the effect off with some global adjustments. This retouch add-on gives you everything you need to retouch photos in a natural way, thanks to its advanced slider controls. How to edit someone bald can sometimes start with creating a smooth base so everything will blend together more seamlessly. This action does just that! When thinking about how to make someone look bald in Photoshop, I almost always decide to do a full creative composite-something fantasy or surreal inspired. This is another action that creates a smoky background from scratch.
Mastering High-End Beauty Retouching - Advanced Techniques for Flawless Results ( Photoshop )
Enhancing Realism and Creative Expression
Once you've created your bald selfie, sharing it on social media is a breeze. Sharing these humorous transformations can spark fun conversations and engage your followers. We can make our bald photos more entertaining by adding humorous elements. Transforming our appearance instantly with a bald filter allows us to explore new looks humorously. By embracing the humor in our bald photos, we turn a simple edit into an entertaining experience.
To enhance realism, adding some fine "peach fuzz" using a custom brush with scattered settings can be incredibly effective. This subtle detail helps integrate the bald area with the rest of the face, making the transition appear more natural and less artificial. When thinking about how to make someone look bald in Photoshop, I almost always decide to do a full creative composite-something fantasy or surreal inspired. This allows for a greater degree of artistic freedom and can lead to truly unique and engaging results.
After learning how to make someone look bald in Photoshop, it's always best to finish the effect off with some global adjustments. These can include subtle color grading, contrast adjustments, or sharpening to bring the entire image together. For instance, a retouch add-on that offers advanced slider controls can help retouch photos in a natural way, ensuring the bald transformation blends seamlessly with the rest of the image. How to edit someone bald can sometimes start with creating a smooth base so everything will blend together more seamlessly; a dedicated action can achieve this efficiently.