Digital images are composed of pixels, the fundamental building blocks that determine an image's resolution and overall quality. Understanding and manipulating image resolution is a crucial skill for anyone working with digital imagery, from graphic designers and photographers to hobbyists aiming for professional-quality prints. Adobe Photoshop, a leading image editing program, offers robust tools to not only view but also alter an image's resolution, enabling users to achieve specific output requirements without compromising visual fidelity. This guide delves into the intricacies of image resolution in Photoshop, exploring how to change it effectively, the implications of different resolution settings, and the advanced features that can enhance image quality.

Understanding Image Resolution: Pixels Per Inch (PPI)
At its core, image resolution refers to the density of pixels within a given area of an image, typically measured in Pixels Per Inch (PPI). This metric dictates how much detail an image can display. A higher PPI means more pixels are packed into each inch, resulting in a sharper, more detailed image. Conversely, a lower PPI indicates fewer pixels per inch, which can lead to a softer or more pixelated appearance, especially when viewed at larger sizes or printed.
Every digital image has a certain number of pixels. The more pixels an image starts with, the higher the resolution. For instance, an image with a resolution of 300 PPI has twice as many pixels per linear inch as an image with 150 PPI. This distinction is critical, particularly when preparing images for print. Professional publications often require images to be at least 300 PPI to ensure crisp and clear reproduction.
The Analogy of Seeds in a Field
To better grasp the concept of resolution, consider an analogy: Imagine you and a friend each having a bucket full of 5000 seeds to plant in a field. You must use all 5000 of your seeds by planting them in 1-inch squares in a field. Now imagine that you are allowed to plant only 150 of your seeds per inch, and your friend is allowed to plant 300 seeds per inch. The total number of seeds (pixels) remains the same for both of you, but the density at which they are planted (resolution) differs significantly. Your friend's field will appear much denser and more detailed because the seeds are planted closer together. Similarly, an image with a higher PPI has its pixels packed more densely, leading to a more detailed visual output.
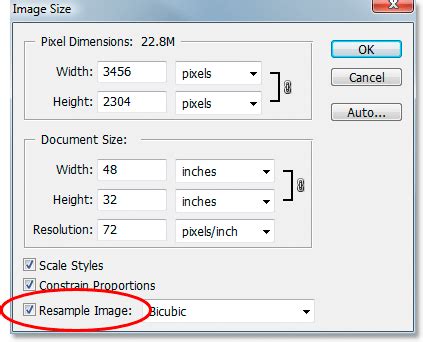
Changing Image Resolution in Photoshop: The Image Size Dialog
Adobe Photoshop provides a powerful tool for managing image resolution through its "Image Size" dialog box. This is where you can view current resolution information and make adjustments.
The Importance of the "Resample" Option
When you access the "Image Size" dialog, you'll notice a crucial checkbox labeled "Resample." This option is central to understanding how Photoshop handles resolution changes.
When "Resample" is checked: This setting allows Photoshop to add or subtract pixels from an image. This is what happens when you resize images to enlarge or shrink them. If you increase the dimensions of an image with resampling enabled, Photoshop will create new pixels based on existing ones (upsampling). If you decrease the dimensions, it will discard pixels (downsampling). Upsampling, in particular, can lead to a loss of image quality, resulting in pixelation or blurriness, as Photoshop attempts to guess the color values of the new pixels. Downsampling removes data from your image, which can also impact detail.
When "Resample" is unchecked: This is the key to changing resolution without altering the total number of pixels in the image. When you deselect "Resample," Photoshop understands that you do not want to add or subtract any pixels to the photo. Instead, it will adjust how many of those existing pixels are displayed per inch. This means the "Pixel Dimensions" (the total count of pixels in width and height) will remain constant, but the "Document Size" (the physical dimensions of the image when printed or displayed) will change.
Step-by-Step: Changing Resolution Without Resampling
To change the resolution of an image in Photoshop while keeping the pixel count the same, follow these steps:
- Navigate to
Image > Image Size...in the Photoshop menu. - In the "Image Size" dialog box, locate the "Resample" checkbox and deselect it.
- You will now see fields for "Width," "Height," and "Resolution." These are linked.
- To adjust the resolution, enter your desired value into the "Resolution" field (e.g., change from 300 PPI to 600 PPI). As you do this, Photoshop will automatically adjust the "Document Width" and "Height" values to accommodate the new resolution while maintaining the original pixel dimensions. For example, if you double the resolution, the document width and height will be halved.
- Alternatively, you can adjust the "Document Width" or "Height" first. Photoshop will then recalculate the resolution based on the unchanged pixel dimensions.
- Click "OK" to apply the changes.
The Impact of Resolution Changes Without Resampling
When you change the resolution without resampling, the pixel dimensions of your image remain unchanged. For example, if you started with an image at 3000 x 2000 pixels (px), it will still be 3000 x 2000px after the resolution adjustment. However, the physical size of the image when printed or displayed will change.
Increasing Resolution: If you had an image with a 300 PPI resolution and you wanted to print it in a professional publication that requires at least 600 PPI, you would double the resolution to 600 PPI. The Pixel Dimensions will have stayed the same (e.g., 3000 x 2000px). However, the Document Width and Height will have decreased by half. This is because the same number of pixels are now being displayed in a smaller physical space, resulting in a higher density.
Decreasing Resolution: Conversely, if you halved your Resolution (e.g., from 600 PPI to 300 PPI), your Document Width and Height would double. The same number of pixels are now spread out over a larger area, leading to a lower pixel density.
The crucial takeaway is that you are not adding or removing pixels; you are simply changing the density at which those pixels are interpreted.
Pixel Resampling: Upsampling and Downsampling Explained
When the "Resample" option is checked in the "Image Size" dialog, Photoshop engages in pixel resampling. This process directly manipulates the number of pixels in an image, which has significant implications for image quality.
Upsampling: Increasing Pixel Count
Upsampling involves increasing the number of pixels in an image. This is typically done when you need to enlarge an image beyond its original pixel dimensions, often for printing at a larger size or when a low-resolution image needs to be scaled up.
How it Works: Photoshop uses interpolation algorithms to create new pixels. These algorithms analyze the existing pixels and estimate the color and tonal values for the new pixels that are being added. There are various interpolation methods available in Photoshop, such as Bicubic Smoother (best for enlargements) and Preserve Details (which uses AI to enhance details).
Potential Issues: While upsampling can make an image larger, it doesn't magically create detail that wasn't there originally. The process of adding pixels can lead to a loss of sharpness, introduce noise, or cause the image to appear soft or "blurry." This is the digital equivalent of trying to stretch a small photograph - the original detail gets diluted. The "detective enhancing a blurry image" scenario often depicted in movies, where a grainy, pixelated image is magically clarified, is largely a work of fiction. In reality, upsampling has its limits.
Downsampling: Decreasing Pixel Count
Downsampling is the opposite of upsampling; it involves decreasing the number of pixels in an image. This is done when you need to reduce the file size of an image, speed up load times for online images, or prepare an image for a display medium that requires a lower resolution.
How it Works: When downsampling, Photoshop discards pixels. It averages the color information of neighboring pixels to create a new, smaller set of pixels.
Impact on Quality: Downsampling removes data from your image. While it can effectively reduce file size, it can also lead to a loss of fine details and sharpness. It's generally advisable to downsample from a higher-resolution source rather than upsample from a low-resolution one, as the former retains more original detail.
Photoshop Tutorial - Understanding resize vs resample
Advanced Resolution Enhancement: Super Resolution in Photoshop and Lightroom
The limitations of traditional upsampling have led to the development of more sophisticated AI-powered tools. Adobe Photoshop and Adobe Lightroom now feature "Super Resolution," a technology that significantly improves the quality of upscaled images.
Super Resolution in Lightroom
One of the fastest ways to improve lower-resolution images and get a high-quality print is using Super Resolution in Adobe Lightroom. This feature leverages artificial intelligence (AI) and machine learning (ML) to intelligently increase image resolution.
How it Works: When you apply Super Resolution in Lightroom, the software analyzes the context of your picture and automatically chooses the best-looking pixels to add. It effectively doubles the image's linear dimensions and quadruples the total pixel count. This is not just about adding generic pixels; it's about adding pixels that enhance detail and maintain sharpness.
Process:
- Right-click on the image you wish to enhance in Lightroom.
- Select "Enhance…" from the context menu.
- Check the "Super Resolution" box.
- Click "Enhance."
- Lightroom will then increase your image resolution and save it as a new DNG (Digital Negative) file, preserving the original image.
Super Resolution in Photoshop
For those who need even more control or are working directly within Photoshop, the Super Resolution feature is also available.
How it Works: Similar to Lightroom, Photoshop's Super Resolution uses AI and ML algorithms to intelligently upscale images. It can quadrupling the pixel count in any photo with the click of a button, aiming to maintain or even improve visual quality.
Process:
- Open your image in Photoshop.
- Go to
Filter > Camera Raw Filter.... - In the Camera Raw dialog, click on the "Detail" tab.
- Under "Enhance," you'll find the "Super Resolution" option. Check the box.
- Click "Enhance." This will create a new, higher-resolution version of your image.
These AI-driven features are a significant leap forward, offering a way to enhance lower-resolution images that was previously only achievable by taking a new photograph or re-scanning at a higher resolution. While it may not be "movie magic," it's a powerful tool for improving image quality.
Choosing the Right Resolution for Your Needs
The ideal resolution for an image depends heavily on its intended use. There's no single "best" resolution; it's about selecting the appropriate setting for the task at hand.
Understanding Quality Thresholds
72 PPI: Historically, 72 PPI was considered the standard for web images because many monitors displayed images at this resolution. However, with modern high-resolution displays, this is often too low for even on-screen viewing to look crisp. For print, 72 PPI is generally insufficient for producing a high-quality image. An image set at 72 PPI might result in a document size that is too large to fit on a standard sheet of paper without being clipped or appearing very pixelated.
150 PPI: This resolution can be acceptable for some less critical print applications, such as proofs or internal documents where extreme detail isn't paramount. However, for professional publications or high-quality prints, 150 PPI is often considered too low.
300 PPI: This is widely regarded as the standard for high-quality printing. Images at 300 PPI will appear sharp and detailed when printed at their intended size.
600 PPI: For extremely fine detail or very large prints where viewing distance might be closer, 600 PPI can be beneficial. However, it also significantly increases file size.
Practical Scenarios
Let's consider a scenario where you have an image at 300 PPI and need it to be 600 PPI for a professional publication.
Using "Resample" (Upsampling): If you check "Resample" and try to increase the resolution to 600 PPI, Photoshop will try to add pixels. This might result in a blurry or pixelated image because the AI or interpolation methods are working with a limited amount of original data.
Without "Resample" (Changing Density): If you deselect "Resample," enter 600 PPI, the pixel dimensions of your image will remain the same. The document width and height will decrease. This is ideal if your original image already has sufficient pixels but you need to adjust its output density for a specific print requirement.
Which one to choose? The 72 PPI and 150 PPI images are too low of quality to produce a high-quality print, so they're out for professional applications. The 300 PPI and 600 PPI images both looked very crisp, but the 600 PPI image was way too small in physical dimensions if you were trying to achieve that density from a low-pixel-count source. However, if you were simply adjusting the output density of an already high-pixel-count image, both might be viable depending on the required output size.
Traditional Resampling Methods in Photoshop
When you need to make a significant change to the size of your original image or add a specific number of new pixels, traditional resampling is your best choice, especially when "Resample" is checked in the "Image Size" dialog.
Method 1: Adjusting Print Size and Resolution Independently
If you have specific needs for the dimensions or size of your image - like a poster at a certain print size - check the "Resample" box. This allows you to adjust the print size and resolution independently, which changes the number of pixels in the image.
- Go to
Image > Image Size.... - Check the "Resample" box.
- Under "Dimensions," enter your desired values for Width and Height. You can choose units like inches or centimeters.
- As you change the Width and Height, Photoshop will automatically adjust the Resolution to maintain the pixel count.
- If you want to control the resolution directly, set your desired Resolution first (e.g., 300 PPI). Then, enter your desired Width and Height. Photoshop will then add or remove pixels accordingly.
- If your image has layers with styles applied to them, select "Scale Styles" under the gear icon to scale the effects proportionally with the image size.
- Click "OK."
Method 2: Adjusting Dimensions or Resolution Without Changing Pixel Count
Sometimes, you might want to see if you can achieve a high-quality print by adjusting only the dimension or resolution without changing the pixel count. This is essentially what happens when "Resample" is unchecked, but you can achieve a similar effect while still having "Resample" checked by carefully balancing the settings.
- Go to
Image > Image Size.... - Deselect the "Resample" box.
- To adjust Resolution, add new values in the "Resolution" field (e.g., change from 300 to 600). Photoshop will automatically adjust the Document Size (Width and Height).
- To adjust Document Size, add new values under "Height" and "Width" (e.g., change inches). Photoshop will then automatically adjust the Resolution.
- Click "OK."
Important Note on Interpolation Methods: Resampling of any kind, especially upsampling, can result in poorer image quality. However, if you know the right interpolation method to choose - that is, the specific way software like Photoshop chooses the color values of new pixels - you can minimize any unwanted pixelation. For enlargements, "Bicubic Smoother" is often recommended. For general use, "Bicubic" is a good balance. "Preserve Details" is excellent for upscaling with AI assistance.

Conclusion: Empowering Your Image Editing Workflow
The best way to get high-resolution images is by using the right camera for the job and capturing the most detail possible. However, when that’s not an option - or you’re looking to improve older digital photos, optimize images for different platforms, or prepare them for specific print requirements - Adobe Photoshop and Adobe Lightroom offer powerful solutions.
By understanding the difference between changing resolution by altering pixel density (without resampling) and changing resolution by adding or removing pixels (with resampling), you can make informed decisions. Experiment with Super Resolution, traditional resampling techniques, and even external AI image upscalers to see how far you can push your image quality and achieve the desired results for any project. Mastering these tools will give you greater control over your images and help you produce professional-quality outputs consistently.