In the dynamic world of digital art and design, the security of your creative assets is paramount. Losing custom brushes, meticulously organized materials, or even your personalized workspace can be a devastating setback. Clip Studio Paint, a powerhouse application for illustrators and comic artists, offers robust solutions to ensure your digital creations and settings are protected. This guide delves into the essential methods for backing up your Clip Studio assets, ensuring your creative workflow remains uninterrupted, regardless of hardware changes or software updates.
Understanding Clip Studio's Cloud Backup Service
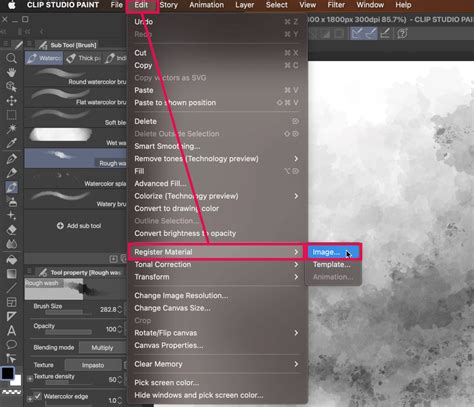
Clip Studio's integrated cloud service is a primary mechanism for backing up your digital assets. This service allows for the synchronization and backup of Clip Studio Paint materials, ongoing projects, and application settings. It's designed to mirror your local data with its cloud counterpart, ensuring you always have access to the most current version of your work. When you edit a file on your device, it is uploaded to the cloud, effectively creating a backup.
It is crucial to note that from Clip Studio Ver. 1.5.0 onwards, the cloud service can only back up data originating from Ver. 1.5.0 or later. For backing up data from older software versions or prior to Ver. 1.5.0, alternative methods, such as using Clip Studio Ver., are necessary. Furthermore, certain types of materials cannot be synced. This includes materials that have been converted from the CLIP Material folder in IllustStudio or Manga Studio 4.0, or those converted from the "Tone Material Collection Disc" (which is exclusively available in Japanese).
The cloud service also has limitations regarding the restoration of specific settings. Materials that rely on brush shapes and textures defined in the Sub Tool Detail settings will revert to their initial configurations if the brush shapes and textures are not present on the device where the additional materials are being recovered. Window layout settings can only be restored correctly when transferring data across the same operating system, such as between smartphones. If you are migrating between different operating systems (e.g., from Windows to macOS), window positions cannot be restored. Additionally, monitor configurations can sometimes interfere with the accurate restoration of window settings. Importantly, settings that are inherently tied to your specific work environment or those related to file saving procedures cannot be synced.
Automatic Synchronization and Cloud Settings
Clip Studio’s cloud service facilitates automatic synchronization of your works. This process diligently matches your local files with their cloud counterparts, guaranteeing that you always possess the latest iteration. When you edit a piece on your device, the changes are uploaded to the cloud, serving as a vital backup.
To configure these settings, navigate to the Cloud screen within the Clip Studio application. Once the Cloud screen is displayed, locate and select the "Cloud Settings" block. Within these settings, you can opt to enable automatic backups. This feature ensures that your items are backed up daily whenever you log into Clip Studio.
It is also essential to be aware of file naming conventions. If your file names contain specific symbols or character strings, such as / > < ? : " \ * | ; NUL, you may encounter issues using them with the cloud service.
Important Considerations for Cloud Backups
Clip Studio's cloud service operates with a policy regarding account activity. Cloud data associated with a Clip Studio account that has not been logged into for a period exceeding one year will be subject to deletion. This measure is in place to manage storage efficiently.
The maximum number of backup app settings that can be stored is 30. Should the number of saved entries surpass this limit, the oldest entries in the backup history will be automatically removed to make space for new ones.
The CELSYS Folder Method: A Direct Approach to Asset Transfer
An alternative and often effective method for backing up and transferring your Clip Studio assets involves directly copying the CELSYS folder. This approach can be particularly useful for transferring custom brushes, tools, workspaces, and downloaded materials. Liz Staley, a seasoned Clip Studio Paint user and author, highlights this method, noting her personal experience when migrating to a new PC.
Locating Your CELSYS Folder
To initiate this process, you first need to locate the CELSYS folder on your current system. It's important to open the main Clip Studio application, not Clip Studio Paint itself. Within the Clip Studio app, navigate to the "Location of Materials" window. This window will display the precise path to the folders where your assets are stored on your computer.
Once you have the path, open your operating system’s file explorer and meticulously follow the folder directory as indicated by the "Location of Materials" window.
Handling Hidden Folders
A common hurdle encountered during this process is that the AppData folder, which often contains the CELSYS folder, is a hidden folder by default in many operating systems. If you are unable to find your CELSYS folder, your operating system may be configured to hide these files and folders. You will need to make hidden files and folders visible. For example, on Windows 11, this setting can be adjusted within the File Explorer's "View" options. Once hidden items are visible, you should be able to locate the CELSYS folder.
Copying and Restoring the CELSYS Folder
After successfully locating the CELSYS folder on your old computer, the next step is to create a complete copy of it. This backup can then be stored externally, perhaps on a USB drive or another cloud storage service, for safekeeping.
Once you have your backup, you can proceed to your new system. Locate the CELSYS folder on the new computer. For added safety and to avoid accidental overwrites, it is advisable to rename your backup of the old CELSYS folder to something distinct, such as "CELSYSbackup," before proceeding with the transfer.
Copy your backed-up CELSYS folder into the location of the corresponding CELSYS folder on the new computer. It is crucial to ensure that the data capacity of the copied folder precisely matches that of the original folder on the source computer. If the data sizes do not align, the copy may be incomplete, leading to potential issues.
While some resources suggest that simply copying the CELSYS folder will transfer all tools, workspaces, and custom settings, personal experiences, like Liz Staley’s, indicate that this method primarily transfers downloaded materials. Custom brushes and workspace configurations might not be included. If you cannot find the CELSYSUserData folder on your new system, launching Clip Studio and Clip Studio Paint can help create it.
Combining Methods for Comprehensive Backup
For the most robust backup strategy, combining the CELSYS folder method with Clip Studio’s cloud backup service is highly recommended. While the CELSYS folder method can transfer a significant portion of your assets, the cloud service excels at synchronizing application settings, window layouts, and custom tool configurations.
When migrating to a new system, utilize the cloud backup service first to restore your application settings, shortcuts, and custom tool folders. This ensures that your preferred working environment is replicated. Subsequently, employ the CELSYS folder method to transfer any remaining materials or custom brushes that may not have been fully captured by the cloud sync.
How To Save, Backup and Restore Clip Studio Paint Custom Brushes
Transferring Settings to Different Operating Systems
The process of transferring settings to a different operating system requires careful attention. For specific guidance on copying settings to different devices, particularly across varying operating systems, refer to sections like "3. Copy Your Settings to Different Devices" and "6. How to Use the Manage Materials Screen" within Clip Studio’s official documentation on "How to Use the Cloud Service." These resources provide detailed instructions tailored for cross-platform transfers.
Restoring Your Workspace
After completing the transfer and restoration process, open Clip Studio Paint on your new system. If the backup and restoration were successful, you should find that your Quick Access settings, custom folders for tools, and other personalized configurations have been seamlessly moved over. This eliminates the tedious task of reinstalling and reconfiguring everything from scratch.
Adjusting to a new computer or an updated operating system can be a challenging experience. However, by investing a small amount of time and following these clear steps, the process of migrating your creative environment can be significantly simplified and made far less stressful.
Considerations for Mobile Users
The question of backing up assets on mobile devices also arises. The ability to automatically sync your works to the Clip Studio cloud service extends to mobile platforms as well. This synchronization ensures that the work edited on your mobile device is uploaded to the cloud, creating a backup.
For users who wish to transfer settings to a different OS, including mobile to desktop or vice versa, the cloud service is the primary tool. However, as previously mentioned, window layout restoration is limited to transfers between the same operating system type (e.g., smartphone to smartphone). Settings dependent on the specific work environment or file saving methods are also not transferable via the cloud.
Ensuring Data Integrity During Backup
Regardless of the method employed, maintaining data integrity is paramount. When copying the CELSYS folder, double-check that the data size of the copied folder matches the original. An incomplete copy can lead to corrupted assets or missing components, negating the purpose of the backup.
If you encounter difficulties locating essential folders like CELSYSUserData, remember that launching Clip Studio and Clip Studio Paint can often prompt the creation of these directories, making them accessible for subsequent backup procedures.
By understanding and implementing these backup strategies, artists can ensure their valuable Clip Studio assets are protected, allowing them to focus on what truly matters: creating.