In the realm of product photography and graphic design, the background plays a pivotal role in ensuring your main subject commands attention. A distracting background can detract from the essence of your product or artwork, while a clean, focused background allows your subject to truly shine. Adobe Photoshop, especially with the advancements in Artificial Intelligence, offers powerful tools to achieve this, enabling you to remove unwanted backgrounds entirely or transform them into a desired solid color, most commonly white. This article delves into the various techniques for changing and perfecting white backgrounds in Photoshop, from initial isolation to creating realistic depth and integration.
The Importance of a White Background
Putting your product against a white background has become the standard for e-commerce. White backgrounds offer several key advantages: they allow shoppers to see your products’ true colors and features more easily, and many third-party marketplace sites require your product photos to have a white background. While it’s ideal to shoot using a white background when capturing your photos, this isn’t always possible. Fortunately, with image editing tools like Photoshop, you don’t necessarily need to reshoot your images if your product photos aren’t shot against a white background. You can effectively create a white background on any product photo in Photoshop, regardless of the original background, in just a few easy steps. This process ensures your product visuals meet industry standards and enhance customer perception.

Isolating Your Subject: The Foundation of Background Manipulation
The first crucial step in changing any background, especially to white, is to accurately isolate your subject. This involves separating the foreground element from its existing backdrop. Photoshop offers several tools to achieve this, ranging from AI-powered automation to more manual, precise methods.
AI-Powered Background Removal
Adobe Sensei-powered tools have revolutionized this process. In newer versions of Photoshop (2019 and later), you can leverage these intelligent features for quick and often remarkably accurate background removal.
Using the "Remove Background" Button: In the Layers panel, locate the Properties panel. Here, you'll find a "Remove Background" button. Clicking this button utilizes AI to automatically detect and remove the background, creating a mask. This is an excellent starting point for many images, especially those with clear subject-background separation.
"Select Subject" Command: For more complex selections, the "Select Subject" command, often found within the "Select and Mask" workspace, uses AI to identify and select the main subject of your image. To access this, you might first use a tool like the Magic Wand Tool, then click "Select and Mask…" in the Options Bar. Within the "Select and Mask" window, choose "Select Subject." Photoshop will then create a selection of your product. Areas not part of the selection will typically have a dark red overlay.
Traditional Selection Tools for Precision
While AI is powerful, there are times when traditional selection tools offer more control or are necessary for intricate details.
Quick Selection Tool: This tool allows you to "paint" a selection. Click and drag over the area you want to select, and Photoshop will intelligently find edges. If the tool highlights an area outside your desired subject, you can switch to the "Subtract from Selection" brush at the top-left of the window to refine the selection.
Magic Wand Tool: This tool is effective for selecting areas of similar color. Simply click on any part of an image, and all other pixels of the same color within the image will be selected. This is particularly useful if your background is a solid or near-solid color.
Lasso Tools (Lasso, Polygonal Lasso, Magnetic Lasso): These tools offer more freeform selection capabilities. The Magnetic Lasso, for instance, attempts to snap to edges as you move your mouse or stylus. You can use your mouse or stylus to make selection borders with a freehand drawing.
Pen Tool: For the utmost precision, especially with sharp, defined edges, the Pen Tool is unparalleled. It allows you to create vector paths that can be converted into selections, offering clean and editable results.
Refining Your Selections: The Art of Fine-Tuning
Once an initial selection is made, it's rare for it to be perfect. Refining the edges is crucial for a professional-looking result.
Select and Mask Workspace: This dedicated workspace provides a suite of tools for fine-tuning selections. You can zoom in and use various brush tools on the left side of the window to refine the selection further. Adjusting the size of the brush and choosing whether you're adding or subtracting pixels helps to precisely define the boundaries of your subject.
Refine Edge Tool: Within the "Select and Mask" workspace, or sometimes accessible directly after making a selection, the "Refine Edge" options allow you to smooth, feather, or adjust the contrast of your selection borders. Global refinement sliders can smooth and feather the edges of your image, creating a seamless transition.
Painting Selections: If the AI tool or other selection methods missed certain areas, you can switch to the Brush Tool (shortcut 'B') and paint directly onto the mask to add or subtract areas. This allows you to meticulously fill in any gaps or correct over-selections.
Creating the White Background
With your subject meticulously isolated, creating a solid white background is straightforward. The key is to do this non-destructively, allowing for future adjustments.
Duplicate Your Layer: Before proceeding, it’s good practice to duplicate your original layer. In the Layers panel, select the layer containing your subject and either right-click and choose "Duplicate Layer…" or use the keyboard shortcut Ctrl+J (Windows) / Command+J (macOS). Name this new layer something descriptive, like "Product." This preserves your original image data.
Create a Mask: With your selection still active on the duplicated layer, click the "Add layer mask" icon at the bottom of the Layers panel (a rectangle with a circle inside). This will create a mask that hides everything outside your selection, effectively isolating your subject.
Add a Solid Color Fill Layer: Now, create a new fill layer for your background. Go to
Layer > New Fill Layer > Solid Color...from the dropdown menu. A color selection box will appear. To achieve a pure white background, move your cursor to the upper-left corner of the color field or type "FFFFFF" into the hexadecimal value field at the bottom. Click OK.Position the Fill Layer: In the Layers panel, ensure this new Solid Color fill layer is positioned below your masked subject layer. Dragging the layer up or down in the stack will change which layer appears on top. Now, your subject will appear on top of the white background.
Enhancing Realism: Adding Depth and Shadows
Simply placing a subject on a solid white background can sometimes look flat. To create a more realistic and professional appearance, especially for product photography, adding subtle shadows and highlights can make a significant difference.
Introducing Realistic Shadows
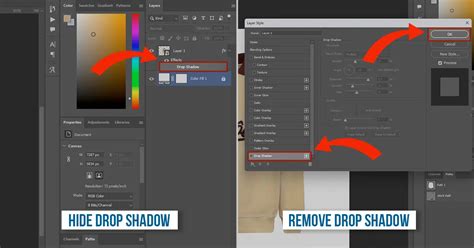
Layer Styles (Drop Shadow): A common method is to use Photoshop's Layer Styles. With your subject layer selected, go to
Layer > Layer Style > Drop Shadow.... In the dialog box, adjust the angle to match the lighting in your original image. Use the "Distance" and "Spread" sliders to control how far the shadow is from the object and its intensity. Avoid increasing the "Size" slider too much at this stage, as you'll blur it manually next.Creating a Separate Shadow Layer: For greater control, you can separate the drop shadow into its own layer. After applying the drop shadow, go to
Layer > Layer Styles > Create Layer. This breaks the style into a new layer.Blurring and Refining the Shadow: Select the newly created Drop Shadow layer. Go to
Filter > Blur > Gaussian Blur.... Adjust the blur slider until the shadow has a soft, natural appearance. You can then use the Eraser Tool (set to a large, soft brush) on the Drop Shadow layer to carefully erase portions of the shadow, mimicking how light would interact with the object and surface. Alternatively, you can create a layer mask within the Drop Shadow layer and paint with black to hide parts of the shadow.Adjusting Opacity: Reduce the opacity of the Drop Shadow layer to make the shadow blend more subtly with the background.
Adding Subtle Highlights
To further enhance realism, you can add highlights that suggest light reflecting from the white background onto the product.
Create an Overlay Layer: Select your subject layer and create a new layer above it (
Layer > New > Layer). Set the blending mode of this new layer to "Overlay" and check the box for "Fill with Overlay-neutral color (50% gray)." Click OK.Using the Dodge Tool: Select this new Overlay layer. Choose the Dodge Tool from the Toolbar (it might be hidden beneath the Burn Tool). In the Options bar, set your Dodge tool settings to a large, soft brush, a "Range" of "Midtones," and an "Exposure" of around 20% or higher.
Painting Highlights: Carefully "paint" highlights onto your image using the Dodge Tool, focusing on areas where light would realistically reflect from the background onto your product. Use your artistic judgment to determine the placement and intensity of these highlights.
Advanced Techniques and Considerations
Non-Destructive Editing and Masking
The use of mask layers is paramount for non-destructive editing. Mask layers allow you to hide or reveal selected portions of your background (or subject) without permanently deleting pixels. This means you can always go back and adjust your selections or masks later.
Batch Processing with Scripts
If you have a large number of images that require background removal and replacement with white, Photoshop's scripting capabilities can save considerable time. You can create a script that takes a set of images and applies specific actions, including making backgrounds transparent and adding a white fill layer, to all of them. To run a script, use the File > Scripts > Browse... menu in Photoshop and select your script file.
Handling Transparent PNGs
When working with a transparent PNG file, making the background white is straightforward. Open the PNG in Photoshop. Create a Solid Color fill layer and set it to white, then position this layer below your PNG layer.
Limitations and File Types
It's important to be aware of certain limitations. For instance, GIFs do not support alpha transparency, meaning a pixel is either fully transparent or not transparent at all; there's no in-between. Therefore, creating a transparent background for a GIF is not possible in the conventional sense.
Image Dimension Limits
Photoshop has limits on image dimensions. If you encounter an "Image exceeds maximum dimensions (8,000 x 8,000 pixels)" error, you will need to resize your image before processing it.
The Free Adobe Express Option
For simpler background removal tasks, the free Adobe Express plan also offers the functionality to make the background of an image transparent, providing an accessible alternative for basic needs.
How To make a Background White in Photoshop
Adjusting Existing White Backgrounds
If your background is already mostly white but not pure white, you can refine it using Photoshop’s Curves function. Go to Image > Adjustments > Curves... (or press CTRL + M / COMMAND + M). In the Curves dialog box, use the white eyedropper tool located below the graph. Click on a portion of your background with this eyedropper. Photoshop will then adjust the background to a pure white based on that sampled color.
Resetting the Default Background Color
Occasionally, the default background color in Photoshop might appear black. To reset it to white, simply press the 'D' key on your keyboard. This resets the default background color to white and the foreground color to black. Any new layers created after this reset will then adopt the white background.
By mastering these techniques, you can efficiently and effectively change and perfect white backgrounds in Photoshop, ensuring your subjects are presented in the best possible light and meeting the demands of various professional applications.
tags: #changing #white #background #in #photoshop