In the realm of digital photography and retouching, achieving a natural yet impactful enhancement of portraits is a common goal. Among the many elements that contribute to a polished image, the brightness and color of teeth play a significant role. Yellowed or dull teeth can detract from an otherwise stunning photograph, diminishing the overall appeal and professionalism of the shot. Fortunately, Adobe Photoshop offers a robust suite of tools and techniques to address this, allowing photographers and editors to subtly yet effectively whiten teeth, thereby enhancing smiles and boosting the confidence of their subjects. This comprehensive guide delves into various methods, from quick fixes to advanced professional techniques, ensuring that anyone can achieve natural-looking, brighter teeth in their images.
The Importance of Teeth Whitening in Photo Retouching
Teeth are frequently the most luminous feature within a smile. When they appear yellow, stained, or lacklustre, the entire portrait can lose its polished and professional edge. Even minor discolorations can draw the viewer's attention away from the intended subject and lessen the overall impact of the image. Subtle whitening can significantly improve:
- Wedding portraits
- Corporate headshots
- Fashion photography
- Social media images
The primary objective is not to render teeth an artificial, pure white. Instead, the aim is to cultivate a natural brightness that complements the smile while meticulously preserving its realistic texture, delicate shadows, and inherent depth. This nuanced approach ensures that the final result appears authentic and unretouched.
Method 1: Hue/Saturation Adjustment Layer (The Most Popular Approach)
This method is widely favored for its user-friendliness and effectiveness in achieving natural-looking results. It provides good control over both the color and brightness of the teeth.
Step 1: Zoom In
Begin by zooming into your image to at least 100%. This allows for precise observation of the teeth and accurate assessment of color changes as you make adjustments.
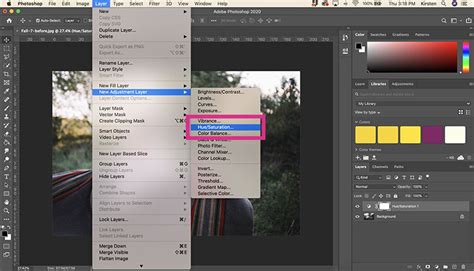
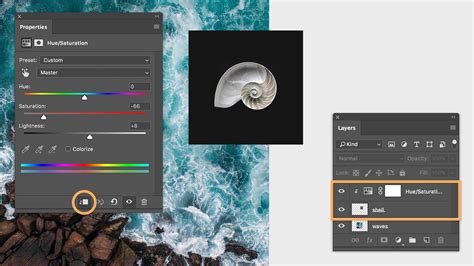
Step 2: Add a Hue/Saturation Adjustment Layer
Navigate to the menu and select Layer > New Adjustment Layer > Hue/Saturation. This action creates a new adjustment layer that will affect only the selected areas or, as we will refine later, the teeth specifically.
Step 3: Target the Yellow Tones
In the Properties panel that appears for the Hue/Saturation adjustment layer, locate the Edit dropdown menu. From this menu, select Yellows. This specific targeting ensures that your adjustments primarily affect the yellow hues present in the teeth, leaving other colors largely untouched.
Step 4: Reduce Saturation
With the Yellows channel selected, carefully drag the Saturation slider to the left. The further you drag, the more the yellow tones will be desaturated, making the teeth appear whiter. It is crucial to make small, incremental adjustments here. Over-desaturating can lead to an unnatural, flat appearance. Keep an eye on the image to ensure you leave just enough yellow to maintain a natural look, as teeth are not typically pure white.
Step 5: Increase Lightness
Once you have addressed the yellow tones, you may find that the teeth appear slightly dull or dark. To counteract this, gently increase the Lightness slider by dragging it to the right. Again, proceed with caution, making subtle adjustments until the teeth achieve a pleasing brightness without looking overexposed or artificial.
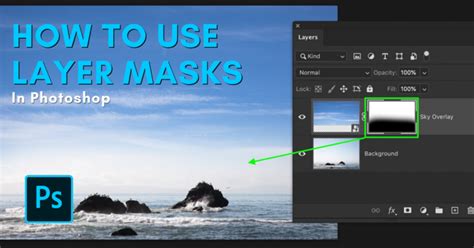
Step 6: Mask the Teeth
A critical step for ensuring the adjustment layer only affects the teeth is masking. If you initially made a selection of the teeth before adding the adjustment layer, Photoshop will have automatically created a layer mask. If not, or if the mask needs refinement:
- Invert the Layer Mask: Select the Hue/Saturation adjustment layer in the
Layerspanel. Then, pressCtrl + I(Windows) orCmd + I(Mac) to invert the layer mask. This will hide the effect of the adjustment layer across the entire image. - Paint with a White Brush: Select the Brush Tool. Ensure your foreground color is set to white. Choose a soft-edged brush with a low opacity (around 20-30% is often a good starting point). Now, carefully paint over the teeth on the layer mask. The white brush will reveal the whitening and brightening effect only where you paint.
Pro Tip: Never push the lightness too high. Teeth should retain their natural texture and subtle shadows. If the teeth appear flat, reduce the opacity of the Hue/Saturation adjustment layer itself until the result looks natural.
Method 2: Curves Adjustment (Professional Control)
For those seeking a higher degree of precision and a smoother, more refined result, the Curves adjustment layer is a preferred tool among professional retouchers. It offers superior tonal control.
Step 1: Select the Teeth
Create a precise selection of the teeth. Tools like the Lasso Tool, Pen Tool, or even the Quick Selection Tool can be employed. For a softer transition, apply a slight feather to the selection (1-2 pixels) in the Select > Modify > Feather menu.
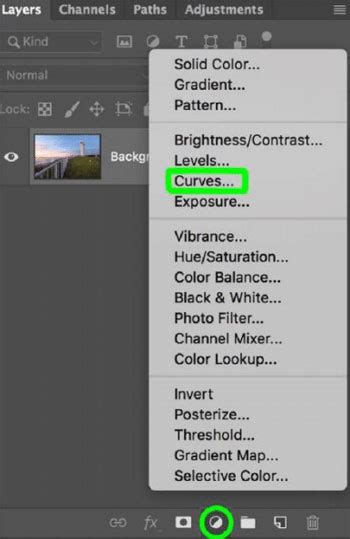
Step 2: Add a Curves Adjustment Layer
With the selection active, go to Layer > New Adjustment Layer > Curves. Photoshop will automatically generate a layer mask based on your active selection.
Step 3: Lift the Midtones
In the Properties panel for the Curves adjustment layer, you will see a diagonal line representing the tonal curve. Click on the middle of this line and gently drag it upward. This action brightens the midtones of the teeth without significantly impacting the deep shadows, thus preserving depth.
Step 4: Neutralize Warm Tones
If the teeth still exhibit a warm, yellowish cast, you can address this within the Curves panel. Switch to the Blue channel from the dropdown menu. Then, carefully lift the highlights in the blue channel. A small adjustment here can neutralize excessive yellow tints and create a more balanced, cooler tone. Curves allow for a better balance between brightness and contrast, yielding a softer and more refined look than basic Hue/Saturation adjustments.
Pro Tip: Make very small adjustments with the Curves tool. Large changes can flatten the texture and remove the natural depth from the teeth, making them look artificial.
Method 3: Dodge & Burn Technique (Advanced Control)
This advanced method, often employed in high-end portrait retouching, offers maximum control over brightness and preserves the teeth's texture exceptionally well. It involves using a neutral gray layer set to Soft Light blend mode.
Step 1: Create a New Layer
Above your image layer, create a new, blank layer.
Step 2: Fill with 50% Gray
Go to Edit > Fill. In the dialog box, choose 50% Gray from the Contents dropdown and click OK.
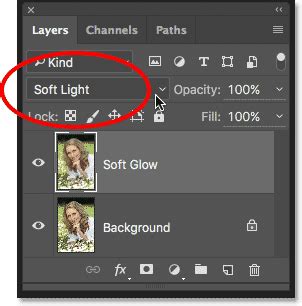
Step 3: Set Blend Mode
Change the blend mode of this gray layer from Normal to Soft Light. This layer will now act as a canvas for your dodge and burn adjustments.
Step 4: Use a Soft Brush
Select a soft-edged round brush. Crucially, set the brush's Flow to a very low percentage, typically between 2-5%. This low flow allows for gradual building of the effect, ensuring subtle and controlled adjustments.
Step 5: Brighten Dark Areas (Dodge)
Set your foreground color to white. Carefully paint with your low-flow brush over the darker areas of the teeth. Build up the effect gradually with multiple strokes. Zoom in to 100% and use small, deliberate strokes to avoid harshness.
Step 6: Darken Overly Bright Areas (Burn - Optional)
If certain areas of the teeth have become too bright, you can switch your foreground color to black and use the same low-flow brush to subtly darken those areas. This step helps to further refine the tonal range and create a more natural appearance.
How to Select Teeth Properly
The foundation of any natural-looking teeth whitening edit in Photoshop lies in a clean and accurate selection. An imprecise selection that bleeds onto the gums or lips will inevitably result in an artificial appearance.
- Tools for Selection:
- Lasso Tool: Quick and straightforward for less complex shapes.
- Pen Tool: Offers the most precise control for clean, sharp edges.
- Quick Selection Tool: Useful for automatically detecting areas based on color and texture, especially in high-contrast images.
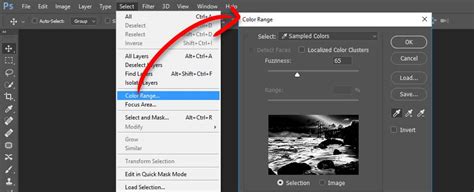
- Select Color Range: This dialog box allows you to sample colors directly from the teeth, creating a selection based on those specific hues. You can then refine this selection using the eyedropper tools and the
Fuzzinessslider.
- Refining the Selection: After making an initial selection, apply a slight feather (1-2 pixels) to soften the edges and ensure a natural blend with the surrounding areas. Always double-check that the gums and lips are excluded from your selection.
Pro Tip: Zooming in to 100% or even 200% while making your selection is paramount. Clean edges and meticulous masking are the hallmarks of professional retouching that differentiate beginner edits from expert results.
Common Teeth Whitening Mistakes to Avoid
To ensure your teeth whitening edits look natural and professional, be mindful of these common pitfalls:
- Making Teeth Pure White: Teeth are not naturally paper white. They have subtle variations in tone and texture. Aiming for pure white will look artificial.
- Removing Natural Shadows: Shadows define form and depth. Eliminating them makes teeth look flat and unnatural.
- Whitening the Gums: Gums have a natural pink hue and should not be affected by teeth whitening adjustments.
- Making Teeth Too Blue: Over-correcting the yellow tones can introduce an unnatural blue cast.
- Ignoring Uneven Lighting: Different parts of the teeth reflect light differently due to their curvature. Adjustments should account for these variations.
The ultimate goal is natural brightness that enhances the smile without making it look fake.
Photoshop vs. Lightroom vs. Photoshop Express for Teeth Whitening
Each Adobe software offers different levels of control and precision for teeth whitening:
- Photoshop: Offers the highest level of control with advanced selection tools, adjustment layers (Hue/Saturation, Curves, etc.), and masking capabilities. It is the best choice for professional portraits and detailed retouching.
- Lightroom: Provides a more streamlined approach. While it has tools like the Adjustment Brush and Radial Filter that can be used for localized adjustments, it offers less granular control over selections and masking compared to Photoshop. It's suitable for quick edits.
- Photoshop Express: A mobile-focused application that is basic and limited in its retouching capabilities. It is generally not recommended for precise teeth whitening.
For professional and natural-looking teeth whitening, Photoshop remains the most powerful and versatile option.
Working with Group Portraits and Multiple Subjects
When editing photos with multiple people, it's important to remember that each individual's teeth may require different levels of whitening. Attempting to apply a single adjustment layer to everyone's teeth at once will likely result in an unnatural look for some or all subjects.
- Individual Adjustment Layers: For the best results in group photos, create a separate Hue/Saturation (or other adjustment layer) for each person whose teeth you need to whiten. This allows you to fine-tune the adjustments independently for each subject, ensuring a natural and consistent look across the entire group.
Advance Photo Editing Skin Retouching in Photoshop Group Study
Handling Stains and Lipstick Marks
Beyond general yellowing, teeth can sometimes have specific stains or lipstick marks that require targeted attention.
- Hue/Saturation for Reds: If addressing lipstick stains, you can target the
Redschannel in the Hue/Saturation adjustment layer and reduce its saturation. - Clone Stamp Tool: For small, localized marks or stains, the Clone Stamp Tool can be very effective. Use a soft brush with low opacity and flow to carefully sample clean tooth areas and paint over the blemishes.
- Brush Tool with Sampled Color: Similar to the Clone Stamp, you can use the Brush Tool with a sampled color from a clean part of the tooth to paint over small imperfections.
Pro Tip: When dealing with specific stains, always zoom in closely and work with a low opacity brush. Gradual blending is key to maintaining a natural texture.
Before & After Comparisons and Final Touches
The ability to compare your edits with the original image is crucial for ensuring naturalness.
- Toggle Visibility: Regularly click the eye icon next to your adjustment layers in the
Layerspanel to toggle their visibility on and off. This allows you to see the direct impact of your edits. - Zoom Out and Assess: After making adjustments, zoom out to view the entire portrait. Does the teeth whitening blend seamlessly with the rest of the image? Are the teeth still detailed and textured?
- Reduce Layer Opacity: If the whitening effect appears too strong or obvious, reduce the overall opacity of the adjustment layer. A subtle change is often more effective than a dramatic one.
When to Consider Outsourcing Teeth Retouching
While Photoshop provides the tools for effective teeth whitening, editing large batches of images can be time-consuming. You may consider outsourcing if:
- You are editing large volumes of photos, such as wedding batches, studio portraits, or e-commerce product images featuring models.
- You need consistent, high-quality results across numerous images.
- You want to save time and focus on other aspects of your photography or business.
Professional retouchers possess the expertise and efficiency to deliver natural-looking results consistently, ensuring that teeth appear bright and healthy without looking artificial.
Frequently Asked Questions
How do you whiten teeth in Photoshop without making them look fake?Use a Hue/Saturation or Curves adjustment layer to target yellow tones and reduce saturation slightly. Apply the effect with a soft, carefully controlled layer mask. Lower the layer opacity if needed, and always preserve the natural texture and soft shadows of the teeth.
What is the best way to whiten teeth in Photoshop?The Hue/Saturation adjustment layer is a popular and effective method for targeting yellow tones. For more advanced control and smoother results, professional retouchers often prefer the Curves adjustment layer.
Why do teeth look gray after whitening?Teeth can appear gray if too much saturation is removed or if the lightness is over-adjusted, creating a flat, desaturated look. Ensure you reduce saturation gradually and maintain subtle variations in tone.
Should teeth be pure white in edited photos?No. Natural teeth have subtle gradients, soft shadows, and slight variations in tone. Aim for balanced brightness that enhances the smile rather than an artificial, pure white appearance.
Final Thoughts
Mastering teeth whitening in Photoshop is an achievable skill that can significantly elevate the quality of your portraits. Whether you opt for the straightforward Hue/Saturation method, the precise Curves adjustment, or the advanced Dodge & Burn technique, the key lies in subtlety and careful masking. Always strive for natural brightness that complements the subject's smile and the overall image, rather than an overtly artificial white. Remember that effective retouching is about enhancement, not alteration. By applying these techniques thoughtfully, you can ensure your subjects always present their best, most confident smiles.