Procreate has emerged as a dominant force in the realm of digital art, offering an accessible yet powerful platform for creators on the iPad. This intuitive application has democratized digital illustration, making it a go-to tool for both budding artists and seasoned professionals alike. While its user-friendly interface makes it a great tool for beginners, the sheer breadth of its features can initially feel overwhelming. This guide aims to demystify Procreate, breaking down its core functionalities and providing a solid foundation for users to explore its creative potential.
Getting Started: Essential Supplies and Setup
Embarking on your Procreate journey requires minimal investment. The core necessities are the Procreate app itself, an iPad, and a drawing implement. For those just beginning, drawing directly on the iPad screen with a finger is a perfectly viable starting point. However, for a more refined and precise drawing experience, an Apple Pencil is highly recommended. Many artists, including experienced professionals, consider the iPad Pro series to be the best iPad for Procreate, offering a seamless and responsive canvas for digital creation. The Procreate app is a paid application, but its affordable price point belies the extensive capabilities it offers, making it an exceptional value for the power it puts in your hands.
The Gallery Page: Organizing Your Digital Studio
Upon launching Procreate, you are greeted by the Gallery page. This serves as your digital portfolio, displaying all your created artworks as thumbnail previews. To maintain order and efficiency, Procreate offers a feature called "stacks." Stacks are essentially folders that allow you to group related projects. This is incredibly useful for organizing illustrations that are part of a series, or for keeping together different canvases used to create a repeating pattern. Effective use of stacks can significantly declutter your workspace and make it easier to locate specific projects.
Within the gallery menu, two frequently used functions are "delete" and "duplicate." The delete function permanently removes artwork, which is a practical way to manage storage space on your iPad by clearing out old or unused projects. The duplicate function, as its name suggests, creates an exact replica of your project, including all its associated layers. This is particularly beneficial when working on repeat patterns, as it allows you to easily replicate and modify elements. It's also an invaluable tool when you wish to experiment with modifications to a piece of artwork without altering the original. To open a project for editing, simply tap on its thumbnail image. A significant advantage of Procreate is its automatic saving feature, ensuring that your progress is consistently preserved.

Initiating a New Project: Canvas Creation
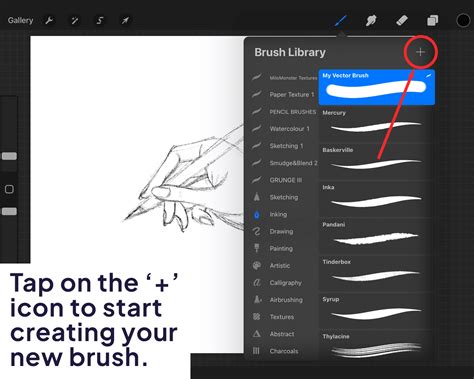
To begin a new artistic endeavor, tap the plus icon located at the top right of the Gallery page. Procreate provides a selection of default canvas presets to facilitate a quick start. For those who wish to simply explore the app's functionalities or engage in casual doodling, selecting "Screen Size" is an excellent option. This preset creates a canvas that perfectly matches the dimensions of your iPad's screen, offering an immediate and accessible workspace. Many artists also find this screen-size canvas ideal for thumbnail sketches or preliminary ideation that won't necessarily be exported as final pieces.
However, for more professional and high-resolution artwork intended for large-scale printing or display, creating custom canvases is often preferred. The integrity of an artwork can be compromised when scaled up significantly if it wasn't initially created at a high resolution. Working with larger canvases in Procreate ensures that your work maintains its quality when reproduced on items like tapestries or bedding. It is important to note that a larger canvas size comes with a trade-off: a reduction in the number of available layers. If you find yourself frequently encountering layer limitations, starting with a slightly smaller canvas size might be a more practical approach.
To create a custom canvas, tap the black icon situated at the top right of the canvas menu. This action opens a screen where you can meticulously define your canvas parameters. For the highest possible resolution, you can set your canvas to the largest dimensions supported by Procreate. On many current iPad models, this can extend up to 27 inches by 27 inches, providing an expansive digital real estate for intricate and detailed creations.
Navigating the Main Tools: Your Digital Toolkit
Once your canvas is open, you will notice the primary drawing tools arrayed at the top right corner of the screen. The first and perhaps most fundamental tool is the brush tool. Procreate boasts an extensive library of high-quality default brushes, catering to a wide array of artistic styles and needs. While there's no immediate necessity to purchase third-party brushes when you're starting out, they can be a fantastic way to expand your creative options and add unique textures to your artwork as you progress.
The size and opacity of your selected brush can be effortlessly adjusted using the intuitive slider located on the left side of the screen. This allows for dynamic control over your mark-making, enabling everything from fine, delicate lines to broad, expressive strokes.
Following the brush tool is the smudge tool. While not universally used by all artists, its function is akin to that of the paintbrush tool, allowing you to blend and soften colors and textures on your canvas. Its utility is often dependent on the specific artistic style being employed.
The eraser tool is next in line. Its purpose is straightforward: to remove elements from your canvas. However, it's generally not recommended to rely on the eraser as a primary editing tool. Procreate offers numerous other features designed for non-destructive editing, which provide more flexibility and safety for correcting mistakes. These methods allow for adjustments and revisions without permanently altering the underlying artwork. While a deeper dive into non-destructive editing techniques is beyond the scope of this introductory guide, it's a crucial concept to explore as you advance your skills.
The Power of Layers
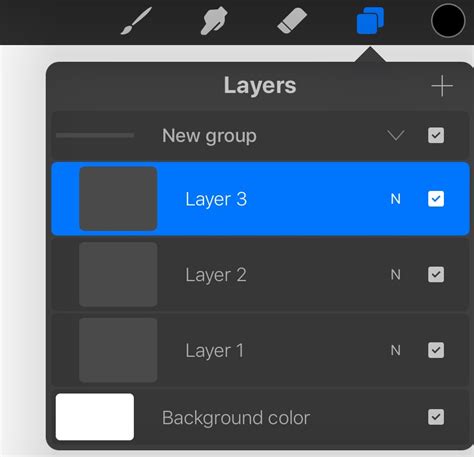
Crucially, the layers panel is a cornerstone of Procreate's functionality. For those familiar with Adobe Creative Suite applications like Photoshop, the concept of layers will be intuitive. Layers allow you to construct your artwork in distinct, independent components. This modular approach grants immense flexibility. You can reposition individual layers, bring elements forward or push them backward in the composition, hide layers to focus on specific parts of your artwork, and even use layers to trace over images or reference material. The possibilities for manipulation and refinement are virtually limitless.
Exploring the Color Palette Options
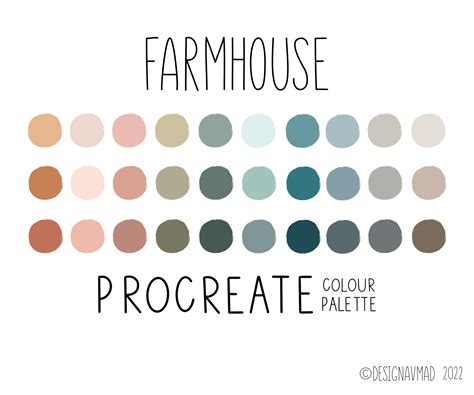
The final icon in the row of main tools on the top right of your screen is the color tool. This opens up a comprehensive menu for selecting and managing colors. At the bottom of this menu, you'll find various options for color selection. The default display is the color palettes menu, a highly favored feature among many artists. This menu allows you to create and save custom color palettes, ensuring consistency and thematic coherence across your projects.
To the left of the palettes menu is the values menu, which offers another method for selecting custom colors. Among the various color-picking tools available, the classic menu is frequently used. This traditional color wheel interface provides a familiar and effective way to choose hues, saturation, and brightness.
Once you have identified a color you wish to use, adding it to a custom palette is a simple process. Navigate back to your palettes menu and tap on any available slot within your chosen palette. This action will automatically add the selected color, making it readily accessible for future use throughout your artwork.
Beyond curated palettes, Procreate also features a powerful color picker tool. This allows you to sample colors directly from your existing artwork or from any image you've imported onto your canvas. The color picker is represented by a small eyedropper icon, typically located within a horizontal tool bar on the far left of the screen. This feature is invaluable for creating harmonious color schemes or for accurately replicating colors from reference material.
Essential Shortcuts and Procreate Animation
Mastering Procreate also involves understanding its essential shortcuts, which can significantly streamline your workflow. The most critical shortcuts for any beginner to learn are how to undo and redo actions. A common question among new Procreate users is, "Where is command Z?" In Procreate, the equivalent of "undo" is achieved by simply tapping the screen with two fingers. To "redo" an action that you have just undone, tap the screen with three fingers. These two shortcuts are fundamental for experimentation and error correction, allowing you to confidently explore different creative directions.
Exploring Animation in Procreate Dreams
For artists looking to delve into animation, Procreate Dreams offers a powerful and accessible environment. It's important to note that the tutorials available might be based on an early release, and features may have evolved. However, the core principles remain. Lisa Bardot provides insights into three primary animation techniques within Procreate Dreams: frame-by-frame animation, utilizing keyframes, and performance-based animation.
For those who are completely new to animation, Alex's "Animation for Anyone" class offers a comprehensive starting point. He guides users through the process of bringing a character to life within Procreate Dreams. Alex even provides a downloadable file of his own character, offering an alternative for users who prefer to start with a pre-made asset. Alex is recognized as an accomplished director and animator, lending significant credibility to his instruction.
Brooke Glaser presents an energetic and focused 17-minute tutorial, packed with valuable information for aspiring animators. These resources, alongside the foundational knowledge of Procreate itself, empower artists to explore the dynamic world of digital animation.
Procreate Dreams - Making frame by frame animation a little easier
Advanced Tips and Further Learning
The fundamental tools and techniques discussed here provide a robust starting point for your Procreate journey. However, Procreate is a deep application with layers of functionality waiting to be discovered. To truly master Procreate and unlock its full potential, continuous learning and practice are key.
Many artists find immense value in structured learning environments. Comprehensive, all-in-one Procreate courses are available, designed to guide users from beginner to advanced levels. These courses often cover a wide range of topics, including advanced brush creation, intricate layer manipulation, custom brush engine settings, and sophisticated color theory application. They can also introduce you to new drawing styles and techniques, providing fresh inspiration and expanding your artistic repertoire.
Engaging with the Procreate community can also be incredibly beneficial. Online forums, social media groups, and dedicated art platforms are excellent places to share your work, receive feedback, and learn from the experiences of other artists. Many experienced Procreate users are generous with their knowledge, offering tips, tricks, and insights that can accelerate your learning curve.
Remember, the journey of mastering any creative tool is ongoing. Procreate, with its ever-evolving features and vast capabilities, offers a continuous learning experience. By understanding the core functionalities, practicing regularly, and seeking out further educational resources, you can transform your creative visions into stunning digital realities. Your Procreate drawings can indeed be taken to the next level with dedication and exploration.