One of Photoshop’s most powerful features is the ability to cut out an element from an image using the Selection tool and a layer mask, and then add it into a different image. This process is a fundamental component of photo editing, enabling the creation of entirely new visual narratives. However, once you’ve combined elements from multiple images, a crucial step remains: smoothing out their often jagged edges to make them look natural and convincingly occupy the same space. This is where the art of edge blending in Photoshop truly shines, transforming a collection of disparate elements into a cohesive and believable whole.
The Foundation: Selections and Layer Masks
Before diving into the nuances of blending, it's essential to understand the underlying mechanisms. The journey typically begins with a selection. Whether you employ the precision of the Pen Tool, the quickness of the Lasso Tool, or the intelligent edge detection of the Object Selection Tool, the initial goal is to isolate the subject from its background. Once a selection is made, it's common practice to apply a layer mask. A layer mask acts as a non-destructive window onto your layer; white areas reveal the layer content, black areas conceal it, and shades of gray create semi-transparency. This non-destructive nature is paramount, as it allows for ongoing refinement without permanently altering the original pixels.
Smoothing the Edges: Anti-aliasing and Feathering
When adding something new to an existing image, the transition between the edges of the new element and the background of the destination image can appear harsh. To combat this, Photoshop offers several techniques, with anti-aliasing and feathering being the most prominent.
Anti-aliasing: The Gentle Softening
Anti-aliasing is a technique that gently softens the opacity and color transition between edge pixels and background pixels. Its primary purpose is to preserve the image’s clarity and detail while reducing the noticeable "stair-step" effect often seen on pixelated edges. Unlike feathering, anti-aliasing doesn't create a broad fade; it works at a very fine, pixel-level to smooth out the sharp transitions. It’s particularly useful when the selection tool itself might introduce some aliasing, ensuring a cleaner cut.
Feathering: The Art of the Gradual Fade
Another, and perhaps more widely recognized, way to smooth the edges of your image is through feathering. Feathering basically softens up the edges of your selection by gently fading between the pixels on the border and the pixels in the surrounding area. This creates a soft, diffused edge that can help a newly added element blend in more naturally with the rest of the image.
To apply feathering, you typically access it through selection tool options or within the Select and Mask workspace.
Feather it: Enter a number into the Feather Radius field. This number determines how many pixels away from the edge of your selection the Feather tool will go before it starts smoothing and blending. The value you choose is critical:
- Start with a small radius like 0.5-2px first. This is ideal for subtle blending, such as with small objects or when the background of the destination image has similar tones to the edges of the subject.
- Go higher at 5-20px for wide feathery edges. This is useful for larger subjects or when you want a more pronounced, ethereal softness.
- Use larger feather amounts for bigger selections or objects. The scale of the object or selection directly influences the appropriate feather radius for a natural blend.
While feathering makes edges semi-transparent, which can increase file size slightly, it's a powerful tool for achieving seamless composites. It’s advisable to use conservatively on low-res web images where file size is a concern.

Beyond Basic Feathering: Advanced Blending Techniques
While feathering and anti-aliasing are core to edge blending, Photoshop offers a richer toolkit for more complex scenarios.
The Layer Mask Brush: Fine-Tuning Transparency
The layer mask itself becomes a canvas for further refinement. Instead of relying solely on the initial feathering setting, you can directly paint on the mask using a brush.
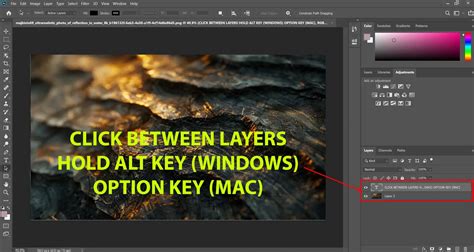
- Insert a layer mask to your light layer. (This advice is often given when dealing with light overlays, but the principle applies to any foreground element).
- Fill the mask at first with white to ensure the element is fully visible.
- Then, spray to the mask edges slowly with black using a brush. This allows you to manually fade the edges nicely. The beauty of this method is its reversibility: if you make an error, nothing is deleted permanently. You can always switch the brush color back to white to bring parts of the layer back.
- Adjust by using the curves tool the steepness of the mask gradient. This offers precise control over the transition.
- You can also spray into it more white or black by large smooth brush that has low opacity or slow airbrush mode ON. This allows for very subtle, gradual transitions that mimic natural light fall-off or atmospheric effects.
Gradient Fills and Radial Gradients
For a more controlled and systematic fade, gradients are invaluable.
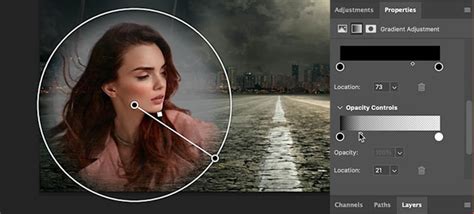
- You can also insert to the mask a radial gradient. A radial gradient, radiating from a central point, can create a soft vignette effect or a smooth blend outwards from a focal point.
- Method I have used is first make edges transparent and then set gradient image as background. This implies creating a transparent edge on the foreground element and then placing a gradient image as the background, allowing the transparency to blend into the gradient.
Addressing Complex Composites and Overlays
Sometimes, the task of blending extends beyond simple object isolation. Overlaying elements like light effects or textures presents unique challenges.
Blending Light Overlays
When dealing with light overlays, a common issue is the harsh perimeter that doesn't blend into the existing image.
- Insert a layer mask to your light layer. As with other elements, a mask is your primary tool.
- Fill the mask at first with white and spray to the mask edges slowly black to fade the edges nicely. This is the fundamental technique to soften the overlay's edge.
- The example provided notes that the overlay uses the blending mode Hard Light which also darkens some areas. This is a crucial observation. Blending modes significantly impact how layers interact. Hard Light, for instance, can increase contrast and saturation, and may require careful masking to avoid undesirable darkening.
- Your case is more complex than mine. The new light should have some effect to the objects in the image. I mean more difference between lit areas and shadows. This highlights that effective blending isn't just about masking; it's about making the overlay feel integrated. This might involve adjusting the overlay's opacity, color, or even using additional masks to selectively apply its effect.
Generative AI Fill: A Modern Solution
For particularly challenging joins or when speed is of the essence, Photoshop's Generative AI Fill offers a novel approach.
- A super lazy option is to use Photoshop's Generative AI fill for something like this. While perhaps "lazy," it's undeniably efficient.
- Use the rectangle tool to to select around the most obvious line. Then hit the Generative AI fill button. It will create a patch to cover the join. This tool analyzes the surrounding pixels and generates content that seamlessly fills the selected area, often resolving hard edges or unwanted seams with remarkable accuracy.
High-Quality Compositing with Generative Fill? - Photoshop Tutorial
Enhancing the Blend: Backgrounds and Color Adjustments
The success of edge blending isn't solely dependent on the foreground element; the background plays a significant role.
Background Considerations
- Consider also to try somehow more complex background than a gradient. While a simple gradient can work, a more complex background that shares visual characteristics with the foreground can significantly improve the blend.
- It blends better if it has horizontally same colours than the image. This is a key principle: matching the tonal and color profiles of the background to the foreground element's environment creates a more harmonious integration.
- Here's one that is made by motion blur from the photo. Creating a background that mimics the motion blur of the original scene can convincingly place a subject within that environment.
- The blurred layer need several duplications to make it thick enough. A slight motion blur is applied also vertically. This indicates that achieving a convincing atmospheric background might require layering and subtle adjustments to texture and depth.
Color Adjustments for Unity
Even with perfect edge blending, differences in color and tone can betray a composite.
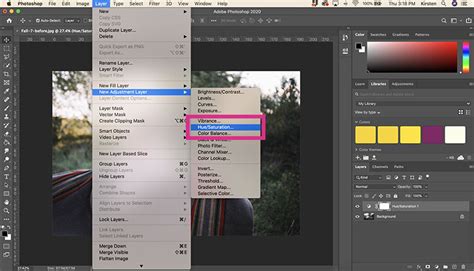
- It needs heavy color adjustment before use. This is a critical step. The foreground element might need its colors shifted to match the lighting and palette of the destination image.
- Red is offensive and must be turned to blue with Image > Adjustments > Hue&Saturation. This specific example highlights how drastic color corrections can be necessary. Using tools like Hue/Saturation, Color Balance, or Curves allows you to fine-tune the color temperature, saturation, and luminosity of the blended element to match its new surroundings.
The Select and Mask Workspace: A Dedicated Environment
For advanced selection and masking, Photoshop’s Select and Mask workspace provides a comprehensive suite of tools. This is where you can refine edge selection, adjust feathering, smooth jaggedness, and control contrast for even more nuanced results. Tools like the "Refine Edge Brush Tool" are specifically designed to intelligently select and blend complex edges, such as hair or fur, which are notoriously difficult to isolate cleanly.
Layer > Matting > Defringe
For specific issues, particularly with elements that have transparent halos, Photoshop offers specialized tools.
- Use Layer > Matting > Defringe to feather just the transparent pixels on the inside. This command is excellent for cleaning up edges that have picked up unwanted color fringing from their original background, especially after applying a mask. It targets the pixels along the edge of the transparency and blends them inward, effectively removing the halo.
Understanding the Nuances: When to Use What
The choice of blending technique depends heavily on the specific image and the desired outcome.
- Feathering is a way to soften the hard edges of an object in your image. It's your go-to for general softening.
- Feathering isn’t the only way to soften up an edge. Remember the brush and gradient tools.
- Photoshop can do so much more than just create soft, feathered edges. Embrace the full range of tools available.
- Use feathering when you want to blend edges seamlessly, like when compositing objects onto new backgrounds or creating masks. This is its primary application.
- Anti-alias smooths jagged edges but doesn't fade or blur the edge itself. It’s more about pixel purity than broad softness.
- Minimal smoothing has little effect on quality. This is true; the impact of smoothing or feathering is directly related to the radius and strength applied.
Ultimately, mastering edge blending in Photoshop is an iterative process of selection, masking, and refinement. By understanding the fundamental tools and exploring the advanced options, you can achieve remarkably seamless and professional-looking composites, bringing your creative visions to life.