DaVinci Resolve is a powerful and popular video editing software renowned for its advanced features, including robust color grading capabilities and 3D video editing. For many users, a key element in streamlining their workflow and achieving consistent results is the use of adjustment clips. These versatile tools offer enhanced control and flexibility, allowing editors to apply effects, color corrections, and other modifications across multiple clips simultaneously without altering the original footage. This guide delves into the intricacies of using adjustment clips in DaVinci Resolve, exploring their benefits, practical applications, and offering alternative approaches for specific grading needs.
The Power and Purpose of Adjustment Clips
An adjustment clip, at its core, is a special type of video clip that acts as a parent layer, influencing all the video clips positioned beneath it on the timeline. This unique functionality means that instead of applying the same effect or color grade to each individual clip, you can place a single adjustment clip above them and achieve a uniform look. This not only saves significant time and manual effort but also ensures consistency across your project.
One of the most significant advantages of using adjustment clips is their non-destructive nature. They do not modify the original pixels of the video clips they affect. This means your source footage remains untouched, offering the freedom to experiment with various looks and effects without risking permanent alterations to your media.
The primary benefit of adding an adjustment clip in DaVinci Resolve is the significant boost in control and flexibility it provides during the video editing process. This ease of use means you don't have to apply the same effect to multiple clips individually, a process that can be incredibly time-consuming and repetitive. Thus, it saves valuable time and manual effort on DaVinci Resolve.
How to Add and Utilize Adjustment Clips
Adding an adjustment clip to your DaVinci Resolve project is a straightforward process.
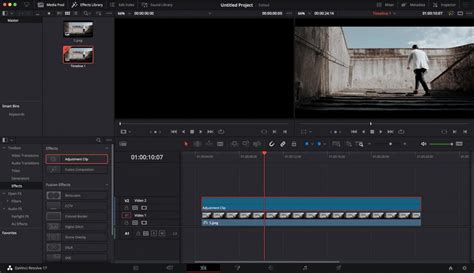
Step 1: Access the Effects LibraryNavigate to the Effects Library, typically found within the Toolbox.
Step 2: Locate the Adjustment ClipWithin the Effects Library, select "Effects." You will find the Adjustment Clip readily available.
Step 3: Drag and Drop to the TimelineClick and drag the Adjustment Clip from the Effects Library and place it on a video track above the clip or clips you wish to affect.
Step 4: Extend the Adjustment Clip's DurationOnce placed on the timeline, you can extend the adjustment clip's duration to match the length of the underlying clips or a specific portion of them. Simply drag the corners of the adjustment clip to match the desired duration. If you want the adjustment to affect the entire duration of a clip, drag the corners of the adjustment clip to match the duration of the video underneath. In our example, we will limit the adjustment to a portion of the video clip.
Any effect available in DaVinci Resolve can be added to an Adjustment Clip. This broad compatibility makes adjustment clips incredibly versatile.
Practical Applications of Adjustment Clips
Adjustment clips are not limited to simple effect application; they can be instrumental in achieving a variety of creative and technical outcomes.
1. Creating Zoom-In Effects
To give a zoom-in element in your video that emphasizes your subject, you can leverage an adjustment clip. The zoom-in effect is created to focus on the subject, thereby engaging the viewers. On DaVinci Resolve, you can create the zoom-in effect using an adjustment clip.
Step 1: Add the adjustment layer to your timeline by heading to the Effects Library and then the Toolbox.Step 2: Click on "Inspector" from the top right corner. Enhance the "Zoom" value according to your desire.
This simple technique can add dynamism to static shots or draw attention to specific details without the need for complex keyframing or additional footage.
2. Enhancing Color Grading
Color grading can fundamentally change the perspective and mood of your video clips. Whether you want to give your video an aesthetic, gloomy, or colorful vibe, you can achieve these changes using an adjustment clip on the Color page.
Step 1: Drag and drop your clip above on the timeline.Step 2: On the Color page, go to "Library" from the right side and select the effect called "Color Space Transform" from the Resolve FX Color section.
By applying color grading effects to an adjustment clip, you ensure that the chosen look is consistently applied across all underlying clips, maintaining a cohesive visual style throughout your project.
3. Adding Dramatic Shake Transitions
The shake transition can add a dramatic feel to your video, helping to hook the audience. If you have recorded a music video, for instance, adding a shake transition can make it more captivating.
Step 1: Add the adjustment layer to your timeline.Step 2: From the left side, select the "Open FX" library and search for the "Camera shake" effect. Apply it to the adjustment layer.Step 3: Navigate to the "Effects" tab from the top right corner. From there, increase the values of motion scale, speed scale, and motion blur.Step 4: Afterward, scroll to the bottom and change the "Border Type" to "Reflect." Now, head back to the Open FX library and select the "Flicker Addition" effect. Apply this particular effect to the adjustment layer. From the "Effects" tab on the right side, select "Flicker Gain" as your flicker type.
You can also select different composite modes. You can also duplicate the adjustment clip and alter the composite mode of the second clip. Once done, decrease the opacity of the second clip.
4. Creating Animations and Keyframes
Adjustment clips can also be used to create sophisticated animations. By utilizing keyframes, you can animate any parameter within the Inspector panel over the duration of the adjustment clip.
Step 1: Add the adjustment clip to your timeline and select it.Step 2: In the Inspector panel, locate the property you wish to animate. Click on the diamond icon next to the property to set a keyframe.Step 3: Move the playhead to a different frame on the timeline and adjust the parameter again. DaVinci Resolve will automatically create a new keyframe.Step 4: Repeat this process to add multiple keyframes, creating complex motion graphics or dynamic visual changes.
If you place the playhead at the beginning of the timeline and play the video, you will be able to see the animation.
DaVinci Resolve Group Clip Functionality: An Alternative Approach
While adjustment clips are incredibly useful, DaVinci Resolve offers alternative functionalities that many users prefer, particularly for color grading. One such powerful feature is clip grouping.
The export behavior with an adjustment layer is generally considered intended by Blackmagic Design. However, an alternative to adjustment layers for color grading that many prefer are DaVinci Resolve's group or remote grade functionalities.
How Clip Grouping Works:
- Grouping Clips: You can group clips from the same camera or a set of clips that require a similar grade. This is done by selecting the desired clips, right-clicking, and choosing "Add to New Group."
- Group Pre-Clip and Group Post-Clip: Within the Color page, you can then apply grades to the "Group Pre-Clip" or "Group Post-Clip" nodes. These grades will be applied to all clips within that group.
- Group Pre-Clip: Applied before any individual clip adjustments within the group.
- Group Post-Clip: Applied after individual clip adjustments within the group.
- Consistent Grading: When you export your project, each individual clip will have the color grade applied via the Group Pre-Clip or Group Post-Clip settings baked in. This provides the same result and functionality as an adjustment clip but is often preferred by professional colorists.
Benefits of Clip Grouping for Color Grading:
- Streamlined Workflow: Apply a consistent grade to multiple clips efficiently.
- Preserves Original Footage: Similar to adjustment clips, this method is non-destructive to the original media.
- Professional Preference: Many colorists are more accustomed to working with node-based grading systems and group functionalities.
Before submitting a feature request to Blackmagic Design regarding adjustment layers, it is highly recommended to explore and try the clip grouping functionality.
Limitations of Clip Grouping
It is worth noting that clip grouping has a significant limitation: clips can only belong to one group at a time.
This means:
- If you want to use groups to manage camera grades between different cameras, you can do that.
- If you want to manage different grades between scenes, you can also do that.
- However, you cannot do both simultaneously because a clip can only be in one group at once.
This limitation can be a crucial factor if your workflow relies on managing multiple grading tiers or complex scene-based adjustments using groups.
The "Ecosystem Protectionism" Argument
There's a prevailing suspicion that Blackmagic Design might be employing a strategy of "ecosystem protectionism" with these limitations. The argument suggests:
- Professional Colorists: Most people round-tripping to Resolve from another editor are likely working with a professional colorist who wouldn't typically use adjustment layers. For them, this limitation wouldn't be an issue.
- Independent Editors: The users who are accustomed to using adjustment layers are often those doing all their post-production work themselves and may be transitioning from a different Non-Linear Editor (NLE).
- The "Ransom": This subtly positions Resolve as a "ransom" situation. Blackmagic Design might be implicitly suggesting that if you want the full color grading potential of Resolve and wish to maintain your existing workflow habits, you should also edit within Resolve and abandon your previous NLE. This can be a significant consideration if this limitation impacts your established workflow.
Advanced Techniques and Considerations
Copying and Pasting Adjustment Clips
Once you have created an adjustment clip with specific settings, you can easily reuse it.
- Copy: Select the adjustment clip on the timeline and copy it using the shortcut
Ctrl/Cmd+Cor by right-clicking and selecting "Copy." - Paste: Navigate to where you want to place the copied adjustment clip on the timeline and paste it using
Ctrl/Cmd+Vor by right-clicking and selecting "Paste."
You can also use an "Alt/Option + Drag" method. Hold down the Alt or Option key, then click and drag the adjustment clip. Release the mouse click first, then release the Alt or Option key. This duplicates the clip with its settings.
Using the Spline Editor for Smoother Animations
For more refined and natural-looking animations, learning to use the spline editor within the Fusion page of DaVinci Resolve is highly recommended. The Fusion page offers more control than the Edit page's splines, allowing animations to start slower, accelerate, and then decelerate, mimicking natural physics.
The "Cutdown Trick" for Commercial Spots
A simple yet powerful technique, particularly relevant for creating short commercial spots (e.g., 15 or 30 seconds), involves using adjustment clips to manage timing. By placing an adjustment clip of exactly 15 seconds on a track above your content and disabling the "auto-select control," you can gain a bird's-eye view of your time constraints. This allows for efficient auditioning of different versions of a short spot on the same timeline.
I Wasted HOURS Editing UNTIL I Used these 5 Adjustment Clip Tips in DaVinci Resolve
DaVinci Resolve's Edit Page Capabilities
The Edit page in DaVinci Resolve is designed to be both intuitive for new users and powerful for professionals. It offers:
- Drag-and-Drop Editing: Quickly build stories and arrange shots.
- Traditional Three-Point Editing: Tools familiar to industry editors.
- Automatic Trim Cursor: A context-sensitive cursor that changes based on where you click, speeding up the editing process.
- Extensive Media Import: Drag and drop files directly, with support for maintaining folder structures.
- Wide Format Support: Works with virtually all professional video and audio formats, including H.264, H.265, ProRes, DNx, Blackmagic RAW, and EXR.
- In/Out Point Marking: Precisely define the portion of a clip you want to use, with separate marking for audio and video for split edits.
- Versatile Edit Types: Insert, overwrite, replace, fit to fill, place on top, append at end, and ripple overwrite options are readily available via drag-and-drop overlays or keyboard shortcuts.
- Advanced Trimming: Smart trim tools, context-sensitive trimming, roll trims, ripple trims, slip, and slide edits provide granular control over clip timing.
- Effects Library: A vast array of broadcast-quality transitions and special effects, including blurs, flares, and warps, are available.
- Title and Text Generation: Create 2D and 3D titles using Fusion title templates or basic generators.
- Keyframing and Animation: Animate any parameter in the Inspector panel over time using keyframe buttons, with advanced control available in the keyframe and curve editors.
- Fairlight Audio Tools: Comprehensive audio editing suite with level controls, panning, pitch, EQ, and a wide range of Fairlight FX for audio post-production.
- Quick Export and Custom Presets: Efficiently deliver your final project with quick export options or create custom render settings on the Deliver page.
- Advanced Editing Features: As you progress, you can explore features like speed ramps, picture-in-picture effects, multicam editing, and advanced trimming tools.
- Dynamic Zoom: Easily add gentle push-in or pull-out animations to shots.
- Stabilization and Lens Correction: Built-in tools to smooth out unwanted camera motion or correct lens distortions.
- Smooth Cut Transition: Advanced optical flow analysis to remove jarring jump cuts.
- Multicam Editing: Robust multicam tools for editing projects with multiple camera angles.
- Customizable Keyboard Shortcuts: Tailor your workflow with extensive keyboard shortcut customization options.
- Subtitle and Closed Captioning Tools: Import and create subtitles with support for various formats like TTML, SRT, and XML.
- Markers: Use markers on clips or the timeline as reminders for tasks or specific points of interest.
Considering Alternatives: Wondershare Filmora
While DaVinci Resolve is a professional-grade software, if you find its adjustment clip workflow or overall complexity challenging, or if you're looking for a more accessible option, Wondershare Filmora is presented as a viable alternative.
Filmora is noted for its user-friendly interface and a plethora of features that can streamline video editing. It also supports the use of adjustment layers, allowing for similar efficiencies in applying effects and color grades across multiple clips. Filmora is available on multiple platforms, including iOS, Android, Windows, and Mac. Its library contains numerous trending effects that can enhance video clips, and it offers options to alter blending modes, change opacity, and apply various presets for a cinematic look.
The platform also offers a free trial, allowing users to test its capabilities before committing to a subscription. This includes access to a collection of free elements even before starting a trial.
Conclusion on Adjustment Clips in DaVinci Resolve
Adjustment clips are an indispensable tool in DaVinci Resolve for any editor looking to enhance efficiency and maintain visual consistency. They offer a non-destructive way to apply a wide range of effects, color grades, and animations across multiple clips. While DaVinci Resolve's clip grouping functionality presents a powerful alternative, especially for professional colorists, understanding and utilizing adjustment clips remains a fundamental skill for navigating and mastering the software's editing capabilities. The flexibility they offer, from simple zoom effects to complex animations, makes them a cornerstone of a streamlined and professional video editing workflow within DaVinci Resolve.