The human eye, often described as the "window to the soul," possesses an unparalleled ability to convey emotion, capture attention, and forge a profound connection with viewers. For photographers, particularly those working with portraits and wildlife, enhancing the natural allure of the eyes can dramatically elevate an image, transforming a good photograph into a truly captivating one. Adobe Lightroom offers a powerful suite of tools that allow for precise and natural-looking eye enhancements, ensuring that the focus remains on the subject's captivating gaze rather than the editing process itself. This tutorial delves into the essential techniques for brightening and defining eyes in Lightroom, applicable to a wide range of photographic genres.
Understanding the Fundamentals of Eye Enhancement
Before diving into specific tools and techniques, it's crucial to grasp the underlying principles of effective eye enhancement. The goal is not to create artificial-looking eyes, but rather to subtly amplify their natural beauty. This involves a delicate balance of exposure, contrast, and detail, ensuring that the enhancements integrate seamlessly with the rest of the image.
The "Windows to the Soul"
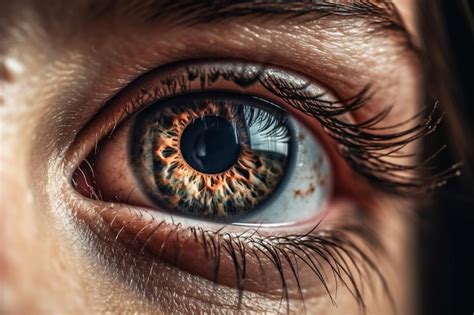
The sentiment that eyes are windows to the soul resonates deeply with photographers. In wildlife photography, for instance, the eyes of an animal are often the immediate focal point, drawing the viewer into the creature's world. The instinct to enhance these features is powerful, and with the right approach in Lightroom, this instinct can be translated into stunning visual results. The inherent ability of eyes to convey emotions and create a connection with viewers makes their careful enhancement a critical aspect of portrait and wildlife photography.
Maintaining Naturalism
A common pitfall in eye enhancement is over-editing, which can lead to unnatural and distracting results. The key to successful eye brightening lies in a light touch and a keen eye for detail. The aim is to achieve a look that is captivating yet authentic, ensuring that the viewer's attention is drawn to the subject's eyes without questioning the realism of the image. This principle extends to all forms of retouching, where the best edits are often those that go unnoticed, seamlessly integrated into the original capture.
Harnessing the Power of Lightroom's Adjustment Brush
The Adjustment Brush in Lightroom is an indispensable tool for localized edits, allowing for precise modifications to specific areas of an image. Its versatility makes it ideal for targeted eye brightening and detail enhancement.
Initial Processing and Preparation
Prior to employing the Adjustment Brush for eye brightening, it is recommended to complete the overall processing of the image. This ensures that the subsequent localized adjustments harmonize with the image's global tone and color balance. Once the overall image is processed to your satisfaction, you can then zoom in on the eyes to begin the fine-tuning process.
Lifting Shadows and Enhancing Detail
A fundamental step in bringing out the best in an eye is to lift the shadows. This can be achieved by subtly increasing the exposure within the eye area, which helps to reveal details that might otherwise be lost in shadow. Following this, a preset specifically designed for "iris enhancement" can be applied using the Adjustment Brush. This preset is often configured to subtly brighten and define the iris.
The Magic of Catchlights
The reflection in the eye, known as the catchlight, is crucial for adding a sense of life and dimension. Lightening the catchlight will impart a beautiful, glossy sheen, making the eyes appear more vibrant and engaging. This is typically achieved using the "Dodge" function within the Adjustment Brush, which essentially applies a slight increase in exposure to the selected area.
Defining Pupils and Dark Markings
Conversely, the pupil and any dark markings around the eye can be subtly darkened to add definition and depth. Using the Adjustment Brush again, these specific areas can be targeted to create a more pronounced contrast, further enhancing the eye's structure and detail. This careful interplay between lightening highlights and darkening shadows is key to creating a three-dimensional effect.
Mitigating Noise in the Iris
In images captured under challenging lighting conditions or with a high ISO, noise (a grainy effect) can be present, even in the eye area. While this may not be noticeable when viewing the image at a smaller scale, it can detract from the detail when zoomed in. The Adjustment Brush can be used to specifically target and reduce noise within the iris, smoothing out the texture without sacrificing detail.
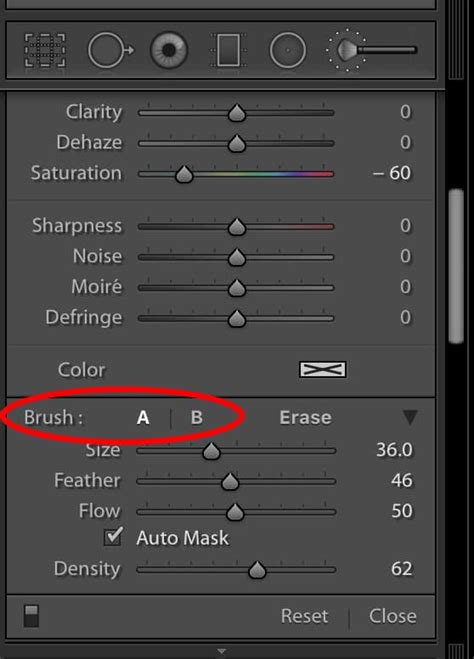
Tailoring Brush Settings for Precision
The effectiveness of the Adjustment Brush hinges on its customizable settings. Adjusting the size, flow, feather, and density of the brush allows for highly precise application. The Flow slider, in particular, is critical; a setting between 25-50% is generally recommended for brightening eyes, as it allows for gradual application of the effect, preventing over-editing. Feathering the brush edges helps to blend the adjustments seamlessly into the surrounding skin tones.
Leveraging the Radial Filter for Targeted Effects
The Radial Filter is another powerful tool in Lightroom that can be used in conjunction with the Adjustment Brush to further refine eye enhancements. It's particularly useful for isolating adjustments to the iris or creating specific lighting effects.
Enhancing Iris Color and Vibrancy
The Radial Filter can be employed to improve the color of the iris and create a more vivid look. Sometimes referred to as a radial mask, this tool is especially effective when you want to enhance the eyes without impacting other areas of the image.
The "Iris Enhance" Preset and Mask Inversion
Within Lightroom's Develop module, there's often a dedicated "Iris Enhance" effect available. When using this effect, it's beneficial to click the "Invert Mask" button. This allows you to draw an ellipse directly over the iris, applying the enhancement precisely where it's needed. After selecting the desired effect and inverting the mask, you can then click and drag to create an ellipse that perfectly fits the iris, adjusting its size and position as necessary.
Duplicating Masks for Consistency
Once you've achieved the desired effect on one eye, you can duplicate the mask to apply the same settings to the other eye. This is done by right-clicking within the masking panel and selecting the "Duplicate" option. This ensures that both eyes receive consistent treatment, maintaining symmetry and a natural appearance.
Streamlining Workflow with Batch Editing
For photographers working with a series of images that require similar eye enhancements, Lightroom's Sync Dialog Box offers a significant time-saving solution.
Applying Settings Across Multiple Images
Instead of manually editing each image individually, the Sync Dialog Box allows you to apply your perfected eye brightening settings to an entire set of photographs at once. This promotes a consistent look and feel throughout your collection, which is particularly valuable for wedding photography or any project where uniformity is desired.
The Synchronization Process
To initiate batch editing, select all the images you wish to edit in the same way. Then, open the Synchronize Settings Dialogue Box by clicking the "Sync" button, typically located at the bottom right-hand side of the screen in the Edit Panels, or by using the shortcut (often Ctrl + D or Cmd + D). Within the dialog box, ensure that the relevant adjustment settings for eye enhancement are selected before synchronizing.
Edit your portraits like a PRO in Lightroom
Achieving Natural-Looking Results: Key Considerations
The ultimate success of eye brightening in Lightroom lies in its subtlety. The goal is to make the eyes "pop" naturally, without drawing attention to the editing process itself.
Balancing Exposure and Contrast
Striking the right balance between exposure and contrast is paramount. Overly brightened eyes can appear flat and artificial, while insufficient contrast can make them lose their impact. Careful adjustment of these sliders ensures that the eyes are well-defined and engaging, yet still appear authentic.
Keeping Clarity and Shadows in Check
Maintaining a natural appearance also involves keeping clarity and shadows in check. While clarity can add definition, excessive amounts can create an unnatural, over-sharpened look. Similarly, while lifting shadows is important for detail, it should be done judiciously to avoid washing out the eye's natural depth. For more controlled adjustments, the Graduated Filter or further use of the Adjustment Brush can be employed.
Avoiding Over-Editing: A Word of Caution
It's easy to get carried away with eye enhancements, especially when first learning the tools. However, a light touch is essential. Over-editing can lead to exaggerated catchlights, unnaturally brightened whites of the eyes, or overly sharp irises. Remember that the goal is to enhance, not to create a caricature.
Applying Techniques to Wildlife and Pet Photography
The principles of eye brightening are equally applicable, and often even more critical, in wildlife and pet photography. The eyes of animals hold immense power to convey their personality, mood, and connection to their environment.
Bringing Wildlife Eyes to Life
In wildlife photography, enhancing the eyes can bring a sense of alertness and vitality to the subject. Lifting shadows, defining the iris, and ensuring catchlights are present can make a significant difference in conveying the animal's presence and spirit. The same techniques for human subjects apply, with careful attention to maintaining the natural characteristics of the animal's eyes.
Captivating Pet Portraits
For pet photographers, the eyes of their subjects are often the most expressive feature. Spending a little time working on the eyes can transform a pet photo from dull to bright and vibrant. However, it's crucial to exercise moderation. Overly brightened, saturated, or sharpened eyes can detract from the natural charm of the animal. Aim for naturally bright eyes with subtle catchlights that reflect the surrounding environment, ensuring both eyes are equally bright and have a similar color tone.
Beyond Brightening: Color and Detail
While brightening is a primary goal, Lightroom also allows for subtle adjustments to the color of the iris and further refinement of details.
Enhancing Iris Color
Using radial filters or the adjustment brush, you can subtly enhance the natural color of the iris, making it richer and more appealing. This should be done with extreme care to avoid creating an artificial hue. The aim is to bring out the existing colors, not to invent new ones.
Refining Dark Markings and Pupils
As mentioned earlier, darkening pupils and dark markings around the eye adds definition and depth. This can be particularly effective in creating a sense of intensity or focus in the animal's gaze.
Presets and Workflow Integration
Lightroom's presets can be a valuable starting point for eye enhancement. Many photographers develop custom presets for their specific style, which can then be applied as a base before making individual tweaks.
Utilizing Presets as a Foundation
Starting with a base preset, such as those from a wedding or portrait collection, can provide a good foundation. These presets often include general adjustments that can be a starting point for eye enhancements. Once a preset is applied, you can then use the Adjustment Brush or Radial Filter to refine the eyes specifically.
Adjusting Preset Intensity
Many presets in Lightroom offer an intensity slider, allowing you to control the overall strength of the applied effect. This is a useful feature for fine-tuning the impact of a preset, ensuring it complements the image without overpowering it.
Conclusion: Unlocking the Expressive Power of Eyes
Enhancing the eyes in your photographs is a powerful technique that can significantly elevate the overall impact of your images, whether they be portraits, wildlife shots, or pet photography. By mastering the tools within Adobe Lightroom, such as the Adjustment Brush and Radial Filter, you can brighten, define, and enrich the eyes while meticulously maintaining a natural appearance. These techniques, when applied with a light touch and a keen eye for detail, allow you to unlock the magic of your subject's gaze, creating captivating and unforgettable images that truly tell a story. Remember that practice and experimentation are key to developing your own signature style in eye enhancement.