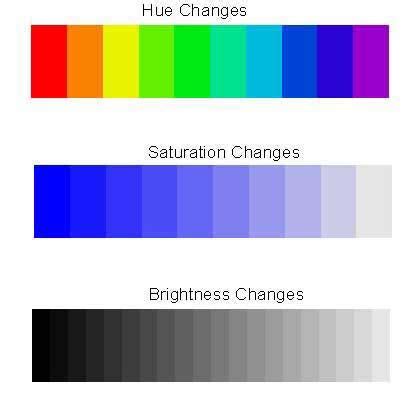
Changing colors within an image is a fundamental yet powerful technique in Adobe Photoshop, allowing for stylistic enhancements, corrections, or complete transformations. Whether you aim to make a specific element pop, correct an inaccurate hue, or reimagine an entire scene with a new palette, Photoshop offers a robust suite of tools. Understanding the basic building blocks of color in Photoshop - hue, saturation, and lightness - is the first step towards mastering these manipulations. Hue represents the pure color itself, such as red, blue, or green. Saturation defines the intensity or purity of that hue, ranging from vibrant to muted. Lightness, as the name suggests, controls the brightness or darkness of the color.
The Power of Adjustment Layers for Non-Destructive Editing
For most color modification tasks, the Hue/Saturation adjustment layer stands out as the most versatile and recommended approach. This method is particularly favored for its non-destructive nature, meaning it doesn't permanently alter the original pixel data, allowing for easy revisions and experimentation.
To employ this technique, you can initiate the process by clicking on the "Adjust colors" button within the Contextual Task Bar. This action will present on-canvas slider controls, enabling you to directly modify the hue, saturation, and lightness of the targeted color. As you make adjustments, you'll see the changes reflected across the entire canvas in real-time. Crucially, Photoshop automatically generates a Hue/Saturation adjustment layer above your active layer, which is linked to the selected color. This ensures that your edits are applied selectively and can be further refined later.
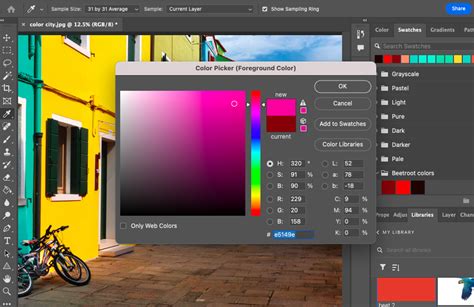
For more granular control and advanced refinement, the Properties panel offers a deeper dive into these adjustments. Here, you will find the familiar Hue/Saturation/Lightness sliders, alongside color swatches that provide a clear before-and-after visual comparison, greatly aiding in achieving the desired outcome.
Applying Specific Color Changes with Hue/Saturation
A common workflow involves using the Hue/Saturation adjustment layer to change the color of specific image elements. This method is compatible with a wide array of file formats, including PSD, JPG, and PNG. The ability to change the color of an image without impacting other areas is elegantly achieved through the strategic use of layer masks in conjunction with adjustment layers. This ensures that your edits are confined to the intended regions of the image. Furthermore, if you opt for adjustment layers, editing or replacing colors in Photoshop becomes a reversible process, offering significant flexibility during the creative workflow.
A step-by-step approach to using Hue/Saturation for specific color changes often begins with making a precise selection of the area you wish to modify. One highly effective method for isolating colors is by utilizing the Color Range selection tool. Navigate to Select > Color Range. Within this dialog, you can actively sample colors directly from your image or the preview area. The tool includes additional sampling options: an eyedropper with a plus sign to add more colors to your selection, and an eyedropper with a minus sign to remove them. This is invaluable for complex color selections.
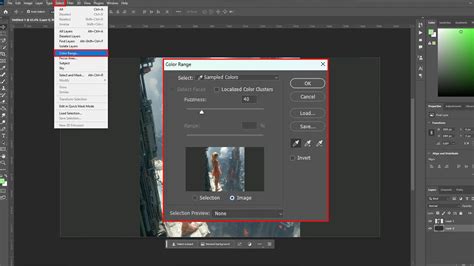
The default Color Range selection samples colors as you click, but several other useful selection modes are available. If you need to select a color only from a particular region of the image, it's advisable to create a rough selection first using a tool like the Lasso Tool before opening the Color Range dialog. The "Selection Preview" dropdown allows you to visualize the selected areas on your actual image. Once you have your selection active, simply add a Hue/Saturation adjustment layer. By manipulating the hue slider, you can then cycle through the spectrum to find the exact color you want to change to.
Advanced Selection Techniques for Precise Color Targeting
When dealing with intricate images or requiring highly specific color replacements, advanced selection techniques become paramount. The Color Range feature is a powerful selection tool that enables you to pinpoint areas of an image based on their color characteristics. This capability makes it remarkably easy to select a specific color and subsequently alter its hue, saturation, and/or brightness.
To initiate a Color Range selection, proceed to Select > Color Range. With the selection radio button active, you can click within the preview area or directly on your image behind the dialog to define the color you wish to isolate. As previously mentioned, the tool offers supplementary sampling options: an eyedropper with a plus sign for adding colors to your selection and an eyedropper with a minus sign for removing them. These additions are exceptionally useful when the desired selection encompasses multiple distinct colors or requires fine-tuning.
The default behavior of Color Range involves sampling colors that you manually select within the preview area. However, Photoshop provides several other valuable selection modes that can cater to different scenarios. For instance, if your objective is to select a color from an image but restrict that selection to a specific part of the image, it is often beneficial to first create a preliminary selection using a tool such as the Lasso Tool. This initial bounding selection can then be refined further within the Color Range dialog. The "Selection Preview" dropdown menu is another critical feature, offering a larger preview of the selected areas as they appear in your actual image, which aids immensely in assessing the accuracy of your selection.
Once your selection is accurately defined and active, the next step is to add a Hue/Saturation adjustment layer. This adjustment layer is the primary instrument for altering the color. By engaging with the hue slider, you can effectively navigate through the color spectrum, allowing you to select the precise new color you intend to implement. This methodical approach ensures that color changes are applied precisely where intended, maintaining the integrity of the rest of the image.
Alternative Methods for Color Replacement
While the Hue/Saturation adjustment layer is often the preferred method, Photoshop offers several other tools and techniques for color manipulation, each suited to different situations and user preferences.
The Color Replacement Tool
The Color Replacement tool is a more direct, brush-based approach to changing colors. It can be accessed by holding down the Brush tool in the Photoshop toolbar. This tool allows you to "paint" over existing colors with a new one. Photoshop provides options to control how the tool samples the original color and how it blends the new color. While it can be quick for simple changes, it often lacks the precision and non-destructive benefits of adjustment layers, and can sometimes lead to less natural-looking results if not used carefully.
Image > Adjustments > Replace Color
For permanent, global color changes that affect the entire image, the Image > Adjustments > Replace Color command is an option. This command allows you to select a specific color range within the image and replace it with a new color. However, unlike adjustment layers, this method makes destructive edits, permanently altering the pixel data. It's generally recommended to use this sparingly or on duplicate layers if you need to preserve the original image.
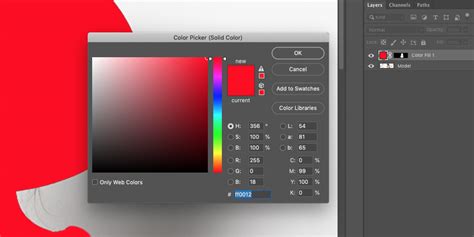
Solid Color Fill Layers for Specific Color Application
Another effective technique, particularly for applying a uniform color or for specific scenarios like recoloring line art, involves using a Solid Color fill layer. This method is exceptionally useful when you need to replace a background color or apply a new hue to an object.
Consider a scenario where you have a grayscale line drawing on a white background, and you wish to change all the white pixels to a specific color, including those within the drawing itself. Instead of trying to "replace" a selected color range, a more elegant solution involves adding a layer filled with your desired specific color below your clipart layer. Subsequently, you would change the clipart layer's blending mode to "Multiply." This blending mode effectively makes white transparent and allows the color below to show through the darker lines of the clipart.
To create a "Solid Color" fill layer, navigate to Layer > New Fill Layer > Solid Color. Photoshop will typically generate a mask along with it, based on any active selection you might have. Alternatively, you can create an empty layer and fill it with your chosen foreground or background color, often accessible through the "Edit" menu or via keyboard shortcuts.
The Sponge Tool for Saturation Control
For localized adjustments to color intensity, the Sponge tool can be employed. This tool allows you to quickly increase or decrease the saturation on only a specific object or area within your image. It acts as a brush that either saturates or desaturates the pixels it passes over, offering a targeted way to enhance or mute colors without affecting the hue or lightness.
Understanding the Nuances of Color Selection and Editing
The ability to accurately select and edit specific colors is central to effective image manipulation in Photoshop. While the Hue/Saturation adjustment layer and Color Range selection are powerful, understanding their interplay and limitations is key.
Making Complex Selections
For more intricate, color-based selections that span your entire image, Photoshop offers powerful tools. Beyond Color Range, you can also leverage Select > Color Range for sophisticated selections. This feature allows for nuanced control over which colors are included in your selection.
A common professional product photography technique involves applying a new color to an object in your image. This often requires careful masking to isolate the product from its background. Once isolated, a Hue/Saturation adjustment layer can be applied to the product layer or as a clipping mask to it, allowing for precise color changes without affecting the background.
Batch Processing for Multiple Images
For users who need to apply color changes across a large number of images, Photoshop offers the efficiency of batch processing. This feature allows you to automate repetitive tasks, including color adjustments, across multiple files simultaneously. By creating an Action that records your desired color changes and then running that Action as a batch process, you can save significant time and ensure consistency across your entire project.
Photoshop Tutorial: How to do BATCH PROCESSING
Reversibility and Non-Destructive Workflows
A crucial aspect of modern digital imaging is the principle of non-destructive editing. As highlighted earlier, using adjustment layers in Photoshop is the cornerstone of this approach. When you apply a Hue/Saturation adjustment layer, for example, it sits on top of your original image layer. This means that the original pixels remain untouched. You can go back at any time, double-click the adjustment layer in the Layers panel, and modify its settings, or even delete it entirely, returning your image to its original state. This reversibility is a significant advantage over destructive editing methods, such as using the Replace Color command directly on the image layer or using tools like the Eraser tool.
Addressing Specific Color Challenges
Photoshop's flexibility allows it to tackle a wide range of color-related challenges, from subtle adjustments to complete overhauls.
Changing White Pixels to a Specific Color
A specific challenge arises when dealing with an image, such as a grayscale clipart-style line drawing on a white background, where the goal is to change all the white pixels to another color, including those seemingly embedded within the drawing. While the Color Replacement tool might seem like a direct solution, it can be cumbersome and may not achieve the desired uniformity, especially with complex shapes.
As discussed previously, a more effective approach involves creating a new Solid Color fill layer and placing it beneath your clipart layer. By setting the clipart layer's blending mode to "Multiply," the white areas of the clipart become transparent, allowing the Solid Color layer beneath to show through. This method ensures that all white areas, internal and external to the drawing, are replaced with your chosen color, achieving a clean and consistent result.
The "Best Way" to Replace Color with a Specific Color
The question of the "best way" to replace color with a specific color in Photoshop is subjective and depends heavily on the image content and the desired outcome. However, for most common scenarios, the combination of Color Range selection followed by a Hue/Saturation adjustment layer is widely considered the most efficient, flexible, and professional method.
This workflow allows for precise targeting of the color to be replaced and non-destructive modification of its hue, saturation, and lightness. While initial attempts might involve tools like the Color Replacement tool, users often find that the precision offered by masking and adjustment layers provides superior results. The process might involve:
- Selecting the target color: Using
Select > Color Rangeto isolate the specific color. - Creating a Hue/Saturation adjustment layer: This layer will automatically be masked based on your selection.
- Adjusting sliders: Modifying the Hue, Saturation, and Lightness sliders within the Properties panel until the desired color is achieved.
For more complex selections, such as recoloring elements with gradients or intricate details, manual masking with tools like the Pen Tool or Lasso Tool, combined with clipping masks and adjustment layers, offers the highest degree of control.
Conclusion: Embracing Photoshop's Color Capabilities
Adobe Photoshop provides an extensive and powerful toolkit for manipulating colors within images. From basic hue and saturation adjustments to complex color range selections and the strategic use of fill layers and blending modes, users have a wide array of options at their disposal. The emphasis on non-destructive editing through adjustment layers empowers creatives to experiment freely, refine their work meticulously, and achieve professional-grade results across a diverse range of photographic and graphic design applications. Understanding the fundamental color elements and mastering the various selection and adjustment tools will unlock a new level of creative control over your visual projects.