Clip Studio Paint (CSP) stands as a powerful and versatile digital art software, a preferred choice for many illustrators, comic artists, and animators. Its extensive toolkit, including a vast array of brushes, empowers artists to bring their visions to life. While CSP comes equipped with a solid selection of pre-installed brushes, the true magic often lies in exploring, downloading, and creating custom brush packs. This guide delves into the world of Clip Studio Paint brushes, from understanding their fundamental settings to importing and crafting your own unique digital tools, ensuring you find or create the perfect brush for your workflow.
The Foundation of Digital Painting: Understanding Brush Dynamics
Concept art production, in particular, demands extensive drawing, painting, and meticulous fine-tuning. Therefore, finding a brush that feels comfortable and intuitive is paramount. Many professional concept artists go a step further by customizing their digital brushes to precisely match their individual work styles, natural pen pressure responses, and desired brush textures. However, for those new to digital art, navigating the myriad of brush settings can feel daunting.
Clip Studio Paint offers a rich selection of pre-installed brushes, encompassing both hard and soft painting brushes that respond dynamically to pen pressure. If these default options don't quite meet your needs, the platform provides access to over 40,000 drawing materials on Clip Studio Assets. By utilizing relevant keywords, you can search for and discover a vast array of supplementary brushes.
Once a brush is downloaded from Clip Studio Assets, it's automatically integrated into your Clip Studio Paint application. You can then effortlessly add it to your sub tool palette by a simple drag-and-drop action. Furthermore, Clip Studio Paint supports the importation of brushes created for other software, including Photoshop's widely used ABR brush files. For brushes acquired from sources other than Clip Studio Assets, you can integrate them into Clip Studio Paint by dragging and dropping the brush files directly from your file explorer into the application.
Exploring the Sub Tool Detail Palette: Unlocking Brush Customization
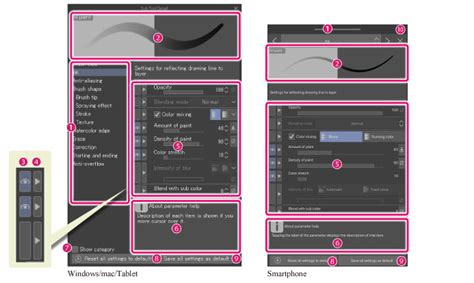
The true power of Clip Studio Paint's brush system lies in its deep customization options, accessible through the Sub Tool Detail palette. This is where you can fine-tune every aspect of a brush's behavior. As you make adjustments within the Sub Tool Detail palette, you can simultaneously draw on the canvas, allowing for immediate visual feedback and iterative refinement of your brush.
Here's a breakdown of key settings you'll encounter:
Brush Size Dynamics: This menu, accessed by clicking the box next to the brush size slider, controls how brush size responds to pen pressure. When pen pressure is linked to brush size, you can set a minimum brush size. For instance, setting the minimum value to zero pixels means that with light pressure, your brush strokes will have no thickness, gradually increasing as you apply more pressure. Conversely, if you increase the minimum value, your brush strokes will maintain a certain thickness regardless of pressure, effectively disabling pen pressure's influence on size.
Tilt Settings: Highly beneficial for emulating traditional pencils, tilt settings replicate the natural feel of a physical pencil. When you tilt a traditional pencil, more of its lead touches the paper, resulting in a darker, broader stroke. By adjusting the tilt values in CSP, you can accurately mimic this effect.
Brush Velocity: This setting dictates how your brush strokes appear based on the speed at which you draw. Faster strokes might produce a different effect than slower, deliberate ones, adding another layer of expressiveness.
Amount of Paint (Ink/Pigment): This setting influences the "opacity" or "density" of the color applied by the brush. Lowering this value means you're using a smaller pigment of color. When painting over existing colors, a low "amount of paint" will result in the original color being barely noticeable, gradually becoming stronger as you continue to paint without lifting your pen.
Anti-aliasing: A brush with strong anti-aliasing will exhibit smooth, softer edges, preventing a jagged, pixelated appearance. Conversely, brushes with weak or no anti-aliasing will have harder, more defined edges, which can appear pixelated when zoomed in.
Brush Tip Settings: This is arguably one of the most crucial areas for brush creation, primarily due to the "Material" settings. Here, you define the shape of your brush tip. You can choose from various pre-defined brush tips or create your own custom brush tip image. The material settings allow you to determine how the brush tip behaves.
- Angle: You can set the angle at which your brush tips rotate. While this might not be noticeable with a simple circular brush tip unless thickness is varied, it becomes significant when using material brush tips, allowing for directional textures.
- Thickness: This setting influences how the brush tip's shape is rendered, affecting the apparent width of the stroke.
Brush Density: Similar to opacity, but with a nuanced difference in application. Even without lifting your pen, continuous strokes will gradually build up the density of the brush, typically by a set percentage (e.g., 6%), creating a more organic build-up of color or texture.
Particle Settings: For brushes that utilize a particle system (like sprays or textured brushes), you can control:
- Particle Size: The size of the individual particles that make up the brush stroke.
- Particle Density: How closely packed these particles are.
- Spray Deviation: The randomness of the particles' placement.
- Direction of Particle: The general direction in which particles are sprayed.
- Gap: Determines the spacing between particles, offering options like wide, normal, or narrow.
- Continuous Spraying: When enabled, holding the pen in one spot without moving will cause the paint to gradually build up.
- Ribbon Effect: This effect can be utilized when using a material brush tip and can create interesting trailing patterns.
Texture Settings: These settings are excellent for adding physical textures to your brushes, mimicking the feel of canvas, paper, or other surfaces. You can adjust:
- Texture Density: Controls the intensity or visibility of the texture.
Stabilization: Increasing the stabilization value results in smoother, more stable lines, which is particularly useful for inking or drawing precise lines.
Taper Settings: This allows for tapering the brush stroke at the beginning or end, creating effects like a feathered or pointed tip.
Custom Brush Tips - Clip Studio Paint Quick Tip
Creating Your Own Brush Tip Material
To create a truly unique brush, you often need to define your own brush tip shape. This process involves creating an image that will serve as the brush tip and then registering it as a material.
- New Canvas: Start by creating a new project. Go to
File > New. For the canvas size, it's recommended to use a relatively large canvas, such as one within the thousands of pixels, to ensure sufficient detail for your brush tip. Choose "Gray" for the Basic Expression Color. This is crucial because gray tones will represent the opacity of your brush, allowing it to be used with any color once created. - Design Your Brush Tip: On this new canvas, draw the shape you want for your brush tip. This could be a simple shape, a complex texture, or even an imported image. If you use multiple layers to create your brush tip, ensure they are merged together before proceeding.
- Register as Material: Once your brush tip design is complete, select all relevant layers and go to
Edit > Register Material > Image Material. Give your material a descriptive name and choose a folder to save it in. - Convert Layer to Grayscale (Optional but Recommended): For optimal results, it's often beneficial to convert your brush tip layer to grayscale if it isn't already. Right-click on the layer and select "Convert layer," then choose "Expression color" and set it to "Gray."
Assigning Your Custom Brush Tip to a Brush
With your custom brush tip material created, you can now assign it to a new or existing brush.
- Duplicate an Existing Brush: The easiest way to create a new brush with your custom tip is to duplicate an existing brush. Right-click on any brush in the Sub Tool palette (the specific brush doesn't matter as you'll be replacing its core properties) and select "Duplicate sub tool."
- Name Your New Brush: A small settings window will appear for your duplicated brush. Give it a recognizable name that reflects its intended purpose.
- Access Brush Tip Settings: In the Tool Property tab for your newly duplicated brush, click the wrench icon to open the Sub Tool Detail palette. Navigate to the "Brush tip" section.
- Select Your Material: Click on "Material" and then click the "Select material" button. This will open the material selection window. Choose the custom brush tip material you registered earlier.
- Assign and Confirm: Click "OK" to assign your custom material to the brush tip. You can now begin using your new custom brush.
Importing Brush Packs
Clip Studio Paint makes it incredibly simple to import brush packs, whether they are downloaded from Clip Studio Assets, purchased from third-party vendors, or even brush files from other software like Photoshop (.ABR).
- From Clip Studio Assets: When you download a brush from Clip Studio Assets within the desktop version of Clip Studio Paint, it will typically open within the app. Ensure you are logged into your Clip Studio account to facilitate downloads. Once downloaded, the brush is usually added to your sub tool palette automatically or can be easily added by dragging and dropping.
- Importing Single Sub Tools: You can import individual sub tools by going to the Sub Tool palette menu and selecting "Import sub tool." This will add the selected sub tool to your current tool group.
- Importing Multiple Brush Files: The most efficient method for importing multiple brush files at once is to drag and drop them directly into the Sub Tool palette.
- Importing ABR Brushes: Clip Studio Paint can import Photoshop's ABR brush files. You can typically do this by dragging and dropping the .ABR file into the Sub Tool palette, or through the import sub tool option in the palette menu.
Once imported, you can organize your brushes by adding them to sub tool groups. Select the brushes you wish to group and use the "Add Sub Tool dialog" or drag them into existing folders within the Sub Tool palette.
Notable Brush Types and Their Applications
Beyond custom creation, understanding the strengths of various brush types can significantly enhance your workflow.
Hoarse Oil Brush: This is a highly versatile brush, especially recommended for beginners in digital painting. It sensitively responds to pen pressure, allowing for the creation of both soft and hard edges. A light touch blends with existing colors, while firm pressure lays down a distinct, hard edge. It can even be used as a sketching pencil by reducing its size.
Texture Brush Sets: Many brush packs offer collections that include painting brushes, smudge brushes, and texture sprays. These are excellent for achieving thick painting styles with a noticeable canvas texture.
Suzumori Nishikiâs Fluffy Pen: This brush offers remarkable adaptability, capable of producing watercolor-like effects or thick paint styles depending on color layering. Each stroke deepens the ink color, creating a rich, layered appearance.
Foliage Brushes: Specialized brush sets exist to rapidly sketch natural elements like bushes and tree foliage. Brushes with leaf-shaped tips, for instance, allow for quick layering in various colors to build depth efficiently.
Water Pattern Texture Brushes: These brushes are designed to create the visual effect of light reflecting on water surfaces, adding realism and dynamism to your scenes.
Wood Grain and Flooring Brushes: Sets containing wood grain textures and wooden flooring patterns are invaluable for quickly adding detailed surfaces to wooden furniture or interior sketches.
Gradient Materials: A set of gradient materials can be instrumental in establishing the mood of a drawing by providing ready-made backgrounds, such as skies. Gradient maps themselves are powerful tools that apply the colors of a chosen gradient to an image based on the existing color values. They can dramatically alter a painting's palette at high opacity or subtly unify colors when used with a lighter touch. You can leverage pre-made gradients or create your own, with real-time previews to fine-tune the effect.
Beyond Brushes: Other Essential Tools for Concept Artists
Clip Studio Paint offers a plethora of tools that extend beyond traditional brushes, designed to streamline the concept art production process.
- 3D Materials: Despite being primarily a 2D painting software, CSP allows for the import and editing of 3D models on the same canvas as your 2D artwork. 3D drawing dolls can serve as essential size references for architectural or mechanical concept art, or as base models for character costume design. Complex 3D models, such as entire city streets, train stations, or castles, provide invaluable guidelines for environmental concept art. Even simple 3D cubes and cylinders can be used to establish spatial relationships and forms for environmental concepts.
Perspective Rulers: For scenes requiring accurate perspective, specialized rulers are indispensable. One-point, two-point, and three-point perspective rulers help ensure that architectural elements and environments are drawn with reliable spatial accuracy.
Copy Stamp Tool (Clone Tool): Often employed in photobashing techniques, the Copy Stamp tool allows you to sample a portion of an image and replicate it elsewhere on your canvas. This is a powerful tool for quickly incorporating photographic elements or repeating textures and patterns.
Achieving Traditional Media Looks Digitally
Recreating the feel of traditional media, such as oil painting or dry brush techniques, requires a nuanced approach in digital art. It's important to remember that no single "magic brush" exists, whether in the digital realm or the traditional one. Traditional oil painters, for example, utilize a variety of brush sizes, palette knives, and even rags to achieve loose, painterly styles. Digitally, this translates to using brushes that can produce both hard ("found") and soft ("lost") edges.
The focal points of an image often benefit from a higher concentration of hard edges, while less important areas can feature softer, more blended transitions. To emulate a traditional look, consider painting over a photographic canvas texture, which can be downloaded from various online resources.
When aiming for a dry brush effect, look for brushes that generate unplanned, spontaneous edges. Some brushes, when used with a mouse or when their settings are adjusted, can randomly apply textures, mimicking the unevenness of dry media.
The concept of "lost and found" edges is central to achieving a traditional feel. This refers to the transition between soft and hard edges. You can achieve this by:
- Layering: Start with a base layer of gray undertones, then apply color layers at higher opacities. A brush like Clip Studio Paint's default "Oil paint flat brush" can create many hard-edged strokes.
- Blending: Use dedicated blending tools or brushes designed for softening edges. The "Soothing watercolor" blender in CSP is excellent for this.
- Combining Brushes: A common technique is to start with a brush that creates rough, lost edges (like "Ink tapered raw") and then refine those edges with a brush that produces harder strokes (like "Oil paint flat brush"). The order can be reversed, starting with hard edges and then softening them.
For instance, the "Ink tapered raw" brush from the Daub brushes set, despite its name, can serve as a fantastic dry brush tool. It has a nice dry texture at the end and mixes colors well, especially when used with a scanned natural media texture. Brushes like "Flat ribbon vertical," "Flat ribbon horizontal," and "Flat ribbon soft" can create distinct edge qualities and textures. The "Daub Pigmento" brush can be used to subtly introduce shadow colors into your paint, but it's advisable to use it at a low opacity (around 10-20%) to avoid overworking edges and muddying colors.
Ultimately, mastering brush packs and customization in Clip Studio Paint is an ongoing journey of experimentation. By understanding the fundamental settings, leveraging the vast resources available, and developing a mindful approach to emulating traditional media, you can unlock new levels of creative expression and efficiency in your digital art.