Photoshop offers a powerful suite of tools to create captivating glow effects, transforming ordinary elements into visually striking compositions. While the term "Outer Glow" might suggest a singular application, its versatility extends far beyond simply making an object appear luminous. This comprehensive guide delves into the nuances of both Outer Glow and Inner Glow effects, providing a detailed understanding of their settings and creative potential. We will explore how to achieve a wide spectrum of radiant and shadowed aesthetics, from subtle enhancements to dramatic transformations, applicable to text, images, and more.
The Layer Styles Dialog: Gateway to Glow
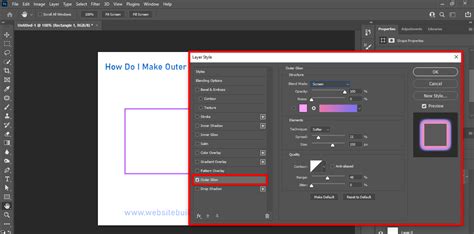
The foundation for creating glow effects in Photoshop lies within the Layer Style dialog box. This central hub provides access to a multitude of customization options, allowing for precise control over the appearance and behavior of your chosen effect. Whether you're aiming for a soft, ethereal radiance or a sharp, defined luminescence, understanding the parameters within this dialog is key.
Outer Glow: Illuminating from Within and Without
The Outer Glow effect is your primary tool for simulating light emanating from an object. However, its capabilities are not limited to just emitting light; it can also be skillfully employed to generate shadow-like effects, adding depth and dimension to your designs.
Blend Mode: Controlling the Interaction
The Blend Mode setting within the Outer Glow dialog box dictates how the glow effect interacts with the pixels beneath it. For creating a classic "emitting light" appearance, modes like Linear Dodge (Add) and Screen are highly effective. These modes lighten the underlying layers, simulating the diffusion of light. Conversely, if your intention is to create an "outer shadow" effect, Linear Burn or Multiply modes are more suitable. These modes darken the underlying layers, mimicking the cast of a shadow.
Opacity: The Subtle Art of Transparency
The Opacity slider offers fine-grained control over the transparency of your Outer Glow. A lower opacity results in a more subtle, understated glow, ideal for delicate highlights or gentle atmospheric effects. Increasing the opacity leads to a more pronounced and intense glow, suitable for creating a strong visual impact. The difference between a subtle and a pronounced glow can dramatically alter the mood and focus of your design, as illustrated by examples showcasing varying levels of glow intensity on text.
Color and Gradients: Painting with Light
Changing the color of an Outer Glow is straightforward. By selecting the corresponding radio button, the Color block becomes active, allowing you to choose any hue from Photoshop's color picker. This opens up a world of possibilities, from classic warm glows to vibrant, otherworldly hues.
Furthermore, the Gradient radio button unlocks even more sophisticated effects. Experimenting with different gradients can help achieve unique and complex glows, such as the iridescent, rainbow-like shimmer seen in soap bubbles. This allows for a more dynamic and nuanced light source that can shift in color and intensity.
Technique: Softness vs. Precision
The Technique dropdown menu offers two primary methods for rendering the Outer Glow: Softer and Precise. The "Softer" option produces a more diffused, feathered edge to the glow, creating a natural, organic spread of light. The "Precise" option, on the other hand, results in a sharper, more defined edge, which can be useful for creating a more graphic or artificial-looking glow, akin to neon lights.
Size: Expanding the Radiance
The Size slider is quite intuitive. It allows you to control the extent to which the glow spreads outwards from the object, measured in 1 px increments. A smaller size creates a more contained, localized glow, while a larger size expands the radiance, enveloping a greater area. The size of the glow directly influences how "hot" or intense the light source appears.
Contour and Falloff: Shaping the Glow's Diffusion
The Contour shapes offer a way to non-linearly control the falloff of the Outer Glow. By selecting different curve profiles, you can dictate how the glow fades out from its source. This allows for more complex and artistic diffusion patterns, moving beyond a simple linear fade. For instance, certain contours can create a glow that intensifies and then rapidly diminishes, or one that spreads out evenly before softening.

Anti-aliased: Enhancing Visual Smoothness
The "Anti-aliased" checkbox is a subtle yet important setting. When enabled, it smooths out the edges of the glow, reducing jaggedness and improving the overall visual quality. While this may result in a very slight decrease in performance, the improvement in the rendered effect is often well worth it, especially for fine details and smooth transitions.
Range and Jitter: Adding Variation and Texture
Adjusting the Range slider in Outer Glow can be likened to modifying the Spread in other layer styles. It influences the overall intensity and spread of the glow. Similarly, the Jitter slider introduces random variations in the glow's intensity and color, similar to the Noise slider. While the difference between Noise and Jitter might not always be immediately apparent, Jitter can create a more dynamic and less uniform glow, adding a sense of organic movement or digital interference.
Saving and Loading Defaults: Efficiency and Consistency
Photoshop allows you to save and load default settings for each layer style, including Outer Glow. This feature is invaluable for maintaining consistency across multiple elements or for quickly recalling settings that have proven effective in previous projects. The "Reset to Default" option will load the last saved default settings, providing a convenient way to revert to a known configuration.
Inner Glow: Illuminating from the Edges Inward
The Inner Glow effect works in a manner analogous to Outer Glow but applies the effect inside the edges of a layer's content. This can be used to create a sense of depth, simulate light sources from within an object, or even produce unique shadowed or textured appearances.

Simulating Shadows and Icy Effects
One creative application of Inner Glow is to simulate a shadow behind a cut-out shape. By adjusting the blend mode, color, and opacity, you can create the illusion that the shape is casting a subtle shadow inwards. Additionally, Inner Glow can be used to create an "icy" type effect, giving the impression of light refracting and reflecting within a translucent material.
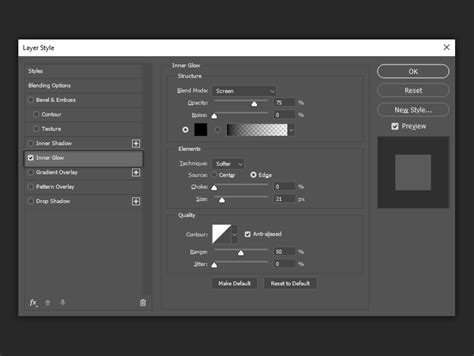
Inner Glow Dialog Box Parameters
The Inner Glow dialog box shares many parameters with its Outer Glow counterpart, offering a familiar yet distinct set of controls.
- Blend Mode: Similar to Outer Glow, this determines how the inner glow interacts with the underlying pixels. Different blend modes can create effects ranging from subtle internal highlights to dramatic internal shadows.
- Opacity: Controls the transparency of the inner glow, allowing for subtle or pronounced internal illumination.
- Noise: Introduces random grain or texture to the inner glow, similar to its function in other layer styles.
- Color and Gradient: Allows you to define the color of the inner glow, either as a solid color or a gradient. This is crucial for achieving specific lighting scenarios or stylistic effects.
- Technique (Softer/Precise): Determines the sharpness or diffusion of the inner glow's edge. "Softer" provides a more organic, diffused light, while "Precise" offers sharper, more defined internal edges.
- Size: Controls the spread of the inner glow from the edges inward. A smaller size creates a tight internal highlight, while a larger size can create a more diffused internal illumination or shadow.
- Contour: Shapes the falloff of the inner glow, allowing for non-linear diffusion patterns. This is essential for creating realistic light interactions within materials.
- Anti-aliased: Smooths the edges of the inner glow for a more refined appearance.
- Range: Similar to "Choke" in other layer styles, this parameter influences the intensity and spread of the inner glow.
- Jitter: When a gradient is applied, Jitter adds color and transparency noise across the gradient, creating an effect similar to Noise but often with more pronounced variations. The higher the Jitter value, the more noticeable the effect.
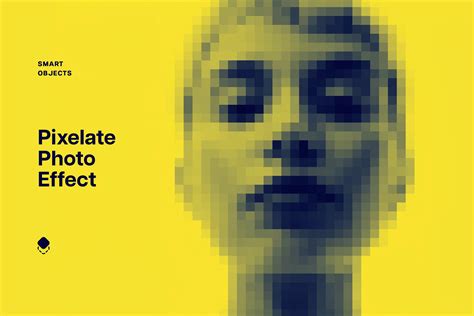
Achieving a Pixellated Inner Gradient Glow
A particularly interesting challenge is to recreate a pixellated, corrupted effect using an inner gradient glow, as seen in a user's query. This involves not just applying an inner glow but also simulating a specific visual artifact. To achieve this, one might consider:
- Selection: Carefully selecting the "inner space" of the lines that define the shape. This could involve using selection tools like the Magic Wand, Quick Selection, or Pen Tool, depending on the complexity of the shape.
- Inner Glow Application: Applying the Inner Glow layer style.
- Gradient Choice: Selecting a gradient that, when combined with the other settings, produces the desired corrupted look. For a "red color just to make everything more clear" scenario, a gradient transitioning from red to black or a darker shade of red might be used.
- Noise/Jitter: Utilizing the Noise or Jitter sliders to introduce the pixellated or corrupted texture. A higher value for these sliders will result in a more pronounced effect.
- Contour Shaping: Experimenting with different Contour shapes and potentially adjusting the Range to fine-tune the falloff and distribution of the inner glow, contributing to the corrupted aesthetic.
- Layer Masking: Potentially using layer masks in conjunction with the Inner Glow to precisely control where the effect is applied, especially if the goal is to affect only the interior of specific shapes.
The user's attempt to select the "outside of the red line and the inside" suggests a common point of confusion. Inner Glow and Shadow effects are typically applied to the content of a layer, affecting its interior or edges, rather than being directly applied to the lines themselves unless those lines are vector shapes or rasterized selections.
Beyond Basic Glows: Expanding Your Creative Toolkit
While the Layer Styles dialog provides the core functionality for creating glow effects, Photoshop offers additional resources and techniques to further enhance your radiant designs.
Non-Destructive Editing and Adjustability
A significant advantage of using Photoshop's Layer Styles for glow effects is their non-destructive nature. This means that the original layer content remains untouched, and the glow effect can be easily modified, toggled on/off, or removed at any time without permanently altering the artwork. This flexibility is crucial for iterative design processes and experimentation.
Fearless Photoshop Actions: Speeding Up the Process
For those looking to achieve glowing effects quickly, Photoshop Actions can be a game-changer. Actions are pre-recorded sequences of commands that can be played back to automate repetitive tasks. A "Fearless Photoshop Action" specifically designed for glow effects can apply a complex set of layer styles and adjustments with a single click, saving considerable time. Often, these actions come with accompanying video tutorials to guide users through their implementation.
Create glow effect in Adobe Photoshop
Layer Style Packs: A Wealth of Presets
The availability of layer style packs, such as those containing over 70 styles across categories like Regular, Bright, Soft, Colored, and Colored Bright, can significantly expand your creative palette. These packs often include sample scenes and backgrounds, allowing you to quickly apply professional and realistic effects, such as neon glows, to your projects.
Animated Glows: Bringing Light to Motion
Did you know that it's possible to create animated glow effects in Photoshop? By combining layer styles with animation techniques, you can bring dynamic, shimmering light to your designs. This opens up possibilities for creating animated logos, dynamic text effects, or even magical visual elements for motion graphics. Actions designed to add magical sparkles to drawn lines are a prime example of how to achieve animated glowing effects for specific applications.
Sparkle Photoshop Action: Instant Magic
The "Sparkle Photoshop Action" offers an intuitive way to transform areas into sparkling effects. By simply brushing over the desired area and playing the action, Photoshop can automatically generate a dazzling sparkle effect, perfect for adding a touch of magic or highlight to any image.
Conclusion: Mastering the Art of Illumination
With a firm grasp of Photoshop's Outer Glow and Inner Glow settings, coupled with an understanding of blend modes, opacity, color, and contour options, you are well-equipped to create a vast array of luminous and atmospheric effects. These tools, when used creatively, can elevate your designs from ordinary to extraordinary. Remember to explore the advanced features, leverage Photoshop Actions and style packs, and even venture into the realm of animated glows to truly master the art of illumination within this powerful software. The possibilities for creating captivating glow effects are virtually endless, inviting continuous exploration and experimentation to achieve stunning visual results.