Color grading is a crucial aspect of video editing, as it sets the mood, enhances storytelling, and adds a professional touch to your footage. DaVinci Resolve, a powerful post-production tool, offers a robust suite of features for color manipulation. However, users often encounter a common challenge: the inability to directly copy and paste compound nodes, especially those comprising just a few nodes or a layer. This article delves into various effective methods for duplicating nodes and transferring color grades within DaVinci Resolve, catering to a range of user needs from basic to advanced.
Understanding the Nuance: Copying Nodes vs. Copying Grades
It's essential to distinguish between copying the attributes of a node and copying an entire node graph or compound node. When users express difficulty in "copying compound nodes," they often mean they want to replicate a specific group of nodes, including their internal structure and settings, to be used elsewhere as a self-contained unit. This is distinct from simply copying the color grade applied by a node or a series of nodes to another clip. The methods discussed below address both scenarios, providing comprehensive solutions for efficient workflow.
Method 1: The Gallery Still and PowerGrade Approach
One of the most versatile methods for copying color grades, and by extension, the node structure that produces them, involves the Gallery and PowerGrades. This approach allows for the saving and reapplication of grades across different clips and even projects.
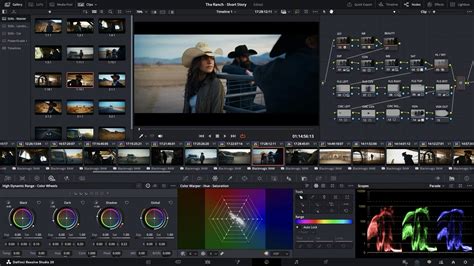
To begin, navigate to the Color page in DaVinci Resolve. Ensure your footage is imported and switch to the Color page interface. You can click on the "Clips" option at the top of the Color page to view your media.
Saving a Still:Once you've applied a desired color grade to a clip, you can save this grade as a "Still." To do this, right-click on the image in the Viewer and select "Grab Still." A screenshot of the current frame, encapsulating the applied grade, will appear in the Gallery panel, typically located at the top left of the DaVinci Resolve interface. The Gallery offers two primary sections: Stills and PowerGrades.
Applying a Still:To apply this saved grade to another clip, select the target clip in the Clips panel. Then, simply middle-click on the desired Still in the Gallery panel. The color grade, along with its associated node structure, will be applied to the selected clip.
Displaying the Node Graph of a Still:A powerful feature of Stills is the ability to inspect their underlying node graph. Right-click on a Still in the Gallery panel and select "Display Node Graph." This will open the Node Graph panel, revealing the specific nodes and their configurations that constitute the saved grade. This is particularly useful for understanding how a grade was constructed or for making minor adjustments before applying it.
PowerGrades for Project-Wide Application:PowerGrades extend the functionality of Stills by allowing you to save and manage grades that can be accessed across different projects. Think of PowerGrades as a form of cloud storage for your color grades. To create a PowerGrade, you can drag a Still from the Gallery into the PowerGrade section. Subsequently, you can drag this PowerGrade onto any node in another project to instantly apply the saved grade.
A common workflow for copying compound nodes using this method involves creating a duplicate version of the grade. On a clip containing the nodes you wish to copy, create a duplicate version of the grade (Ctrl+Y on Windows or Command+Y on Mac). Then, delete all nodes you do not need, leaving only the desired nodes. Grab this modified clip so it goes into the gallery (Ctrl+Alt+G or Command+Alt+G). Now, select the clips in the timeline to which you want to copy the nodes. In the gallery, middle-click on the grabbed grade or right-click and choose "Append Node Graph." This effectively transfers the isolated node graph.
Method 2: Keyboard Shortcuts for Efficient Grade Transfer
DaVinci Resolve offers keyboard shortcuts that can significantly speed up the process of copying color grades, especially when dealing with adjacent clips.
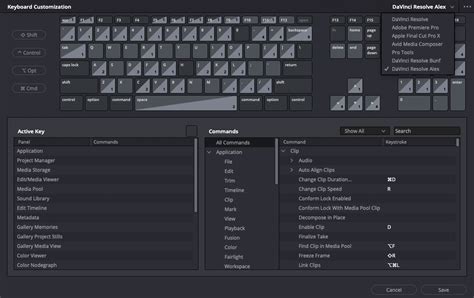
"Apply Grade from One Clip Prior" Shortcut:To access and customize keyboard shortcuts, go to the "DaVinci Resolve" menu option at the top left of the interface and select "Keyboard Customization." In the Commands section, choose "Color." On the right-hand side, locate the command named "Apply Grade from One Clip Prior."
As the name suggests, this shortcut allows you to copy the color grade directly from the immediately preceding clip in the timeline. This is incredibly useful for maintaining a consistent look across a sequence of shots. It's important to note that this shortcut specifically copies the grade from the previous clip, not from a selected source clip.
Method 3: Duplicating Individual Nodes
Sometimes, the need arises to duplicate a specific node within a node graph, rather than an entire compound node or grade. This is particularly relevant when you've made precise adjustments within a single node, such as a power window or a qualifier, and want to replicate that node to invert the mask or apply a different correction to the remaining image.
The "Duplicate" Function:If you have a clip with nodes, and you've applied a qualification or power window to a specific node, you can right-click on that node and select "Duplicate." This creates an exact copy of the node, including all its settings, masks, and qualifiers.

Utilizing Outside Nodes:When working with nodes that have power windows and/or qualifiers, you can create an "outside node." An outside node effectively captures "anything but that selection." This is achieved by creating a new node after the node with the power window or qualifier. This new node will then operate on the portion of the image excluded by the original node's mask. This is a powerful technique for secondary corrections and can be achieved after duplicating a node or by routing mattes.
Copying Node Attributes:There are multiple ways to copy information from one node to another. A straightforward method is to copy the attributes of a node. Select the node you want to copy from (let's call it node A), and press "C" (or Command+C on Mac) to copy it. Then, select the new node you want to paste the attributes into (node B) and press "V" (or Command+V on Mac) to paste. This will transfer all settings from node A to node B, overwriting node B's existing parameters.
Method 4: Using Memories for Bulk Adjustments
Memories offer another avenue for saving and applying color grades, particularly useful for making bulk adjustments to multiple clips. After applying color grading to a clip, you can access the "Color" option in the menu bar at the top and explore the "Memories" feature. While not a direct node duplication method, it serves as an efficient way to store and recall specific grading states for later application.
Advanced Workflow: The Power of External Controllers
While DaVinci Resolve provides robust in-software solutions, professional colorists often leverage external hardware controllers to enhance their workflow efficiency and precision. Devices like the TourBox are designed to map frequently used functions and shortcuts to physical buttons and knobs.
The BEST Editing Tool for DaVinci Resolve? | TourBox Elite Plus Review
Whether you're adjusting color parameters, fine-tuning grades, or navigating through your timeline, a controller like TourBox can significantly amplify your efficiency and precision. Mapping functions such as "duplicate node," "grab still," or "apply grade from prior clip" to dedicated physical controls can streamline complex operations, allowing for more intuitive and faster color grading sessions. This approach is particularly beneficial when dealing with intricate node structures or when needing to repeat operations rapidly.
Addressing Compound Node Limitations
The initial user observation highlights a key limitation: directly cutting and pasting compound nodes, especially simple ones, isn't always straightforward in DaVinci Resolve. This often necessitates the workarounds described above, such as using the Gallery for stills or duplicating individual nodes and reconstructing the desired graph.
While it would be ideal to simply highlight, say, four nodes and copy-paste them as a self-contained unit, this functionality isn't natively supported for arbitrary node selections in the same way as copying a single node's attributes. This limitation is not unique to DaVinci Resolve; similar challenges exist in other professional color grading software, such as Baselight.
The workflow of creating a new version, deleting unnecessary nodes, storing the remaining ones to a PowerGrade or Gallery still, and then reapplying it is a well-established and effective method for managing and transferring complex node structures. While it involves multiple steps, with practice, users can become quite proficient at this process.
Conclusion: Embracing DaVinci Resolve's Node Management Tools
As you've learned throughout this tutorial, there are various methods to copy color grades and manage node structures in DaVinci Resolve. From the versatile Gallery and PowerGrade system to targeted keyboard shortcuts and the ability to duplicate individual nodes, the software provides powerful tools to enhance your workflow. For those looking to further streamline their color grading experience and elevate their editing process, exploring external controllers can offer unparalleled efficiency and precision. By mastering these techniques, you can effectively transfer your creative vision across clips and projects, ensuring a polished and professional final product.