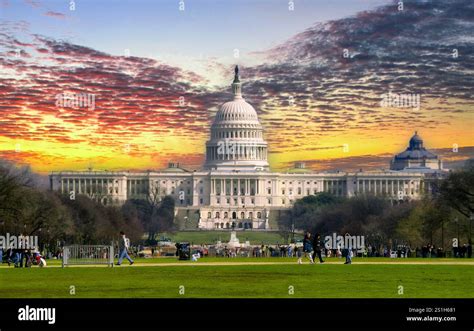
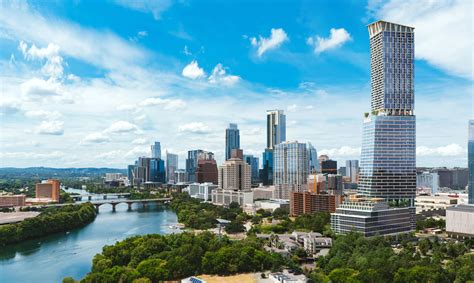
Photoshop offers a powerful suite of tools for transforming the skies in your photographs, moving beyond simple color adjustments to complete replacement. This tutorial delves into achieving ultimate control and accuracy when altering the sky, whether you're aiming for a subtle enhancement or a dramatic overhaul. We will begin with a photograph that I captured just outside of Austin, Texas. It’s a really interesting building (Fun fact: it was featured on the TV show, The Leftovers). The problem is that the sky was plain blue, which isn’t so bad if you use a polarizing filter to make it more blue, which I did. However, because I don’t live in Texas (I’m in California), I’m unable to go back when the sky is different to get a more moody photo. This scenario highlights a common challenge for photographers: capturing the perfect light and atmosphere in a single shot. Fortunately, Photoshop provides sophisticated solutions to overcome such limitations.
The Power of Sky Replacement: An AI-Driven Approach
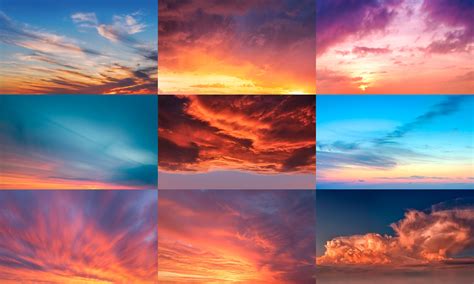
Photoshop offers a collection of skies organized into three categories: Blue Skies, Spectacular, and Sunset. These pre-made options provide a quick and effective way to imbue your images with different atmospheric qualities. To access this feature, open any image with a so-so sky and choose Edit > Sky Replacement. This action will present you with a gallery of skies, allowing you to preview various atmospheric conditions superimposed onto your photograph.
Adobe Firefly generative AI is an intelligent technology that detects the original sky and replaces it with a new one. This AI-powered tool goes beyond a simple overlay; it intelligently analyzes the existing scene and seamlessly integrates the new sky. It then automatically adjusts the lighting and shadows to match the scene, ensuring a more realistic and cohesive final image. The beauty of this feature lies in the fact that all changes are fully editable, giving you granular control over the outcome.
The sky replacement feature in Photoshop uses AI to automatically detect and replace skies in photos. Yes, the AI-based sky replacement feature in Photoshop allows for customization by letting you import your own sky images and adjust settings to match the lighting and mood of your photo. This is crucial for achieving a natural-looking result. The AI-powered sky replacement tool generally performs best on photos with a clearly defined horizon and distinct sky, as this provides the AI with more reliable information to work with.
The process is remarkably straightforward:
- Pick an image: Select the photograph you wish to modify.
- View the gallery: Access the Sky Replacement tool via Edit > Sky Replacement.
- Let Adobe Sensei do the work: Browse the provided sky options or import your own.
Importing and Refining Your Own Skies
While Photoshop’s built-in sky library is extensive, the true power for achieving unique and personalized results comes from importing your own sky photographs. I keep a collection in Lightroom of all the clouds and skies that I shoot. Whenever I see an interesting sky, I shoot it with the best camera that I have with me. This practice ensures you have a diverse palette of atmospheric elements at your disposal.
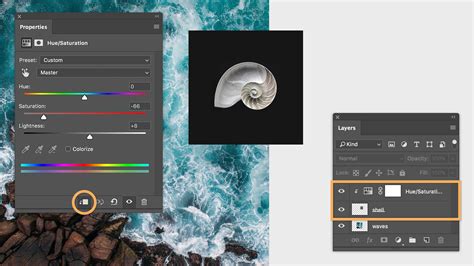
To import a custom sky, you’ll typically find an import option within the Sky Replacement panel. Once your chosen sky is loaded, you can further refine the integration. This is usually where you grab the masking tool. You will see the layer style box. Paint on the house where it was blending out, so that all the house is showing again. This manual refinement is key to correcting any imperfections and ensuring a seamless blend between the foreground and the new sky.
Beyond Simple Replacement: Achieving Realistic Blends
The automatic sky replacement is a fantastic starting point, but achieving a truly photorealistic result often requires manual adjustments. The AI does an admirable job of matching lighting and color, but subtle discrepancies can arise. For instance, if the original photo had warm, golden hour lighting, and you replace the sky with a bright midday blue, the lighting on the foreground might appear incongruous.
To address this, you can use adjustment layers. After the sky replacement is applied, you can add layers like Curves or Color Balance above the sky layer and clip them to it (Alt-click between the layers in the Layers panel). This allows you to selectively adjust the color temperature, brightness, and contrast of the new sky to better match the foreground. For example, if the new sky is too cool, you can add a touch of yellow or red to the Color Balance adjustment.
The horizon line is another critical area for attention. Sometimes, the AI might not perfectly mask the original sky, leaving subtle halos or artifacts. In such cases, a careful application of the Brush tool with a soft edge, set to a low opacity and flow, can help to clean up these edges. Remember, the goal is to make the transition as invisible as possible.
Advanced Masking and Compositing
For those seeking even greater control, or when dealing with complex foregrounds like intricate trees or buildings with many edges, manual masking becomes indispensable. This involves using tools like the Pen Tool or the Quick Selection Tool to create a precise mask of the original sky area. Once you have a clean selection, you can invert it to create a mask for the new sky layer.
Drag the corner handle to resize and reposition the sky. This is a crucial step when the aspect ratio of your imported sky doesn't perfectly match the original photo, or when you want to emphasize certain cloud formations. Proper scaling and placement are vital for creating a believable composition.
Consider the direction of light in both the foreground and the new sky. If the sun is casting shadows in one direction in the original photo, the new sky should ideally have light sources that align with this. This might involve subtle adjustments to the position of the new sky or even flipping it horizontally if necessary.
Understanding the AI's Strengths and Limitations
The AI-powered sky replacement in Photoshop, often referred to as Adobe Sensei, is a remarkable advancement. It excels at identifying the sky and foreground and applying initial adjustments for lighting and color. It’s particularly adept at handling straightforward scenes with clear horizons.
However, AI is not infallible. In situations with complex elements like wispy foliage, fine hair, or reflections, the AI might struggle to create a perfectly clean mask. This is where human intervention, through manual masking and refinement, becomes essential. The AI provides a powerful shortcut, but the artist’s eye is still needed for the final polish.
It’s also worth noting that the AI’s interpretation of "mood" or "atmosphere" is based on its training data. While it can generate dramatic sunsets or moody storm clouds, achieving a very specific, nuanced mood might still require manual tweaking of color and lighting.
Creative Applications and Considerations
The ability to change sky color in Photoshop extends far beyond simply fixing a dull sky. It opens up a world of creative possibilities. You can:
- Enhance the mood: Transform a bright, sunny day into a dramatic, overcast scene for a more somber or mysterious feel.
- Create composite images: Blend elements from different photographs to construct entirely new visual narratives.
- Illustrate specific times of day: Accurately depict a sunrise or sunset, even if the original photo was taken at a different time.
- Correct technical issues: Overcome the limitations of filters or camera settings by replacing an overexposed or underexposed sky.
When choosing a replacement sky, consider the overall context of the image. A busy, cloudy sky might detract from a clear foreground subject, while a simple blue sky might be too bland for a dramatic landscape. Think about the implied light source and how it interacts with the foreground elements.
Practical Tips for Seamless Integration
- Resolution Matters: Use sky images that are of equal or higher resolution than your base photograph to avoid pixelation or loss of detail.
- Color Harmony: Pay close attention to the color palette of the original image and choose a sky that complements it. Use adjustment layers to fine-tune the color balance.
- Lighting Direction: Ensure the light in the new sky is coming from a similar direction as the light in the foreground.
- Edge Refinement: Use a soft brush with low opacity to gently blend the edges of the new sky with the foreground, especially around complex areas like trees.
- Foreground Adjustments: Sometimes, you may need to apply subtle adjustments to the foreground to make it better match the lighting and color of the new sky. This could involve adding a slight color cast or adjusting contrast.
Thanks for checking it out! I hope you enjoyed this tutorial as much as I did creating it. Mastering the art of sky replacement in Photoshop is a skill that can dramatically elevate your photography, allowing you to capture the mood and atmosphere you envision, regardless of the conditions present when the shutter was clicked.