Unwanted background noise can significantly detract from the quality of any audio recording, whether it's for podcasts, music production, voiceovers, or video content. From the subtle hum of electronics to the disruptive sounds of a busy environment, these audio imperfections can plague even the most meticulously planned productions. Fortunately, Adobe Audition, a powerful and versatile audio workstation, offers a robust suite of tools designed to tackle a wide array of audio issues, enabling creators to restore clarity and achieve professional-sounding results. This guide delves into the various methods and effects available within Adobe Audition to effectively identify, isolate, and eliminate background noise, ensuring your audio content shines.
Understanding the Nature of Audio Noise
Before embarking on the journey of noise removal, it's crucial to understand that some level of noise is almost inevitable in any recording scenario. This can stem from various sources: ambient room tone, the subtle whirring of equipment like fans or air conditioning, distant traffic, wind interference, or even the inherent noise floor of a low-quality microphone. Even in a perfectly soundproofed environment, some residual room tone can be captured. The key is not to despair when noise inevitably creeps in, but to leverage the right tools to mitigate its impact. Adobe Audition provides a comprehensive toolkit to address these challenges, from subtle hums and hisses to more intrusive pops and crackles.
Adobe Audition: A Professional Audio Editing Suite
Adobe Audition is a highly regarded audio editing software that forms part of the broader Adobe Creative Suite. Its capabilities extend to recording, mixing, and editing audio files, making it an indispensable tool for professionals across various audio disciplines. Whether you're a podcaster, music producer, or sound designer for video, Audition offers the features necessary to produce polished, professional-grade audio content. Its user-friendly interface, combined with a wealth of pre-set settings, caters to both novice users and seasoned audio engineers, streamlining the workflow and enhancing efficiency.
A significant advantage of Audition is its versatility in handling diverse audio tasks. It offers a range of tools, from subtle, non-damaging effects like equalizers for minor adjustments to more aggressive, specialized tools for significant background noise reduction. This flexibility makes it a preferred choice for video producers who often integrate Audition with other Adobe products like Premiere Pro. It is generally advisable to start with the gentler noise reduction methods to preserve the integrity of your original audio before resorting to more intensive processes.
Leveraging Spectral Display for Precise Noise Identification
One of the most powerful features for identifying and isolating noise is the Spectral Display. This visual representation allows you to "see" sound, breaking it down into its constituent frequencies and amplitudes over time.
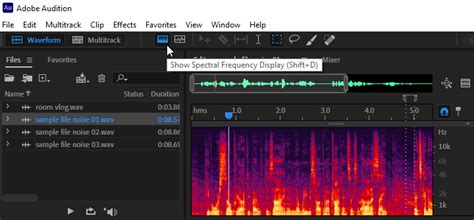
To utilize this feature, open your audio file in the Waveform editor. By double-clicking the file in the Files Panel, you can reveal the waveform. At the bottom of the editor, a slider can be moved to access the Spectral Frequency Display. This display visually highlights abnormal sounds that might be contradictory to your desired audio, such as a distinct click, a sudden burst of static, or a persistent hum.
Within the Spectral Display, you can select specific ranges of noise or individual audio artifacts. This precise selection is crucial for targeted noise reduction. For finer control over the visualization, selecting a Logarithmic scale from the dropdown menu can be beneficial, as it more closely reflects human hearing perception. By playing back your audio while observing the Spectral Frequency Display, you can pinpoint the exact time and frequency at which problematic noises occur.
Noise Reduction/Restoration Effects: A Deep Dive
Adobe Audition offers a variety of specialized effects within the "Noise Reduction/Restoration" category, each designed to address different types of noise.
Noise Reduction Effect
The Noise Reduction effect (found under Effects > Noise Reduction/Restoration > Noise Reduction) is a primary tool for reducing background and broadband noise with minimal impact on the quality of the desired signal. To effectively use this effect, it's recommended to apply it to audio that does not have a DC offset, as this can sometimes introduce clicks in quieter passages.
The core of this effect involves capturing a "noise print" - a sample of the background noise you wish to remove. This is done by selecting a section of audio that contains only the unwanted noise. If the selected range is too short, the "Capture Noise Print" function may be disabled. In such cases, you can either select a longer noise range or duplicate the selected range to create a longer sample.
How to use Noise Reduction in Adobe Audition WITHOUT degrading audio quality!
Once a noise print is captured, the Noise Reduction effect analyzes the entire selected audio to identify and attenuate frequencies matching the noise profile. The effectiveness of this process is influenced by several parameters:
- Amount of Noise Reduction: This slider controls the percentage of noise reduction applied to the output signal, determining the amplitude reduction of detected noise. Values between 6 and 30 dB typically yield good results. The proper amount is subjective and depends on the type of noise and the acceptable loss of signal quality.
- Spectral Decay Rate: This parameter specifies the percentage of frequencies processed when the audio falls below the noise floor. Fine-tuning this percentage allows for greater noise reduction with fewer introduced artifacts. Values between 40% and 75% are often most effective.
- Smoothing: This setting considers the variance of the noise signal within each frequency band. Bands with high variance (like white noise) are smoothed differently than constant bands (e.g., 60-Hz hum).
- Precision Factor: This controls changes in amplitude. Values between 5 and 10, particularly odd numbers, are ideal for symmetrical processing. Lower values (3 or less) can lead to volume drops or spikes between processing blocks due to large FFT blocks.
- Transition Width: This defines the amplitude range between the noise and the desired audio. A width of zero acts like a noise gate, immediately silencing audio below the threshold. Alternatively, a range can be specified for a gradual fade to silence.
- FFT Size: The Fast Fourier Transform (FFT) size determines the number of individual frequency bands analyzed. A higher FFT size leads to more precise noise frequency removal but can also introduce "swooshing" or reverberant artifacts. Good settings typically range from 4096 to 8192. The FFT size represents a trade-off between frequency and time accuracy.
- Noise Print Snapshots: This setting dictates the number of noise snapshots included in the captured profile. An optimal value of 4000 generally produces accurate data. Very small values can significantly impact the quality of noise reduction, and a higher number of snapshots, when applied at 100% reduction, might remove more original signal along with the noise.
Adaptive Noise Reduction
The Adaptive Noise Reduction effect (Effects > Noise Reduction/Restoration > Adaptive Noise Reduction) is designed for quickly removing variable broadband noise such as background sounds, rumble, and wind. Its real-time operation allows it to be used in conjunction with other effects in the Effects Rack within the Multitrack Editor. Unlike the standard Noise Reduction effect, which is an offline process, Adaptive Noise Reduction is more dynamic.
For optimal results, apply Adaptive Noise Reduction to selections that begin with a period of noise followed by the desired audio. This effect is computationally intensive. Key parameters include:
- Noise Reduction Level: Controls the degree of noise reduction, with values between 6 and 30 dB being effective.
- Noise Reduction Decay: Determines how quickly noise processing drops by 60 decibels. Fine-tuning this setting can enhance noise reduction while minimizing artifacts.
- Frequency Range: Retains desirable audio within specified frequency bands around detected artifacts. For instance, a setting of 100 Hz ensures no audio is removed within 100 Hz above or below identified noise.
- FFT Size: Similar to the standard Noise Reduction effect, this parameter controls the number of frequency bands analyzed, influencing frequency and time resolution. Higher settings increase frequency resolution, while lower settings increase time resolution.
Hiss Reduction
When background noise manifests as a constant hiss, often referred to as the "noise floor," the Hiss Reduction effect is particularly useful. After opening your audio recording in Audition and navigating to Effects > Noise Reduction/Restoration > Hiss Reduction, you'll find the "Capture Noise Print" function. Clicking "Hiss Sample" and then "Capture Noise Print" allows Audition to analyze the sampled hiss. You can then use the provided sliders to control the noise removal process until satisfactory results are achieved.
Automatic Click Remover and Click/Pop Eliminator
For transient noises like clicks, pops, and static, especially those found on vinyl recordings, Adobe Audition offers dedicated tools.
The Automatic Click Remover effect (Effects > Noise Reduction/Restoration > Automatic Click Remover) provides a real-time solution similar to the DeClicker effect. It allows you to choose which detected clicks to address and can be integrated into the Effects Rack.
The Click/Pop Eliminator effect (Effects > Noise Reduction/Restoration > Click/Pop Eliminator) is another powerful option for removing microphone pops, light hiss, and crackles common in on-location recordings or older media. This effect utilizes detection and correction settings to identify and remove these artifacts.
Key parameters for these effects include:
- Sensitivity: Determines how sensitive the effect is to detecting noise. Lower settings detect more clicks but might include desirable audio.
- Discrimination/Threshold: Controls the level of clicks to detect. Lower values detect more subtle clicks, while higher values focus on louder ones.
- Reject: This parameter dictates how many potential clicks are rejected by the algorithm. Adjusting this value helps balance the removal of unwanted clicks with the preservation of original audio, preventing distortion that can make audio sound muffled.
- FFT Size: Controls the FFT size used for repair. While "Auto" is often suitable, specific FFT sizes (e.g., 32, 48, 64) can be manually set for finer control, though higher values increase processing time.
- Pop Oversamples: Includes surrounding samples in detected clicks, which can help if corrected clicks remain audible. Increasing this value can also force larger FFT sizes.
- Run Size: Specifies the number of samples between separate clicks. Larger values can lead to more noticeable repairs as larger data blocks are processed at once.
- Remove Large Events: This option is for removing very large unwanted events, such as significant scratches on vinyl.
Sound Remover Effect
The Sound Remover effect (Effects > Noise Reduction/Restoration > Sound Remover) is designed to remove specific, unwanted audio sources from a recording. It works by learning a sound model from a selected portion of the audio that contains only the target sound.
Key settings for the Sound Remover include:
- Learn Sound Model: This initiates the process of analyzing the selected waveform to create a model of the sound to be removed.
- Complexity: A higher complexity setting is beneficial for more mixed or complex sounds, leading to more accurate results but requiring longer processing times.
- Refinement Passes: Determines the number of passes the algorithm makes to remove sound patterns matching the model. More passes increase aggressiveness.
- Speech Optimized: When selected, this option ensures the algorithm is careful in removing audio patterns that closely resemble speech.
DeHummer Effect
The DeHummer effect (Effects > Noise Reduction/Restoration > DeHummer) is specifically designed to remove narrow frequency bands and their harmonics, most commonly addressing the hum produced by power lines or electronic equipment. You can set the root frequency of the hum and the width of the affected frequency band and its harmonics.
DeReverb Effect
For addressing echoes and reverberation, which are often problematic and difficult to remove, the DeReverb effect (Effects > Noise Reduction/Restoration > DeReverb) can be employed. This effect estimates the reverberation profile of the audio and allows you to adjust the amount of reverberation. It's important to note that applying dereverberation can sometimes reduce the overall output level, so the "Output Gain" serves as a make-up gain to compensate.
Other Useful Tools for Noise Mitigation
Beyond the dedicated noise reduction effects, other tools within Adobe Audition can assist in managing unwanted audio.
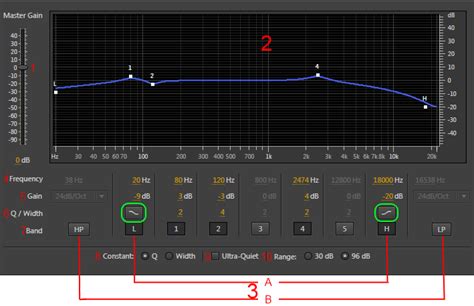
Equalizer (EQ)
Equalizers are fundamental tools for shaping the tonal balance of audio, and they can be highly effective in reducing certain types of noise, particularly low-frequency rumble or specific resonant frequencies. Audition offers various EQ options, including graphic and parametric equalizers.
To use an equalizer for noise reduction:
- Highlight the entire audio recording or the specific section you want to process.
- Navigate to the Effects tab, then Filter and EQ.
- Choose your preferred equalizer (e.g., Graphic Equalizer).
- Carefully identify and reduce the amplitude of frequencies that contain unwanted noise. Be cautious not to remove essential frequencies that contribute to the clarity and character of your desired audio.
While EQ is excellent for low-intensity noise, it's less effective for complex or broadband noise. It's a valuable first step but rarely a complete solution for severe noise issues.
Frequency Analysis
The Frequency Analysis tool complements the Equalizer by helping you pinpoint problematic frequencies visually. Unlike manual EQ adjustments, Frequency Analysis helps localize troublesome frequencies, allowing for more targeted filtering.
To use Frequency Analysis:
- Open the Frequency Analysis window from the Window menu.
- Select a "Logarithmic" scale for a representation closer to human hearing.
- Playback your audio to analyze the frequency spectrum. The display will highlight peaks and anomalies that correspond to specific noises. Once identified, you can then apply an EQ filter to attenuate these frequencies.
Noise Gate
A Noise Gate is an effective tool for silencing audio below a certain threshold, making it useful for removing background noise during silent or quiet passages. It's particularly beneficial for content with large spoken sections, like podcasts, where manual editing of every quiet moment would be tedious.
To use a Noise Gate:
- Accurately measure your noise floor by playing the quietest part of your audio and observing the playback level meter.
- Select your entire audio recording.
- Go to the Effects tab, then Amplitude and Compression, and select Dynamics.
- In the AutoGate dialog box, set the threshold to your measured noise floor level or a few decibels above it.
- Adjust Attack, Release, and Hold parameters (e.g., Attack: 2ms, Release: 200ms, Hold: 50ms) to control how quickly the gate opens and closes.
- Click "Apply."
Amplitude Statistics and Distortion Check
Sometimes, what appears to be background noise is actually distortion caused by the audio source exceeding its optimal level. Adobe Audition can help identify this.
To check for distortion:
- Double-click your audio track to access the Waveform editor.
- Open the Amplitude Statistics window from the Window menu.
- Click the "Scan" option. The report will indicate any "Possibly Clipped Samples." You can then navigate to these clipped parts of your audio file and attempt to fix the distorted audio, perhaps by reducing gain or re-recording the segment.
Third-Party Plug-ins
While Adobe Audition offers a powerful array of built-in tools, specialized third-party plug-ins can also provide advanced noise reduction capabilities. For instance, CrumplePop's AudioDenoise utilizes AI to automatically identify and remove background noise in real-time. After installing such plug-ins, they can typically be accessed through Adobe's Plugin Manager (Effects > VU or VST3).
Best Practices for Noise Reduction
- Work on Copies: Always work on a copy of your original audio file to preserve the source material.
- Gentle Approach First: Begin with less aggressive noise reduction tools and settings. Over-processing can lead to artifacts and degrade audio quality.
- Listen Critically: Use headphones and listen carefully at different playback levels to assess the effectiveness of your noise reduction and identify any unintended side effects.
- Targeted Application: Apply noise reduction effects only to the specific sections of audio that require it, rather than processing the entire file uniformly unless necessary.
- Combine Tools: Often, the best results are achieved by combining multiple noise reduction techniques. For example, you might use Adaptive Noise Reduction for broad background noise and then a Click/Pop Eliminator for transient artifacts.
- Understand Trade-offs: Be aware that aggressive noise reduction can sometimes remove desirable audio elements or introduce artifacts. Finding the right balance is key.
By understanding the nature of audio noise and mastering the diverse tools available in Adobe Audition, creators can effectively overcome audio imperfections and elevate the quality of their productions. Experimentation with settings and a critical listening approach will lead to the most satisfying results, ensuring your message is heard clearly and without distraction.