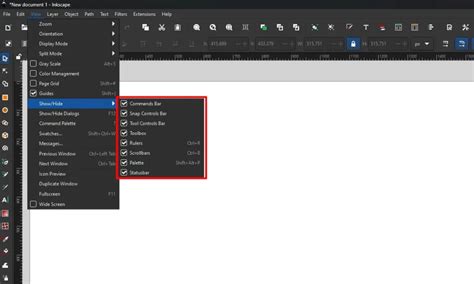
Inkscape, a powerful and free vector graphics editor, offers a versatile array of tools for manipulating objects, creating intricate designs, and achieving specific visual effects. For users new to the software, understanding how to combine, group, and precisely select objects is fundamental to unlocking its full potential. This tutorial delves into the practical application of these features, addressing common challenges such as merging shapes, enclosing elements, and managing selections within groups, with a focus on achieving professional-looking results.
Enclosing Shapes and Managing Borders
A common task for beginners in Inkscape involves placing one object, like a double helix PNG, within another, such as a hexagon, and then applying a border to the enclosing shape without affecting the inner element. When saving and re-importing such a design, users often find that adding a border to the hexagon also applies it to the helix, and this border can appear disproportionately thick.
The key to overcoming this lies in understanding how Inkscape handles grouped objects and the distinction between paths and groups. If a hexagon and a helix are grouped together, Inkscape treats them as a single entity. Attempting to apply a stroke to the group will affect all its constituent parts.
To achieve the desired effect - a border solely on the hexagon - the objects must be treated individually, even when visually contained. This often means ensuring the helix is a distinct object, possibly converted to a path if it's a raster image (PNG), and then placed within the hexagon. The hexagon itself should be a separate vector path.
When it comes to adding a border, it's crucial to select only the hexagon path. This can be achieved using the Nodes Tool (N), which allows for the precise selection of individual paths within a group or layered composition. Instead of selecting the entire group with the Select Tool (S), one can specifically target the hexagon's path nodes.
Navigating and Selecting Within Groups
Groups in Inkscape are containers for organizing multiple objects. While they simplify management, they can sometimes complicate direct manipulation of individual elements, especially when objects are layered or hidden. Fortunately, Inkscape provides several intuitive methods for accessing and selecting objects within a group without necessarily ungrouping them.
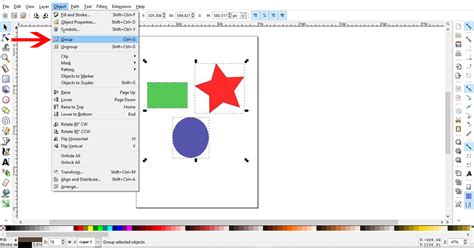
One effective technique involves a simple double-click with the Select Tool (S). When applied to a grouped object, this action "enters" the group, allowing you to select and modify individual objects within it. This is particularly useful for applying unique styles, such as a specific stroke or fill color, to an element that is part of a larger grouped composition.
For selecting objects that are obscured by others, Inkscape offers powerful shortcuts. The Alt + Click combination allows you to select objects that are positioned behind foreground objects. Holding down the Shift key while using Alt + Click adds the newly selected object to your current selection, enabling the selection of multiple obscured items.
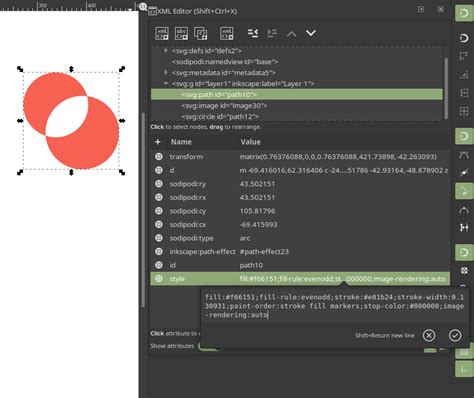
A more advanced, yet highly effective, method for selecting hard-to-see objects is through the XML Editor (Shift + Ctrl + X). This tool provides a hierarchical view of all objects in your document, allowing you to select any element by name or type, regardless of its visual position on the canvas.
Another valuable technique for selection is switching to Outline view. This mode displays all objects as wireframes, making it easy to identify and select elements that are otherwise hidden. Once selected in Outline view, the objects remain selected even when you switch back to the normal, rendered view, until you deselect them.
For situations where a background object is significantly smaller than the foreground one, you can use the Select Tool (S) to drag a selection rectangle around it. However, care must be taken to ensure this rectangle does not encompass the foreground object as well.
How to Select Object Below Another Object Inkscape?
Merging Objects and Achieving Opacity Effects
The concept of "merging" objects in Inkscape can have different interpretations. If the user's intention is to combine several objects into a single path that can be edited as one, the Path > Combine operation is the appropriate tool. However, it's important to note that this operation can only be applied to paths, not groups directly.
If you have a group of objects that you wish to combine into a single path, you must first ungroup them. Select the group, then go to Object > Ungroup (or use the shortcut Shift + Ctrl + G). Once ungrouped, select all the individual objects you wish to combine, and then apply Path > Combine.
A critical point to remember is that when objects are combined, they will adopt a unified style. If the objects within the group had different colors, strokes, or opacity settings, the combined object will inherit the style of the last drawn object in the selection before the combine operation. This can sometimes be a point of confusion, as the resulting style might not be what was initially expected.
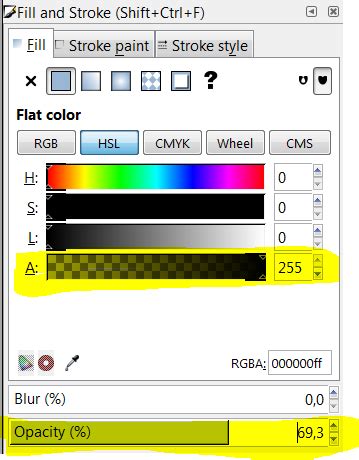
For achieving effects using opacity, such as creating a layered look where one object is slightly transparent over another, it's common to have two objects of identical shape placed precisely on top of each other. To select both of these identical, overlapping objects, you can employ the Alt + Click method described earlier, followed by Shift + Click to add the second object to the selection. Once both are selected, you can then adjust their opacity independently or together using the Fill and Stroke dialog.
The Power of Snapping for Precision
Precision is paramount in vector graphics, and Inkscape's Snapping tools are indispensable for achieving pixel-perfect alignment and placement. Snapping allows objects, nodes, and guides to "stick" to specific points or to each other, eliminating guesswork and ensuring accuracy.
The configuration of snapping settings is found within File > Document Properties > Snap. Here, users can fine-tune how snapping behaves. For general snapping, it's recommended to set "Snap only when closer than" and adjust the "Snap Distance" to a value around 20 pixels. This ensures that snapping activates when objects are within a close proximity, providing a responsive yet not overly aggressive snapping behavior.

The Snap toolbar, located along the right side of the canvas, provides quick access to toggle snapping on and off and to enable specific snapping behaviors. To achieve precise node alignment, it's essential to engage the "Snap nodes, paths and handles" button. Within this, enabling "Snap cusp nodes" and "Snap smooth nodes" is particularly useful. Other snapping options can be left disengaged until a deeper understanding of their function is developed.
With snapping enabled and configured, two primary benefits emerge:
Node Snapping During Dragging: When using the Node Tool (N), as you drag a node, it will automatically snap to other nearby nodes. This "jump" to alignment occurs when the node is within the defined snap distance. A text announcement will flash on screen, indicating what has snapped to what, which is invaluable in complex drawings. Simply release the mouse button when you see this confirmation.
Precise Node Placement During Drawing: When using drawing tools like the Pen Tool (Bezier curves and straight lines), snapping allows you to place new nodes precisely on top of existing nodes while you are drawing. As long as the pen pointer is within the snap distance of an existing node, clicking to set a new node will result in it being placed exactly on top of the existing one.
These snapping capabilities are not just about aligning existing elements; they are fundamental to creating new shapes with perfect junctions and seamless connections. For instance, when drawing a series of connected shapes, ensuring each new node snaps to the previous one guarantees a continuous and clean path.
Advanced Selection Techniques and Outline View
Beyond double-clicking and Alt + Click, Inkscape offers further methods to ensure every object can be selected. The XML Editor is a robust tool for those who prefer a structured, code-like approach to object management. It lists every element in your drawing, allowing you to select, rename, or even reorder them. This is particularly useful for hidden layers or very small objects that are difficult to target with the mouse.
The Outline view is another powerful ally for selection. By navigating to View > Outline (or using the shortcut /), the canvas transforms into a wireframe representation of your artwork. In this mode, all objects are visible as outlines, regardless of their stacking order or opacity. This makes it incredibly easy to select objects that might be completely obscured in the normal view. Once you've made your selection in Outline view, you can switch back to the normal view (View > Normal or \ ) and your selections will remain active until you perform another selection action or deselect them. This allows for precise modifications to objects that would otherwise be inaccessible.

Consider a scenario where you have a complex design with many overlapping elements. Using Outline view allows you to isolate and select a specific underlying shape to modify its color, stroke, or even its path data without inadvertently affecting the foreground objects. This level of control is crucial for refining intricate designs and correcting errors.
Combining Objects: Understanding the "Combine" Operation
The term "merge objects" in Inkscape can refer to several distinct operations, each with its own purpose and outcome. When users speak of merging objects, they often mean combining them into a single, unified shape. In Inkscape, the primary tool for this is Path > Combine.
It's important to distinguish between "Combine" and "Group." Grouping (Ctrl + G) simply creates a parent-child relationship between objects; they remain individual entities within the group. Combining, on the other hand, performs a boolean operation on the paths of the selected objects, resulting in a single new path.
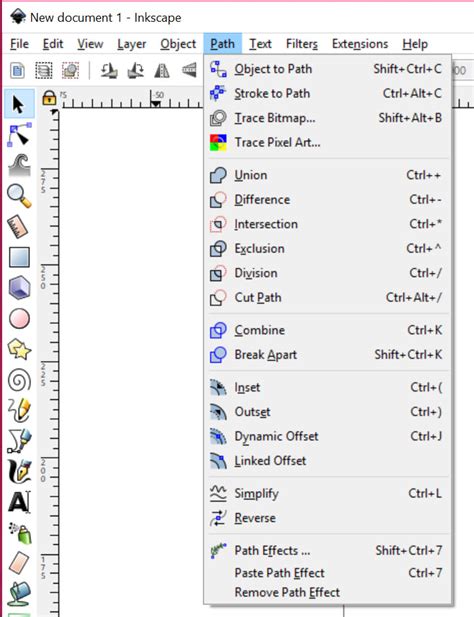
The Path > Combine operation effectively subtracts the top object from the bottom object. If multiple objects are selected, it iterates this process. For example, if you have three overlapping shapes, combining them will result in a shape where the areas of the second and third objects are "cut out" from the first.
If the goal is to create a single shape by joining overlapping areas, the Path > Union operation is used. This takes all selected shapes and merges them into one, eliminating overlapping lines and creating a single, continuous boundary.
Conversely, Path > Difference subtracts the top object from the bottom object. Path > Intersection creates a new shape from only the areas where all selected objects overlap. Path > Exclusion creates a shape from the areas where objects do not overlap.
When using Path > Combine or any other path operation, it's crucial to understand that these operations are destructive to the original paths. The original objects are replaced by a single, new path. Therefore, it's often advisable to duplicate your objects before performing these operations, especially if you might need to revert to the original shapes later.
The stylistic consistency mentioned earlier also applies to these path operations. If objects with different styles are combined, unioned, or differenced, the resulting single path will inherit a style, typically based on the last selected object or a default setting. This means that if you combine a red circle and a blue square, the resulting shape might be red or blue, depending on which was selected last. To ensure a specific style for the combined object, it's best to set the desired style on one of the objects before performing the operation, or to reapply the style to the resulting path afterward.
Advanced Techniques for Complex Selections
When dealing with intricate designs, selecting specific objects can become a challenge. Inkscape provides several advanced methods to ensure that even the most obscured or difficult-to-access objects can be precisely selected.
One such method involves using the XML Editor (Shift + Ctrl + X). This powerful tool displays a hierarchical tree of all the objects in your Inkscape document. Each object is listed with its type (e.g., path, group, text) and its ID. By navigating this tree, you can directly select any object, regardless of its position on the canvas or whether it's hidden behind other elements. This is particularly useful for selecting objects that are very small, have transparent fills, or are part of deeply nested groups.
Another invaluable technique is the use of Outline View. Accessing this through View > Outline (or the shortcut /) transforms the canvas into a wireframe display of all objects. In Outline View, every object is rendered as a set of lines, making it impossible for one object to obscure another. This allows for easy identification and selection of any object, even those completely hidden in the normal rendering mode. Once an object or multiple objects are selected in Outline View, they remain selected when you switch back to the normal view (View > Normal or \ ). This allows you to then apply transformations, styles, or path operations to precisely chosen elements.
For instance, imagine you have a background image that you want to apply a filter to, but it's covered by several foreground shapes. Using Outline View, you can easily select the background image without touching the foreground shapes, and then apply your desired filter or adjustments.
The ability to select objects behind others using Alt + Click is also fundamental. When you Alt + Click on an area covered by multiple objects, Inkscape selects the topmost object at that point. Repeating Alt + Click will cycle through the objects beneath. Holding Shift while using Alt + Click adds subsequent selections to the current one, allowing you to build up a complex selection of disparate objects.
These advanced selection techniques are not merely conveniences; they are essential tools for maintaining control and precision in complex vector artwork. They empower users to overcome the visual limitations of layered designs and to interact with their artwork at a fundamental level.