Achieving accurate and pleasing colors in your photographs is a fundamental aspect of post-processing. Among the various color correction techniques, adjusting white balance plays a pivotal role. Incorrect white balance can cast an unwanted color tint over your images, making them appear dull or unnatural. Fortunately, Photoshop offers powerful tools to correct these issues, allowing you to make the white in your photo look white and bring realism to your colors. This guide will explore multiple methods for adjusting white balance in Photoshop, from straightforward automated tools to more nuanced manual approaches, ensuring your images showcase their true colors.
Understanding White Balance: The Foundation of Accurate Color
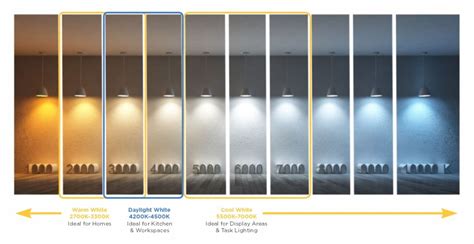
White balance, at its core, is the adjustment of a digital photograph to make its colors appear more realistic. As photographer and educator Adam Long explains, “It’s a way to set a photograph to neutral, to make the white look white.” Different lighting situations create different color temperatures, which directly impact how colors are rendered in an image. For instance, if you take a photo of a white object under certain lighting conditions, it can appear bluer than it actually is due to the ambient light's color cast.
This phenomenon is why it’s called “white balance” but actually affects all the colors in your photo. When you’re shooting with natural light from an overcast sky, your photos will tend to have a cold color temperature, leaning towards a blue tone. Conversely, shooting in unnatural incandescent light with typical tungsten light bulbs creates a warm color cast, showing up as more yellow or orange. Different color temperatures can convey different moods, and understanding how they work is key to using them intentionally.
The goal with white balance is to understand how it can be affected and to use it intentionally. While a perfectly accurate white is often the objective, there might be instances where a slightly skewed color temperature works in your favor to convey a specific mood or artistic intent. Photographer Kenton Waltz suggests, “White balance is a great place to start. Then you can decide how you want it to feel and adjust from there.”
Pre-Shoot Considerations: Setting the Stage for Success
A good first step is accounting for white balance in your camera settings before you even import your photos into Photoshop. As photographer Grace Rivera states, “With white balance, you’re matching the camera to the light source.” Most newer DSLR cameras have powerful automatic white balance (AWB) functions that can handle many common lighting scenarios effectively. However, for greater control and consistency, manual white balance adjustments are also an option. You can choose a specific setting depending on your light source, such as a "cloudy day" setting or a setting for bright sunlight. Rivera advises, “You can adjust based on where you are.”
Crucially, putting your camera on the RAW file setting before you shoot is important for post-processing flexibility. This file format preserves all the image data that is recorded by your camera’s sensor, offering the most latitude for making adjustments like white balance in post-production without significant degradation of image quality.
Shooting photos with mismatched sources of light will make it significantly more difficult to edit the white balance in post-production. Waltz emphasizes this point: “Try to get your light sources to match. If you have somebody lit with an incandescent bulb sitting next to a window on an overcast day, you’re going to have one half of your photo really warm and the other half really cold.”
For scenarios where being exact is the ultimate goal, such as product photography or food photography, a gray card is an invaluable tool. A gray card is a square of material specifically shaded at 18 percent gray. To set white balance using a gray card, you would take a shot with the card filling the entire frame. Then, navigate to your camera’s menu, select the option to set a custom white balance, and set it by choosing your photo of the gray card. This ensures a truly neutral reference point.
White Balance Adjustments in Photoshop: The Camera Raw Filter Method
While getting it right in-camera is ideal, Photoshop provides robust tools to correct white balance in post-production. Before making any adjustments, it’s crucial to protect your original image. To do this, convert your image layer into a Smart Object. This allows for non-destructive editing, meaning you can always go back and alter your adjustments without re-editing the original pixels.
Leveraging the White Balance Tool in Camera Raw
In Photoshop, the best tool for adjusting white balance is arguably the white balance tool within the Camera Raw filter. This filter offers a highly automated yet precise way to correct color casts.
- Accessing Camera Raw: With your image layer as a Smart Object, go to
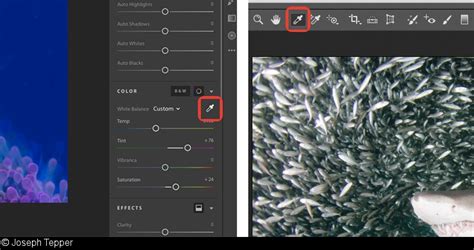
Filter > Camera Raw Filter. - Locating the White Balance Tool: Within the Camera Raw interface, find the "White Balance Tool" (it often looks like an eyedropper).
- Clicking on a Neutral Area: The core function of this tool is to click on a mid-gray (neutral gray) or white area in the image. It's essential to ensure that the area you select is not overexposed, as this would lead to inaccurate readings. Although this tool offers manual input via clicking, it is, in fact, highly automated in its process.
- Observing the Changes: Upon clicking a neutral area, you'll notice immediate changes. The image on the left will update to reflect the corrected white balance, and simultaneously, the sliders on the white balance toolbar, particularly the Temperature and Tint sliders, will shift to indicate the adjustments made.
- Fine-Tuning with Temperature and Tint Sliders: Below the white balance tool options, you'll find the Temperature and Tint sliders. These sliders are intuitive to use and correspond to four color ranges: blue, yellow, green, and magenta. After using the white balance tool to click on a neutral area, you can then fine-tune the white balance with these sliders. The Temperature slider moves between blue (cooler) and yellow (warmer), while the Tint slider moves between green and magenta. Pay close attention to the changes in Temperature and Tint values in the Basic panel as you make these adjustments.
- Applying the Adjustments: Once you've achieved your desired look and the white balance is corrected, click the “OK” button to apply the Camera Raw filter adjustments to your image. Your image is now corrected for white balance.
Alternative White Balance Adjustments in Photoshop: Beyond Camera Raw
While the Camera Raw filter is highly recommended, there are situations where you might need or prefer to adjust white balance without using it, or perhaps you're looking for alternative methods.
The Threshold and Curves Method
This method is a bit more involved but can be effective, especially if your image lacks clear neutral areas.
- Import and Prepare: Import your photo into Photoshop and ensure it's a Smart Object for non-destructive editing.
- Create a Neutral Layer: Create a new blank layer above your image layer.
- Add a Threshold Adjustment Layer: Create a new Threshold adjustment layer (
Layer > New Adjustment Layer > Threshold). Initially, this layer will likely make your image pure black and white. - Sample Point Marker: The Threshold adjustment layer, when used in conjunction with a neutral gray layer, helps in identifying a neutral point. Once you've placed a sample point marker (which you'll do in the next step), the neutral gray layer and the Threshold adjustment layer have served their purpose and can be hidden or deleted if desired.
- Create a Curves Adjustment Layer: Next, create a new Curves adjustment layer (
Layer > New Adjustment Layer > Curves). - Use the Gray Eyedropper: Within the Curves panel, select the gray eyedropper tool. Click on the sample point marker that you established using the Threshold layer. This action will adjust the Curves to neutralize the color cast based on that sample point.
- Fine-tune (Optional): You may still need to fine-tune the white balance using the Temperature and Tint sliders within the Curves adjustment or by creating another adjustment layer.
Utilizing Photo Filter Adjustment Layer
The Photo Filter adjustment layer offers a simpler way to apply color casts or correct them.
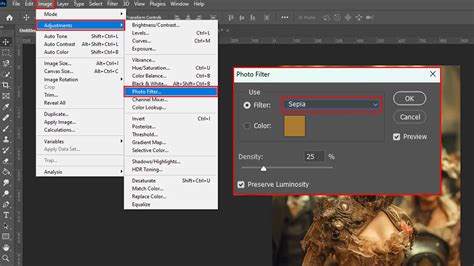
- Create a Photo Filter Layer: Choose
Layer > New Adjustment Layer > Photo Filter. You can also access this throughImage > Adjustments > Photo Filter, though the adjustment layer method is non-destructive. - Select a Filter or Custom Color: You can choose from various pre-set filters (like warming or cooling filters) or select the "Color" option for a custom filter.
- Adjust Density: Use the "Density" slider to control the strength of the color being applied.
- Preserve Luminosity: The "Preserve Luminosity" option is important if you want to avoid changing the brightness values of your image while adjusting the color.
- Color Sliders: If you choose a custom color, you can use the Cyan/Red, Magenta/Green, or Yellow/Blue sliders to add or subtract specific color tones. The values above the sliders indicate the changes in the red, green, and blue channels.
- Preview: Enable the "Preview" option to see your edits in real-time on your image.
Localized Adjustments with Layer Masks
For more targeted white balance corrections, layer masks are invaluable. You can apply any of the above adjustment layers (Camera Raw, Curves, Photo Filter) and then use a layer mask to reveal or conceal the effect on specific areas of your image. This is particularly useful when dealing with scenes that have mixed lighting or when you only want to correct a specific part of the photo. A Gradient Map Adjustment Layer can also be used for more advanced color grading and white balance adjustments.
Advanced Considerations and Best Practices
Avoiding Excessively Bright Areas for Calibration
When using any automated white balance tool, whether it's the eyedropper in Camera Raw or a similar function, it's crucial to remember that the tool reads information from a specific area in the image to calibrate the white balance. If you select an excessively bright or overexposed area, the tool will interpret that bright data as neutral, leading to an incorrect and often undesirable white balance correction. Always aim to select areas that are mid-toned and appear neutral in their current state.
Understanding the Mood and Intent
While accurate white balance is often the goal, there are situations where a skewed color temperature works in your favor. For example, “Say you’re shooting in a dimly lit bar or restaurant. That’s the type of thing where you want to convey that mood. You may want to preserve the color of the ambient light rather than correct it,” suggests Rivera. Similarly, when shooting a sunset, the inherent warmth of the light is a crucial part of the image’s appeal. In such cases, rather than forcing a neutral white balance, you might intentionally adjust the temperature to enhance the warm tones.
The Power of Experimentation
Photographer Grace Rivera offers excellent advice for those learning about white balance: “The best thing you can do if you’re just starting out and learning about things like white balance is to play with every combination of the settings that you can and see how it affects things.” Set up a tripod outside, face a sunset, and experiment with different white balance settings on your camera, such as "shady" or "daylight," to observe the results. Similarly, in Photoshop, try applying different adjustment layers and sliders to see their impact.
Advance Color Correction in Photoshop | Colour Correction in Photoshop
Beyond White Balance: Enhancing Your Images
Once you've mastered white balance adjustments, you can explore further ways to enhance the colors, contrast, and texture of your photos. Tools like Color Balance can be used not only to correct color imperfections but also to create dramatic effects by altering the overall mixture of colors within your image.
Exploring TourBox for Enhanced Workflow
For those who find themselves frequently adjusting parameters like white balance, tools like TourBox can significantly streamline the workflow. TourBox features a built-in "Adjust Selected Parameter" function, allowing for more intuitive and faster control over adjustments within Photoshop and other creative software. You can also configure more interesting and personalized shortcuts and controls within the TourBox software itself, making complex edits more accessible and efficient. If you're interested in such workflow enhancements, you might check out products like the TourBox Lite.
In conclusion, while mastering white balance in Photoshop can seem daunting, the array of tools available, from the precise Camera Raw filter to more creative options like Photo Filter and the fundamental understanding of color temperature, empowers you to achieve stunningly realistic or artistically enhanced results. By understanding the principles of light and color, and by utilizing Photoshop's powerful features, you can transform your images and ensure they convey the intended mood and visual fidelity.