Photoshop's clipping mask feature is a powerful and versatile tool that allows for precise control over layer visibility, offering a dynamic way to integrate images, shapes, and text. While often compared to layer masks, clipping masks operate on a fundamentally different principle, utilizing the content and transparency of a base layer to dictate what is visible in the layers positioned above it. Understanding this distinction and mastering its application can significantly enhance your workflow and creative possibilities within Photoshop. This guide delves into the intricacies of clipping masks, from their fundamental operation to advanced techniques, enabling users of all skill levels to leverage their full potential.
The Core Concept: Content and Transparency as a Mask
At its heart, a clipping mask in Photoshop functions by using the "content" of a layer to control the visibility of the layer directly above it. This "content" can be anything from pixel data in an image, vector shapes, or even text. The key principle is that where the base layer has actual content, the layer above it will be visible. Conversely, any area of the base layer that is transparent will cause the corresponding area of the layer above it to be hidden. This is a crucial difference from layer masks, which use grayscale values to selectively reveal or conceal parts of a single layer.
To create a clipping mask, you fundamentally need at least two layers. The layer at the bottom of the stack serves as the "mask" or "base layer," and the layer positioned directly above it is the one that will be "clipped." When the clipping mask is formed, the content of the base layer effectively "cuts out" a visible area for the clipped layer. This means that only the portions of the upper layer that align with the non-transparent areas of the lower layer will be displayed.
Understanding Layer Structure and Visibility
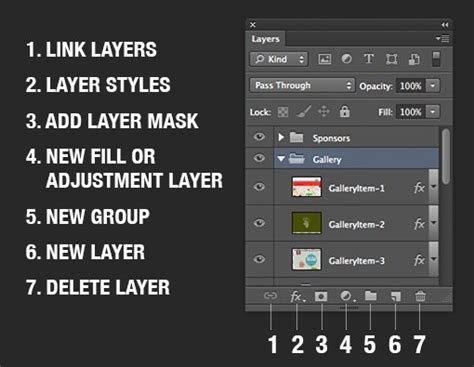
The visual cue in the Layers panel for a clipping mask is quite distinctive. When a layer is clipped to the one below it, its name will appear indented, with a small downward-pointing arrow originating from it and pointing towards the base layer. This visual indicator clearly signifies the relationship between the layers, making it easy to identify and manage clipped groups.
The original document may have multiple photos on different layers. To create a clipping mask, you would add an adjustment layer, or any layer for that matter, and then clip it to a layer beneath it. As you modify the adjustment layer, its effects will only apply to the layer it is "clipped" to. This is particularly useful when you want an adjustment, like a color correction or a tonal shift, to influence a specific element without affecting other parts of your composition. For example, by clipping a Curves adjustment layer to a Gradient Map layer, you can ensure that the curve adjustments only affect what the gradient map is doing. When you have clipped the layer, you will notice right away that your luminosity changes from the curves layer are now behaving as expected and only applying the change to your previous adjustment layer.
Practical Applications: Beyond Simple Layer Masking
While layer masks are excellent for creating seamless blends and subtle transitions, clipping masks excel when you need to fit an image or effect within a well-defined shape or boundary. This makes them ideal for a variety of creative tasks.
Fitting Images into Shapes and Text
One of the most common and visually striking uses of clipping masks is to place an image within a shape or text. To achieve this, you would first create your shape or type layer. This layer will serve as the base layer, defining the boundaries of the mask. Then, you would place the image layer you want to mask directly above the shape or text layer. By creating a clipping mask, the image will now only be visible within the confines of the shape or text.

For instance, if you have a photograph and you want to place it inside a textually created "frame," you would put the text layer under the photo layer in the Layers panel. Then, you would target the text layer and select "Layer > Create Clipping Mask." The photograph will then appear exclusively within the boundaries of the text. This technique is invaluable for creating eye-catching graphics, posters, and web designs where specific elements need to be contained within defined areas.
Using Clipping Masks with Adjustment Layers
As mentioned earlier, clipping masks are incredibly useful for applying adjustments to specific layers or groups of layers. This offers a level of control that is difficult to achieve with standard layer masks. You can clip an adjustment layer, such as a Hue/Saturation, Color Balance, or Curves adjustment, to a single layer or even to another adjustment layer. This ensures that the effects of the adjustment layer are confined only to the layer(s) beneath it.
I feel it's always good to experiment with new ways of accomplishing things, and usually a better or faster way is found. Clipping masks are commonly used when an adjustment needs to be applied to a single layer (or Layer Group) in a document. This allows for non-destructive editing and precise control over where your adjustments take effect. The ColourMapX panel, for example, can lead users to explore clipping adjustment layers to other adjustment layers, a technique that might not be immediately obvious but offers significant benefits in fine-tuning specific visual elements.
Creating Clipping Masks: Methods and Shortcuts
Photoshop offers several intuitive ways to create clipping masks, catering to different user preferences and workflows.
The Layer Menu Method
The most straightforward method is through the Layer menu:
- Ensure the layer you wish to clip is positioned directly above the base layer that will serve as the mask.
- Select the layer you intend to clip.
- Navigate to
Layer > Create Clipping Mask.
The Keyboard Shortcut
For those who prefer keyboard-driven workflows, Photoshop provides convenient shortcuts:
- Select the layer to be clipped.
- Use
Command + Option + G(Mac) orControl + Alt + G(Win) to create a Clipping Mask.
The Alt/Option Key Method
This is often considered the fastest and most intuitive method for many users:
- In the Layers panel, position your cursor over the line that separates the two layers you wish to associate (the layer to be clipped and the base layer).
- Hold down the
Optionkey (Mac) orAltkey (Win). - Your cursor will transform into a small downward-pointing arrow.
- Click your mouse. This action will create the clipping mask.
Visually, you will know that the layers are clipped because the bottom-most layer’s name will be underlined in the Layers panel, and the clipped layer(s) will be indented with an arrow pointing downwards towards the base layer.
Photoshop Tutorial: How to Create Clipping Mask in Photoshop
Understanding the Mechanics: Content vs. Transparency
To truly grasp how clipping masks work, it's essential to understand the concept of "content" and "transparency" on a layer. A layer in Photoshop is not merely a visual element; it's a canvas that can contain information. This information is referred to as "content." When a layer is created, it might be blank, meaning it has no content and is therefore entirely transparent. As you add pixels, shapes, or text, you are populating that layer with content.
When you create a clipping mask, Photoshop examines the base layer. Any area of the base layer that contains content (i.e., is not fully transparent) will allow the corresponding area of the clipped layer to be visible. Conversely, any area of the base layer that is transparent will hide the corresponding area of the clipped layer.
Let's illustrate this with an example:
- Start with an image on "Layer 0."
- Add a new blank layer, "Layer 1," below "Layer 0." By default, this new layer is transparent.
- Create a clipping mask by selecting "Layer 0" and using
Alt/Option + Clickbetween "Layer 0" and "Layer 1." - The result is that "Layer 0" (the image) is now hidden. This is because "Layer 1" has no content and is entirely transparent. Any part of "Layer 0" sitting above a transparent area of "Layer 1" is therefore hidden.
Now, let's add content to the base layer:
- Select "Layer 1" and draw a shape (e.g., a black circle) on it.
- You will notice that the preview thumbnail for "Layer 1" now shows the black shape.
- The image on "Layer 0" is now partially visible, appearing only where it overlaps the black shape on "Layer 1."
This demonstrates that the shape on "Layer 1" acts as a window, allowing only the parts of "Layer 0" that fall within that window to be seen.
Editing and Refining Clipped Layers
Once a clipping mask is established, you retain significant flexibility to edit and refine the contents and the mask itself.
Repositioning and Resizing Clipped Content
You can easily move and reposition the clipped layer within the mask. Simply select the clipped layer in the Layers panel and use the Move Tool to drag it. As you move the image, only the area that moves over the shape on the layer below it remains visible. This allows you to fine-tune the composition and ensure the most important parts of your image are within the masked area.
Furthermore, you can resize the clipped content using Photoshop's Free Transform command (Command + T on Mac, Control + T on Win). While the clipped layer is selected, invoke Free Transform. You can then scale, rotate, or skew the content. Holding down the Shift key while dragging the corner handles ensures proportional scaling. Press Enter (Win) or Return (Mac) to commit the changes.
Editing the Masking Layer
To edit the shape or content of the base layer that defines the clipping mask, simply select that base layer and use Photoshop's various drawing, shape, or type tools to make your modifications. Any changes to the base layer will instantaneously update the visibility of the clipped layer(s) above it.
Adding and Removing Layers from Clipping Masks
Adding new layers to an existing clipping mask group is straightforward. Place the new layer directly above the existing clipped layer. Then, hold down the Alt/Option key and position your cursor between the new layer and the one below it, clicking when the cursor changes to the clipping mask icon. This will clip the new layer to the same base layer. To remove a layer from a clipping mask, select the clipped layer and go to Layer > Release Clipping Mask.
Advanced Clipping Mask Techniques
Beyond the fundamental applications, clipping masks can be combined with other Photoshop features for even more sophisticated results.
Blending Modes with Clipping Masks
Experimenting with different blending modes on your clipped layers can lead to unique visual effects. The blending mode dictates how the pixels of the clipped layer interact with the pixels of the layers below it, within the boundaries of the clipping mask. This can create interesting color shifts, tonal adjustments, or textural overlays.
Combining Clipping Masks with Adjustment Layers
As previously discussed, clipping adjustment layers is a powerful technique. You can create intricate effects by stacking multiple adjustment layers, each clipped to different base layers or even to each other. This allows for highly targeted color grading, tonal corrections,, or stylistic enhancements that affect only specific elements of your design.
Using Vector Masks with Clipping Masks
Vector masks, known for their scalability and crisp edges, can also be used in conjunction with clipping masks. If your base layer utilizes a vector mask, the clipping mask will adhere to the precise vector paths, ensuring clean and sharp boundaries for your clipped content. This is particularly useful for designs that require precise geometric forms.
Filters and Clipping Masks
Applying filters to clipped layers can produce creative outcomes. For example, you could clip a layer containing a texture to a shape and then apply a blur filter to the texture layer to create a soft, diffused effect within that shape.
Clipping Masks Across Different Software
While this guide focuses on Photoshop, the concept of clipping masks is not exclusive to it.
- Adobe Illustrator: In Illustrator, clipping masks are used to mask vector objects or groups of objects. The principle is similar: the content of the base object defines the visible area of the objects contained within the mask.
- Procreate: The Procreate app also features clipping masks, allowing users to confine the effects of a layer to the underlying visible content. This is a fundamental tool for digital painting and illustration on the iPad.
Troubleshooting Common Clipping Mask Issues
Occasionally, users may encounter issues when working with clipping masks. Here are a few common problems and their solutions:
- Layer Not Clipping as Expected: Ensure that the layer you intend to clip is positioned directly above the base layer in the Layers panel. Also, verify that the base layer has actual content and is not entirely transparent.
- Unwanted Visible Portions: If parts of the clipped layer are visible where you don't expect them, it's likely due to the content of the base layer. You may need to edit the base layer to refine its shape or remove unwanted transparent areas.
- Transparency Issues: Double-check the transparency settings of both the clipped layer and the base layer. Sometimes, low opacity or fill on the clipped layer can be mistaken for a clipping mask issue.
By understanding the fundamental principles of content and transparency, and by practicing the various methods of creation and editing, you can unlock the full potential of clipping masks in Photoshop. They are an indispensable tool for precise control, creative integration, and sophisticated visual effects, empowering you to bring your design visions to life with greater accuracy and artistry.