Understanding how pages function in Adobe InDesign is crucial for crafting visually stunning and organized documents, be it magazines, books, or brochures. Pages provide structure and flow to your designs, and mastering their manipulation is a fundamental skill for any InDesign user. In this blog post, we'll explore the basics of managing pages in Adobe InDesign, delving into the powerful Pages panel and its extensive capabilities. From opening the panel to mastering techniques like rearranging, duplicating, and utilizing parent pages, we'll provide easy-to-follow tips for enhancing your designs and achieving professional results.
The Pages Panel: Your Command Center for Document Structure
The Pages panel is a powerful tool that allows you to manipulate, organize, and visualize the structure of your document effortlessly. It serves as the central hub for all page-related operations, offering a clear overview of your document's layout. To access it, navigate to Window > Pages.
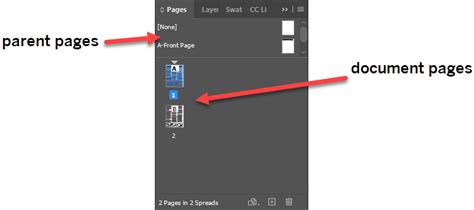
Within the Pages panel, you'll see thumbnails representing each page or spread in your document. These thumbnails are your visual cues for managing your content. You can distinguish between single pages and spreads, which are groups of two or more pages that appear side-by-side in your layout, such as the opening pages of a book or magazine.
Navigating and Organizing Pages
Managing the order and arrangement of pages is a core function. To rearrange pages within a spread, simply click and drag the page thumbnail to your desired position. This is particularly useful for fine-tuning the flow of your content. For moving pages between spreads or reordering spreads themselves, drag the thumbnails to the desired location within the panel. InDesign offers flexibility, allowing you to have spreads that can include up to ten pages, though most documents use two-page spreads exclusively.
You can also drag an existing page to a spread in the Pages panel, integrating it seamlessly into your layout. Furthermore, InDesign allows you to move pages not only within a document but also between two different documents, a feature that can significantly streamline complex projects.
Duplicating Pages and Spreads
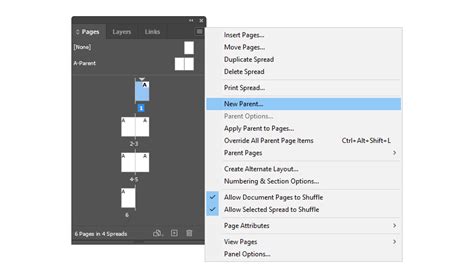
Duplicating pages or entire spreads is a time-saving technique for reusing layouts or creating variations. To do this, click on the Pages panel menu, often represented by a "burger" icon (three horizontal lines) located at the top-right corner of the panel. From the dropdown menu, choose "Duplicate Page" or "Duplicate Spread," depending on your preference. You can duplicate a page just after the selected page or at the end of the document. This is invaluable when you have a recurring design element or a section that needs to be repeated with minor modifications.
Inserting Pages
Beyond duplicating existing pages, you can also insert new pages into your document. This is typically done through the Pages panel menu as well, where you'll find an option to "Insert Pages." This allows you to specify the number of pages to insert, their location, and whether they should be single pages or part of a spread. The Control Panel, accessible by clicking the burger icon in the top-right corner of the application window, also offers advanced page settings, including options for inserting pages from other documents.
Deleting Pages
If you no longer need certain pages, you can easily delete them. Select the page or spread thumbnail you wish to remove in the Pages panel and click the Delete icon at the bottom of the panel, or select "Delete Page(s)" from the panel menu. Be cautious when deleting pages, as this action is permanent and will remove all content on those pages.
Parent Pages: The Power of Reusable Layouts
Parent pages, previously known as master pages, are a cornerstone of efficient InDesign workflow. A parent page acts like a background template that you can quickly apply to multiple document pages. Objects placed on a parent page will automatically appear on all document pages to which that parent is applied. This is incredibly useful for elements that need to be consistent across your document, such as logos, page numbers, headers, and footers.
Understanding Parent Page Functionality
Objects on a parent page that appear on document pages are typically surrounded by a dotted border, indicating their origin. Any changes you make to a parent page are automatically reflected on all associated document pages. This saves immense time and ensures consistency. Parent pages can also contain empty text or graphic frames that serve as placeholders on document pages, allowing for content to be easily added later.
Parent pages can have multiple layers, just like regular document pages. The stacking order of objects within a layer is maintained. If you want a parent item to appear in front of objects on a document page, assign a higher layer to the object on the parent. A parent item on a higher layer will appear in front of all objects on lower layers.
Applying and Modifying Parent Pages
Applying a parent page to one or more document pages is straightforward. To apply a parent to a single page, drag the parent page icon from the top section of the Pages panel to the desired document page icon. To apply a parent to an entire spread, drag the parent page icon to a corner of the spread in the Pages panel. You can apply a parent to multiple pages at once by selecting the desired document pages and then applying the parent. For instance, you can apply a parent to pages 5, 7‑9, and 13‑16.
When you unassign a parent from a page, its layout and items no longer apply to that page, reverting it to a basic document page. You can create new parent pages from scratch, from an existing parent page, or even from a document page.
Creating Custom Parent Pages
To create a new parent page, click the Pages panel menu and choose "New Parent." You can specify the number of pages in the parent spread (up to ten), assign a name, and choose the document page size on which to base it. You can also create child parents, which are based on existing parent pages, allowing for hierarchical organization of your master layouts.
When you select a parent spread and choose "Parent Options" from the Pages panel menu, you can modify its settings. InDesign automatically updates any pages using that parent. To see the results of parent edits, you can use Arrange > Tile to view multiple pages simultaneously.
It's important to note that any parent you apply should ideally contain the same number of pages as the spread you're applying it to. If you change column or margin settings on a parent, or apply a new parent with different settings, you can force objects on the page to adjust to the new layout automatically. Automatic page numbers inserted on a parent display the correct page number for each section of the document to which the parent is applied.
Advanced Page Management Techniques
Adobe InDesign offers several advanced features for page management that can significantly enhance your workflow and design capabilities.
Different Page Sizes Within a Document
Yes, you can define different page sizes for pages within a single document. This is achieved using the Page tool in conjunction with specific panel options, allowing for dynamic layouts where certain pages might require a different dimension than the rest of the document. This is particularly useful for inserts or special sections within a larger publication.
Moving and Copying Parent Pages Between Documents
You can move or copy parent pages between documents. To do this, open both the source and destination documents. In the source document, select the parent you want to move or copy in the Pages panel. Then, in the destination document, select the Pages panel menu and choose "Move To," selecting the destination document name from the menu. You can also copy parent pages by dragging them from the source document's Pages panel to the destination document's window.
Local Overrides and Detaching from Parent Pages
Sometimes, you might need to make minor adjustments to an object that originated from a parent page, without affecting the parent itself. This is known as a local override. You can modify attributes like the fill color of a local copy. Parent items that have been overridden on the local copy will have a different appearance in the Pages panel.
If you want to completely detach an item from its parent, creating a standalone copy on the document page, you first need to create a local override. Then, you can detach the item. You can detach a single item or multiple items by selecting them and choosing "Detach All Objects From Parent" from the Pages panel menu. This action effectively breaks the link between the object and its parent, allowing for complete independent modification.
Removing Overrides
If you've made local overrides and later want to revert an object back to its parent state, or remove all overrides from a page or spread, InDesign provides options for this. From the Pages panel menu, you can choose "Remove All Local Overrides." This action will detach any overridden items and then reapply the parent page objects. Be aware that this may result in two copies of some objects on the page if the overridden object differs significantly from the parent. To remove all parent overrides, you can select the page(s) in the Pages panel, then choose "Remove All Local Overrides" from the panel menu. For a complete reset, you can unassign the parent and then reapply it.
Hidden Spreads
InDesign allows you to hide spreads, which can be useful for managing complex documents or temporarily setting aside sections. Hidden spreads remain invisible by default. You can toggle their visibility using the "Show Hidden Spreads" option in the Pages panel menu. If a document has only one visible spread, the "Hide Spread" option will be disabled. Attempting to navigate to an object on a hidden spread will result in an alert message.
Rotating Spreads
When working with documents that have rotated content, such as calendars or tables, you can rotate the spread view within InDesign. This allows you to work with the content in a more natural orientation without affecting the actual layout of the page.
Learn Adobe InDesign in 11 MINUTES! | Formatting, Tools, Layout, Text Etc. | 2023 Beginner Basics
Randomly Reordering Pages
For tasks involving the random distribution of pages, such as distributing single-page stories in a book, manual reordering can be incredibly time-consuming, especially in large documents. While InDesign doesn't have a one-click "randomize pages" button, scripting can be employed to achieve this. For a nearly 400-page document, manually moving pages is highly impractical. Exploring ExtendScript (InDesign's scripting language) or searching for existing scripts that can perform random page reordering would be a viable solution to avoid the error "Invalid value for parameter 'reference' of method 'move'" that can arise from attempting manual, large-scale rearrangements. Such scripts can programmatically move page elements to achieve the desired random distribution.
Understanding the intricacies of page management in Adobe InDesign opens up a world of creative possibilities, allowing you to craft visually captivating publications with ease. Experiment with these techniques to unleash your design prowess and bring your ideas to fruition. The ability to seamlessly arrange, duplicate, and manage pages, coupled with the power of parent pages, provides the foundation for efficient and professional document creation.