Procreate, the powerful digital art application for iPad, offers an expansive toolkit for artists of all levels. While its default brushes are impressive, the true magic often lies in customization and combination. This tutorial delves into the intricate art of combining two Procreate brushes to create unique dual brushes, unlocking a universe of new artistic possibilities. We will explore the process step-by-step, from selecting and preparing your brushes to fine-tuning their combined behavior and understanding the nuances that lead to exceptional results.
The Power of Combining Brushes in Procreate
The ability to combine two brushes in Procreate is a significant feature that allows artists to transcend the limitations of single-stroke textures and effects. Instead of relying on pre-made dual brushes or complex layering, Procreate offers a streamlined approach to creating custom brushes that blend the characteristics of two distinct sources. This feature is particularly valuable for artists who aim to replicate the tactile feel of traditional media, where the interplay of different textures and pigments creates depth and visual interest.
The concept of combining brushes goes beyond simply overlaying two textures. It involves understanding how Procreate interprets and blends these elements, allowing for nuanced control over the final output. Whether you're aiming for the soft, bleeding edges of watercolor, the opaque richness of gouache, or the gritty texture of pastels, brush combination provides a direct path to achieving these effects.
Understanding the Primary and Secondary Brush Dynamics
A crucial aspect of brush combination in Procreate is the concept of a "primary" and "secondary" brush. When you combine two brushes, Procreate designates one as the primary, which acts as the master, dictating the overall stroke behavior and form. The second brush, the secondary, then influences the primary, adding its unique texture, shape, or effect.
The choice of which brush to designate as primary can dramatically affect the final result. The primary brush generally controls the foundational shape and structure of the stroke, while the secondary brush adds details, textures, or modifications. For instance, if you combine a solid line brush (primary) with a texture brush (secondary), the line will remain the dominant form, but the texture will be applied within or around it. Conversely, if the texture brush is primary, the line might become a mere suggestion, with the texture taking center stage. Experimentation is key to understanding how these roles influence your combined brush's output.
Preparing Your Brushes for Combination
Before diving into the combination process, it's essential to prepare your chosen brushes. The Procreate system allows you to combine only single brushes; existing dual brushes cannot be combined further. Therefore, ensure that the brushes you intend to merge are individual entities.
A wise practice is to create backup copies of the brushes you plan to combine. This ensures that your original brushes remain intact and can be used independently or for future combinations. You can create a dedicated brush set, perhaps named "Combine" or "Dual Brushes," to keep your modified and combined brushes organized.
To duplicate a brush, open the Brush Library, swipe left on the thumbnail of the brush you wish to copy, and select "Duplicate." Once you have your duplicate brushes ready, you can proceed to combine them.
The Step-by-Step Process of Creating a Dual Brush
Combining two brushes in Procreate is an intuitive process, primarily managed within the Brush Library and the Brush Studio.
Step 1: Selecting and Combining Brushes
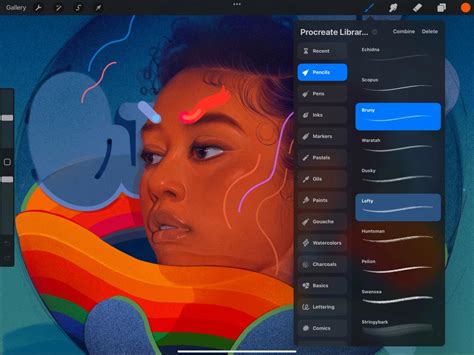
- Open the Brush Library: Tap the paintbrush icon to access your brush library.
- Select the Primary Brush: Tap on the first brush you want to use. This brush will be designated as your "Primary" brush. In the Brush Library interface, the selected primary brush will be highlighted in bright blue.
- Select the Secondary Brush: Swipe right on the thumbnail of the second brush you wish to combine with the primary. This brush will become the "Secondary" brush and will turn dark blue.
- Initiate Combination: At the top right of the Brush Library, you will see the option "Combine" appear. Tap on "Combine."
- Access the Combined Brush: Your new combined brush will now appear, typically taking the name of the primary brush. Tap on this new dual brush to enter the Brush Studio, where you can further customize its settings.
Step 2: Customizing Your Dual Brush in Brush Studio
The Brush Studio is where the real magic happens, allowing you to fine-tune how the two brushes interact.
Brush Preview: At the top left of the Brush Studio, you'll see a preview of the two brushes that form your dual brush. You can tap on either preview to expand a panel where you can select which brush to edit. A blue line will appear next to the brush you currently have selected for editing.
Editing Individual Brushes: You can edit the settings of each brush independently. Tap on the brush you want to modify.
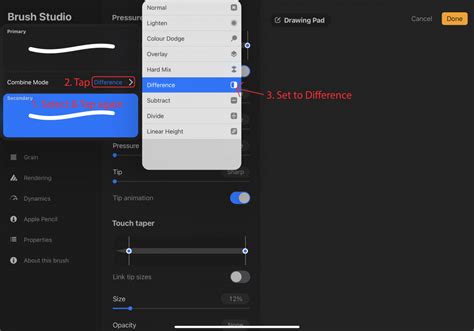
Combine Mode: This is a critical setting that determines how the two brushes interact.
- Tap on the brush you wish to edit.
- Tap on it again to reveal its blend modes.
- Tap the "Normal >" indicator to access a list of available blend modes (e.g., Normal, Multiply, Screen, Difference, etc.).
- Select a blend mode and observe the live preview on the drawing pad to see how it affects the combined stroke. Experimenting with different blend modes can yield vastly different and interesting visual results. For instance, using the "Difference" blend mode can create unique cutout effects, as seen when combining a "Star Confetti" brush with a "Glitter" brush to achieve a design where stars are subtracted from the glitter texture.
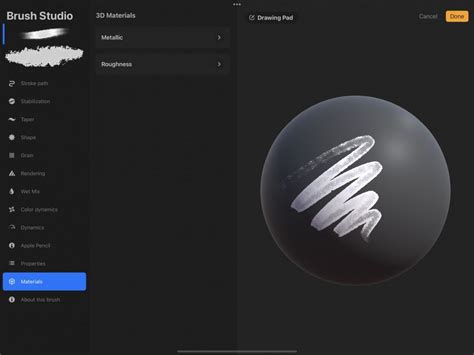
Rendering Settings: Within the "Rendering" section, you can adjust how each brush's texture and shape are applied.
- Rendering Mode: Each brush has its own rendering mode. For example, you might set the primary brush to "Intense Glaze" and the secondary brush to "Heavy Glaze" to achieve specific visual qualities.
- Blending Settings: While the primary brush offers more blending adjustments (like Flow, Wet Edge, Burnt Edge), the secondary brush might have fewer. Adjust these to control the paint-like qualities of the stroke. For example, setting a low flow on one brush can create a more subtle effect.
Properties: The "Properties" tab allows for fundamental adjustments.
- Brush Behavior: Here, you can adjust the "Maximum Size" of each brush independently. Making the secondary brush smaller than the primary can create a subtle textural overlay, while making it larger might create a halo or outline effect.
- Other Settings: Explore other properties like "Jitter" or "Rotation" if applicable to your chosen brushes, further influencing how the secondary brush's texture is applied relative to the primary brush's stroke.
Shape and Grain: The Shape Source and Grain Source of each individual brush contribute significantly to the final combined effect. Modifying these within the Brush Studio for either the primary or secondary brush will alter the fundamental building blocks of the combined stroke.
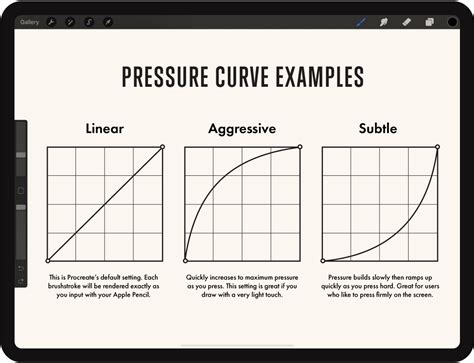
Taper and Pressure Curve: These settings, found in their respective tabs, control how the brush responds to pressure, tilt, and the start/end of a stroke. Adjusting the Pressure Curve for each brush can fine-tune how the opacity or size changes with stylus pressure. Taper settings can create more realistic brush tip effects, reducing the size at the start or end of a stroke.
Step 3: Testing and Refining Your Dual Brush
Once you've made your desired adjustments in the Brush Studio, tap "Done" to save your new dual brush. It's now ready to be tested on your canvas.
- Test Strokes: Draw various strokes, varying pressure, speed, and direction, to see how your dual brush behaves.
- Iterative Refinement: If the result isn't exactly what you envisioned, don't hesitate to go back into the Brush Studio (by tapping on your dual brush in the library) and tweak the settings. This iterative process of adjusting, testing, and refining is key to mastering Procreate brush creation.
Advanced Techniques and Considerations
Beyond the basic combination process, several advanced techniques and considerations can elevate your dual brush creations.
Understanding Brush Behavior at Different Scales
The behavior of a brush can change significantly when you alter its size. For instance, a grain texture might appear more pronounced at a larger scale or become a subtle background element when scaled down. When creating dual brushes, consider how the scale of each individual brush's texture or shape will interact. Adjusting the "Maximum Size" and "Minimum Size" in the "Properties" tab for each brush can help control this interaction.
Utilizing Blend Modes Effectively
The "Combine Mode" dropdown offers a wide array of options, each producing a unique visual outcome. While "Normal" is the default, exploring modes like "Multiply" for darker, richer effects, "Screen" for lighter, brighter results, or "Difference" for subtractive or inverted textures can lead to unexpected and creative applications. Understanding the fundamental principles of digital blend modes will greatly enhance your ability to leverage these options effectively.
The Role of Traditional Media Inspiration
Many artists use Procreate to emulate the look and feel of traditional art forms like watercolor, gouache, pastels, and colored pencils. When creating dual brushes, think about how these traditional media interact:
- Watercolor: Characterized by soft, bleeding edges, transparency, and unpredictable washes. Combining brushes that mimic these qualities can create realistic watercolor effects.
- Gouache: Known for its opaque, matte finish. Layering gouache brushes can create bold, flat strokes that contrast with more transparent media.
- Pastels & Pencils: These media often introduce grain, texture, and a hand-drawn quality. Combining brushes that replicate these textures can add a rustic or sketchy feel.
By layering different brush characteristics â for example, a soft watercolor wash with a textured gouache overlay â you can build up rich, authentic-looking digital artwork. The overlaps, rough edges, and the way colors build upon one another are all aspects that can be meticulously recreated through brush combination.
Beyond Simple Combinations: Pattern Brushes
While this tutorial focuses on combining two individual brushes, Procreate also offers the powerful capability of creating pattern brushes. These brushes use a repeating pattern tile as their source, allowing for the creation of seamless textures and intricate designs. The principles of brush creation, including shape, grain, and rendering, are foundational to understanding pattern brushes as well. Advanced courses and tutorials delve into creating multi-colored, multi-layered pattern combo brushes that can be painted instantly onto any canvas, offering even more sophisticated artistic control.
How to Make Seamless PATTERN BRUSHES in Procreate | From Pattern Tile to Texture Brush
Uncombining Your Brushes
If you decide you no longer need a combined brush or wish to revert to your original individual brushes, the process is straightforward:
- Open the Brush Library.
- Tap on the dual brush you wish to uncombine to select it.
- Tap on the dual brush again.
- You will see an "Uncombine" option. Tap it to separate the brushes back into their individual forms.
Procreate for Lettering and Calligraphy
Procreate is an incredibly powerful tool for digital lettering and calligraphy. While the learning curve can sometimes feel steep, understanding features like brush blending can significantly elevate your work. In modern calligraphy, blending colors with brush pens is a skill that typically requires practice with physical tools. Procreate simplifies this by offering software-based solutions.
While Gaussian blur offers a simple slider for blending larger areas, it provides less control. For more precise blending, the Smudge tool is invaluable. Unlike standard brushes, smudge brushes don't paint color but rather mix and drag existing colors on the canvas. This manual blending allows for a high degree of artistic control, enabling you to create custom gradient effects and smooth transitions.
The flexibility of the Smudge tool, combined with the ability to select different brushes for smudging, makes it a powerful instrument for achieving desired artistic effects, even after the initial colors have been laid down. Using clipping masks can further refine these blended areas, allowing you to apply effects non-destructively.
When selecting colors for blending, using analogous colors (those next to each other on the color wheel) generally produces smoother, more harmonious results than complementary colors, which can create more vibrant but sometimes jarring transitions.
Conclusion: Unleashing Your Creative Potential
The ability to combine brushes in Procreate is a testament to the app's versatility and power. By understanding the interplay between primary and secondary brushes, mastering the settings within Brush Studio, and experimenting with different blend modes and parameters, artists can unlock an almost limitless array of new brushstroke effects. Whether you're aiming to replicate traditional media textures, create intricate patterns, or develop unique lettering tools, brush combination in Procreate offers a direct and rewarding path to enhancing your digital art workflow and pushing the boundaries of your creativity.