Adobe Lightroom has revolutionized the way photographers approach post-processing. For portrait photographers, in particular, the ability to quickly and consistently enhance images is paramount. Lightroom presets offer a powerful solution, acting as pre-defined settings that can transform a photograph with a single click. This article delves into the world of Lightroom presets for portraits, exploring their benefits, how to use them effectively, and how they can elevate your photography, whether you're a seasoned professional or just starting out.

The Power of Presets: Simplifying Post-Processing
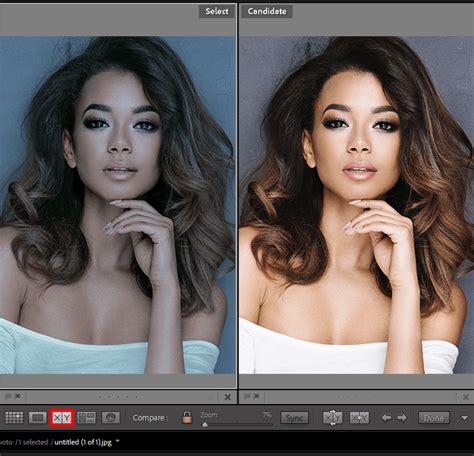
At its core, a Lightroom preset is a saved collection of image adjustment settings. Think of it as a sophisticated filter, but one that offers far more control and customization than the basic filters found in many other applications. For portrait photography, this means you can apply specific looks that enhance skin tones, add mood, improve lighting, and bring out the best in your subjects, all without manually adjusting dozens of sliders.
The primary advantage of using presets is the significant time savings they offer. Instead of meticulously tweaking exposure, contrast, highlights, shadows, white balance, and color grading for each individual portrait, a preset can achieve a similar, often superior, result in an instant. This is particularly invaluable for photographers who handle a large volume of work, such as wedding photographers, event photographers, or those running high-volume portrait sessions. By simplifying your post-processing workflow, presets free up valuable time that can be redirected towards client interaction, shooting more, or developing your creative vision.
Furthermore, presets are instrumental in establishing a consistent visual style across your portfolio. If you're aiming for a clean, bright, and airy look, or perhaps a darker, moodier aesthetic, a well-chosen set of presets can ensure that all your portraits share that cohesive feel. This consistency is crucial for building a recognizable brand and attracting clients who resonate with your specific style.
Unlocking High-Quality Results: Premium and Customizable Presets
The world of Lightroom presets is vast, offering a spectrum from free options to professionally curated premium packs. While free presets can be a great starting point for experimentation, premium presets often provide a higher level of sophistication and are developed with specific photographic styles and technical considerations in mind. These presets are meticulously crafted by experienced photographers and retouchers who understand the nuances of portrait editing, including how to handle various skin tones, lighting conditions, and desired aesthetics.
One of the key benefits of high-quality presets, especially those designed for portraits, is their inherent customizability. The idea isn't to apply a preset and be done with it. Instead, presets serve as excellent starting points. Once a preset is applied to your portrait, you can then fine-tune the settings to perfectly match the specific image. This might involve slight adjustments to exposure to account for varying lighting, subtle tweaks to color saturation to enhance eye color, or minor modifications to skin smoothing if a particular area requires it. This blend of automated enhancement and manual refinement allows you to achieve a unique look that is both efficient and deeply personal.
Many preset creators offer packs specifically designed to cater to different skin tones. This is a critical consideration in portrait photography, as presets that work beautifully on lighter skin might introduce undesirable color casts or unflattering tones on darker skin, and vice versa. Presets designed with inclusivity in mind ensure that you can achieve flattering results for a diverse range of clients, enhancing their natural beauty without compromising on color accuracy or aesthetic appeal.
Lightroom Mobile Presets: Editing On the Go
The advent of Lightroom Mobile has democratized powerful photo editing, allowing photographers to enhance their images using their smartphones or tablets. This is where Lightroom Mobile presets become particularly powerful. Whether you're a travel photographer capturing portraits on your adventures, a social media influencer, or simply someone who prefers the convenience of mobile editing, these presets allow you to create stunning images wherever you are.
Lightroom Mobile presets work just like their desktop counterparts. You can import them into the mobile app and apply them to your photos with a single tap. The ability to edit and share professional-looking portraits directly from your mobile device is a game-changer, enabling real-time content creation and a more agile workflow. Many premium preset collections are cross-compatible, meaning presets purchased for desktop Lightroom can often be synced and used in Lightroom Mobile, offering a seamless editing experience across devices.
The Discover tab within Lightroom also plays a vital role in this ecosystem. It provides in-app learning resources and inspiration, showcasing how other photographers are using presets and editing techniques. This is an invaluable tool for both beginners looking to understand the fundamentals and experienced users seeking new ideas and creative approaches.
Edit your portraits like a PRO in Lightroom
Creating Your Own Lightroom Presets
While readily available presets offer immense value, there's also a significant creative and practical benefit to developing your own. Creating your own Lightroom presets allows you to encapsulate your unique editing style, making it easily replicable across your work. This is particularly useful if you've spent time perfecting a specific look for your brand or for a particular type of portrait session.
The process of creating a preset is straightforward. You begin by editing a photograph in Lightroom until you achieve the desired look. Then, you access the preset creation tool, typically found by right-clicking in the Presets panel and selecting "Create Preset." You can then choose which adjustment categories to include in your preset (e.g., exposure, color, tone curves, HSL, effects). Naming your preset descriptively is crucial for organization, especially as your collection grows.
Once created, your custom presets can be used just like any other. They can be applied to new images, shared with colleagues or friends, or even sold if you develop a particularly sought-after style. This ability to create and share your own presets fosters a sense of community and allows for a deeper engagement with the Lightroom editing process. It’s a way to distill your photographic vision into a reusable tool.
Presets for Every Portrait Scenario
The versatility of Lightroom presets extends to virtually every type of portraiture.
- Headshots and Professional Portraits: For corporate headshots or professional branding sessions, presets can offer a clean, polished look that enhances subjects without being overly stylized. These often focus on subtle skin retouching, balanced exposure, and crisp details.
- Lifestyle and Candid Portraits: Presets designed for lifestyle or candid shots might lean towards a more natural, authentic feel. They could enhance ambient light, add a touch of warmth or coolness, and subtly boost colors to make the scene feel vibrant yet believable.
- Fashion and Editorial Portraits: This genre often demands more dramatic and stylized looks. Presets can be used to create high-contrast, desaturated, or vibrantly colored images that align with the artistic vision of a fashion shoot. They might include specific tone curve adjustments or split toning to achieve unique color palettes.
- Environmental Portraits: When the subject is photographed within their surroundings, presets can help balance the exposure between the subject and the background, ensuring both are well-rendered. They can also enhance the mood of the environment, whether it’s a bustling city street or a serene natural landscape.
- Black and White Portraits: Dedicated black and white presets can transform color images into striking monochrome compositions. These presets often focus on manipulating contrast, clarity, and tonal range to create dramatic depth and texture.
Enhancing Every Skin Tone
A significant challenge in portrait editing is ensuring that presets enhance all skin tones beautifully and accurately. This requires presets that are designed with an understanding of color theory and how different light temperatures and color casts affect various complexions.
Professionally developed presets for portraits often include specific adjustments to hue, saturation, and luminance (HSL) for skin tones. They might subtly shift the orange and red channels to neutralize unwanted green or magenta casts, or adjust the luminance of these channels to bring out a healthy glow. Some advanced presets might even incorporate targeted adjustments for specific skin tones, ensuring that whether you're shooting fair, olive, or dark skin, the results are consistently flattering.
When selecting presets, it's advisable to look for those that explicitly mention their compatibility with a wide range of skin tones or offer variations within a pack to cater to different complexions. Experimentation is key. Apply a preset and then examine the skin tones closely. If they appear unnatural, too yellow, too red, or too desaturated, it’s an indication that the preset might need significant modification or isn't the best fit for that particular image. However, with the right presets, you can achieve results that make every subject look their absolute best.
Level Up Your Editing with Free Presets and In-App Learning
For those new to presets or looking to expand their toolkit without immediate financial investment, Adobe offers over 40 free Lightroom presets. These presets, accessible through the Adobe ecosystem, provide a fantastic opportunity to experiment with different looks and understand how presets function. They cover a range of styles, from enhancing landscapes to improving portraits, and can serve as excellent starting points for learning.
The Discover tab within Lightroom is an invaluable resource, particularly for those utilizing the free presets or wanting to explore beyond them. It features tutorials, curated collections of presets, and showcases from other users, offering practical examples and creative inspiration. This integrated learning environment allows you to not only apply presets but also understand the underlying adjustments that create them, fostering a deeper comprehension of photo editing.
By leveraging these free resources and the in-app learning tools, photographers of all levels can significantly level up their photo editing skills. The journey from basic adjustments to sophisticated, stylized portraits becomes more accessible and enjoyable with the guidance and tools provided by Lightroom.
Finding Your Favorite Presets and Making Them Your Own
The process of finding the "perfect" Lightroom preset is often a journey of exploration and experimentation. What one photographer considers a favorite might not resonate with another's aesthetic. The key is to identify presets that align with your artistic vision and then learn to adapt them.
When browsing for presets, consider the following:
- The Creator's Style: Look at the portfolio of the preset creator. Do their images look similar to the style you aspire to achieve?
- Preset Descriptions: Read the descriptions carefully. Are they designed for portraits? Do they mention specific benefits like skin tone enhancement or mood creation?
- Before & After Examples: Pay close attention to the before and after examples provided. Do they showcase a significant transformation that appeals to you? Are the results consistent across different types of portraits?
- Reviews and Testimonials: See what other users are saying about the presets.
Once you’ve found a set of presets you like, remember the crucial step of customization. Apply a preset to an image, and then review the changes. Use the adjustment panels in Lightroom to fine-tune:
- Exposure: Adjust if the image is too dark or too bright.
- White Balance: Tweak if the colors look too warm or too cool.
- Contrast and Clarity: Modify to enhance or soften the overall look.
- HSL (Hue, Saturation, Luminance): Make specific color adjustments, especially for skin tones, eyes, and clothing.
- Tone Curve: For more advanced control over highlights, midtones, and shadows.
By understanding how to tweak these settings, you can transform a preset into a truly personalized effect. This iterative process of applying, refining, and saving your modified presets is how you develop a unique and efficient editing workflow. It's about using presets as a powerful foundation upon which you build your individual artistic expression.