Transforming raw data into polished, precisely laid-out documents has historically been a labor-intensive process. The traditional method often involves tedious copy-pasting from a data source into design software. However, Adobe InDesign and its server counterpart offer a powerful solution for automating this very task. The Data Merge feature within InDesign stands out as a remarkably efficient tool for streamlining document creation, especially for projects involving repetitive data. This tutorial delves into the intricacies of Data Merge, empowering users to harness its capabilities for a wide array of design needs.
Understanding the Power of Data Merge
At its core, "Data Merge" in InDesign refers to the process of transferring specific information from an external data source into an InDesign document. This capability extends beyond simple population; it allows for the creation of numerous variations of a single document, each populated with distinct data. The workflow begins with the user selecting predefined fields within an InDesign document. These fields then act as placeholders, automatically populated with corresponding information from a designated data source. This automated population is the key to its efficiency, particularly for documents where data is repeated systematically.
The applications for Data Merge are extensive. It is exceptionally well-suited for generating documents where data elements are consistently structured across numerous entries. This makes it an ideal tool for creating product catalogs, where each item’s details-description, price, and image-need to be presented uniformly. Beyond catalogs, Data Merge can be employed to produce price lists, weekly advertisements, personalized certificates, business cards, and even mailing labels or envelopes. The flexibility of the tool means that with a well-prepared data source, a vast array of dynamic documents can be produced quickly and accurately.
Preparing Your Data Source: The Foundation of a Successful Merge
The success of any Data Merge operation hinges on the quality and structure of the data source. This source typically takes the form of a spreadsheet or a plain text file containing both textual and non-textual information. For InDesign Data Merge, the required import formats are .csv (comma-separated values) or .txt (tab-delimited text). It is crucial to ensure that all fields within this data source are defined correctly to avoid import errors and ensure accurate data population.
When preparing your spreadsheet, the very first row must be dedicated to defining your fields. These field names act as labels for the data that will be merged into your InDesign document. It is imperative to write these field names accurately. If InDesign encounters issues with certain characters in field names, a common workaround is to precede the name with an apostrophe (e.g., 'ProductName') to ensure it is recognized correctly. After defining all the necessary fields, the subsequent step involves populating the table with your actual records-the individual pieces of information that will populate each instance of your document.
The populated table must then be exported in either a comma-delimited .csv or a tab-delimited .txt format. It is important to note that Data Merge will not work with proprietary spreadsheet formats like .xls or .xlsx. When exporting to a .csv file, you will typically be prompted to choose an encoding. This step can sometimes be complex, as conversions between different file types and encodings can lead to unexpected results. Paying close attention to the encoding (such as ASCII or Unicode) is vital; selecting the wrong encoding can prevent the Data Merge panel from populating with your fields.
Setting Up the Data Merge Panel in InDesign
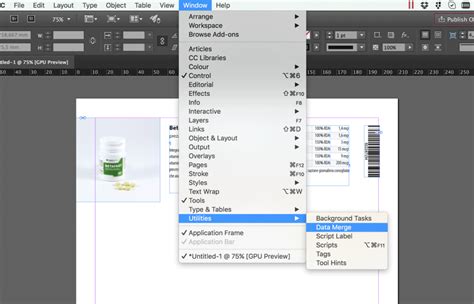
Once your data source is meticulously prepared and saved in the correct format, the next stage involves configuring the Data Merge panel within InDesign. Open your InDesign document and navigate to Window > Utilities > Data Merge to access the panel. Upon selecting your data source file via the "Select Data Source" option, the panel will attempt to intelligently interpret your file's properties.
The Data Merge panel will present several settings that need to be configured to match your exported data source. The "Delimiter" setting is crucial; you must choose "Comma" if you saved your data source as a .csv file, or "Tab" if you used a .txt file. The "Encoding" option requires careful selection, typically between "ASCII" and "Unicode." An incorrect encoding choice, such as opening an ASCII file with a Unicode setting, can result in the Data Merge panel failing to display any fields, rendering the merge impossible. The "Platform" setting should be set to "PC" or "Mac" depending on your operating system. After confirming these settings, click "OK."

Mapping Fields and Customizing Your Layout
With the data source successfully linked, the focus shifts to mapping the fields from your data source to your InDesign document layout. In the Data Merge panel, you will see a list of all the fields you defined in your spreadsheet. Fields that are successfully mapped within your InDesign layout will be visually represented, often surrounded by double angle brackets, such as <<FieldName>>. Numbers may also appear next to each field in the panel, indicating their order.
To insert a field into your layout, you simply place your cursor at the desired text position within your InDesign document and then click on the corresponding field name in the Data Merge panel. This action automatically inserts the placeholder. If the characters < and > are not visible, it may be due to the font you are using not containing those specific glyphs; however, the Data Merge process will still function correctly.
You must repeat this process for all the text and image fields you intend to use. As you map fields, you can simultaneously customize the layout to meet your specific design requirements. For instance, if you are creating a product catalog, you would map the product name field to the text box designated for the product title, the price field to the price display area, and so on.
It's important to understand that with the standard InDesign Data Merge feature, you can typically automate only one product layout per merge. If your project requires the use of multiple, distinct product templates mixed within the same document, you might need to explore more advanced solutions like dedicated catalog publishing services.
Creating the Merged Document: Bringing Your Data to Life
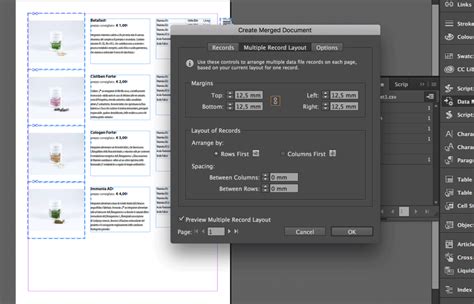
The final step in the Data Merge process is to generate the merged document. Within the Data Merge panel, locate and click the "Create Merged Document" icon. This action opens a dialog box where you can define how the records from your data source will be laid out in the final output.
You have the option to generate an "Overset Text Report," which is highly recommended for identifying any content that doesn't fit within its designated frame. You can also set up an alert for missing images, which will notify you if any image files specified in your data source cannot be located.
The arrangement of records is controlled by pagination settings. The Data Merge tool operates within your document's page margins. You can paginate records in one of two primary directions: "Rows First" or "Columns First." "Rows First" merges records from left to right across a page, and then moves to the next row from top to bottom. Conversely, "Columns First" merges records from top to bottom within a column and then moves to the next column from left to right.
Two spacing options allow you to precisely define the distance between each record: "Between Columns" and "Between Rows." For catalog layouts, selecting "Fit Images Proportionately" is often the desired setting to ensure images are scaled correctly within their frames. After configuring these options, click "OK." InDesign will then create a new document, populating each instance with the corresponding data from your source file.
Easily Automate Text and Images with InDesign Data Merge
Advanced Considerations and Common Pitfalls
While Data Merge is a powerful tool, several advanced considerations and common errors can arise during its use. For instance, when dealing with images, ensuring the source path is correctly specified is paramount. Placing an image in InDesign first and then using the Links panel to "Copy Info > Copy Platform Style Path" can help obtain the accurate file path, especially for images stored on network drives. This technique is particularly useful for avoiding errors when referencing images.
The process of embedding images is also controlled during the merge. Activating the "Link" option ensures that InDesign maintains a link to the original image files rather than embedding them directly into the InDesign document. This is generally preferred for managing file sizes and allowing for easier updates to the images later.
A recurring issue users encounter is the inability to merge multiple data rows within the same product layout. Standard Data Merge typically creates one design instance per record in your data source. This can be a significant obstacle if your project involves grouping products with minor variations. For such scenarios, specialized catalog creation software might offer more flexibility.
Furthermore, InDesign Data Merge cannot automatically create a fully print-ready document in a single workflow, especially when needing to incorporate static or dynamic pages alongside the merged content. It also has limitations regarding text formatting; you cannot change the formatting of only selected parts of a merged field. For example, if a price needs to be bolded, you cannot apply that formatting to just the price within a larger text block containing other merged data.
Troubleshooting Common Data Merge Errors
Several errors can occur when using Data Merge, and understanding these common issues can save considerable time and frustration.
"The selected data source has one or more empty field names." This error typically indicates that your
.csvor.txtfile is not clean. There might be empty columns or deleted text that leaves behind invisible characters. To resolve this, you can place the file as text within InDesign and enable "Show Hidden Characters" to identify the issue. Copying the data to a new file or using a text editor to clean the content is often the fastest solution.Fields Separated by Semicolon ";". If you are using Excel on Windows, your regional settings might be configured to use semicolons as list separators instead of commas. This can cause issues when InDesign expects a comma-delimited file. The easiest workaround is to export your data as a tab-delimited
.txtfile. Alternatively, you can change your operating system's list separator to a semicolon, but be aware this change affects all applications on your computer.Encoding Issues. As mentioned earlier, incorrect encoding can prevent fields from appearing in the Data Merge panel. If you encounter this, try re-importing the data source file and selecting a different encoding, such as Unicode.
Missing Images. Ensure that the file paths for images in your data source are correct and that the images are accessible from where InDesign is looking. Using the "Copy Full Path" method from the Links panel can help ensure accuracy.
Overset Text. When fields contain more text than can fit in the designated frame, overset text occurs. The "Generate Overset Text Report" option is invaluable for identifying these instances. You can then adjust the frame size, font size, or the spacing between records to accommodate the content.
Beyond the Basics: Expanding Data Merge Capabilities
Data Merge is not limited to simple text and image population. It can also be used to automate the creation of QR codes. By formatting a specific field in your data source to contain QR code data, InDesign can generate these codes dynamically for each record.
While Data Merge excels at populating fields within existing text frames, it has limitations when it comes to creating tables. You can insert placeholders into a table structure in InDesign, and Data Merge will populate them. However, for complex table creation, it is often more efficient to create tables in applications like Excel and then link them into InDesign, or to use custom scripts in conjunction with Data Merge.
The Data Merge feature maintains a connection to the original data source. If you update or modify records in your spreadsheet, you can refresh the merged document by selecting "Update Content In Data Fields" from the Data Merge panel. This ensures that your InDesign document remains synchronized with your data.
The "Create Merged Document" dialog offers granular control over the output. You can choose to create a "Single Record" document, where each page contains one record (ideal for certificates or letters), or a "Multiple Records" document, which is suitable for catalogs and price lists, allowing multiple records per page. The layout options within this dialog, including spacing and pagination direction, are crucial for achieving the desired final appearance.
When to Use Data Merge
Data Merge is particularly effective when you need to lay out a document, or a significant portion of it, that follows a repetitive "prototype example" or a consistent layout structure. This structure needs to be repeated across multiple instances, with only the data changing. Typical scenarios where Data Merge shines include:
- Product Catalogs: Populating each product entry with its name, description, price, and image.
- Envelopes and Mailing Labels: Merging recipient addresses and names for mass mailings.
- Certificates: Generating personalized certificates with names, dates, and achievements.
- Business Cards: Creating a batch of business cards with individual employee details.
- Personalized Letters: Merging recipient information into form letters for targeted communication.
- Infographics: Automating the population of data-driven charts and graphs with up-to-date figures.
The ability to automate these tasks significantly reduces manual effort, minimizes the risk of human error, and dramatically speeds up the production process. Learning to use Data Merge is generally straightforward, even for those new to InDesign, making it an accessible yet powerful feature for enhancing document production workflows. While it has its limitations, understanding its capabilities and how to overcome common challenges allows users to unlock a new level of efficiency in their design projects.