Photoshop's interface, a powerful gateway to intricate image manipulation, can initially appear overwhelming. However, understanding and customizing its workspace is fundamental to an efficient and enjoyable workflow. A workspace is essentially the entire working area of Photoshop, encompassing all the menus, tools, and panels, and their arrangement on your screen. By tailoring this environment to your specific needs, you can significantly streamline your creative process, whether you're a photographer, a digital painter, a graphic designer, or involved in any other visual art form.
The Anatomy of the Photoshop Interface: Panels and Their Purpose
At the heart of Photoshop's customizable interface are its panels. These are modular windows that house a vast array of tools and functions, each designed to assist with specific aspects of image editing.
The Color Panel: Your Foundation for Hue and Tone
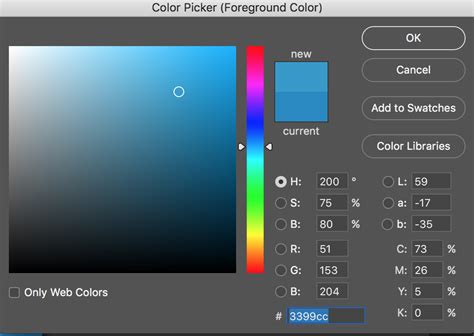
One of the most frequently used panels is the Color panel. This essential tool allows you to select and modify the colors for both your foreground and background. By clicking on either of the display boxes representing these colors, you can reveal the specifics of that color and access the Color Picker window. Within the Color Picker, you have granular control over color selection. You can drag and slide indicators to fine-tune your desired hue, saturation, and brightness. As you make adjustments, you'll see the color values change in real-time. At the bottom of this window, you'll find the hex code, a unique alphanumeric identifier for that precise color. This hex code can even be directly edited; for instance, entering six 'F's will set the color to pure white.
The Layers Panel: Building Your Image Composition
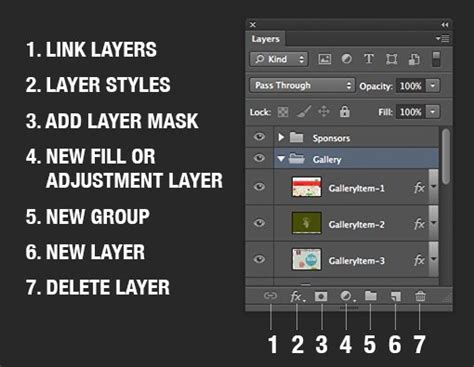
The Layers panel is another cornerstone of Photoshop's functionality. Every addition to your image - whether it's a new image, a mask, or an object - creates a new layer. The Layers panel meticulously displays these layers, their order within the image, and any associated masks. This hierarchical organization is crucial for non-destructive editing, allowing you to modify individual elements without affecting others. The panel also includes a Channels tab, which enables you to examine and manipulate the individual Red, Green, and Blue channels of your image.
The History Panel: Your Undo Button and Beyond
The History panel serves as a comprehensive record of every action you take within your document. It displays a chronological list of changes, allowing you to step backward and forward through your editing process. This is invaluable for experimentation, enabling you to revisit earlier states of your image with ease. The History panel, like other panels, can be expanded and collapsed. You can adjust its length by dragging the bottom edge and its width by dragging the left border, making it as prominent or as subtle as your workflow demands.
Other Key Panels and Their Roles
Beyond these core panels, Photoshop offers a multitude of others, each catering to specific tasks:
- Properties Panel: Displays properties of the currently selected layer or adjustment.
- Adjustments Panel: Provides access to various image adjustments like Brightness/Contrast, Hue/Saturation, and Levels.
- Swatches Panel: Offers a collection of predefined colors for quick access.
- Libraries Panel: Allows you to store and access assets like colors, text styles, and graphics across different Adobe applications.
- Histogram Panel: Shows the pixel brightness distribution for the selected layer, offering insights into tonal range.
- Navigator Panel: Provides a thumbnail view of your image and allows for quick zooming and panning.
Customizing Your Canvas: Arranging Panels and Toolbars
Photoshop's interface is not static. You have the power to arrange panels, toolbars, and menu bars into a specific configuration, known as a workspace. This customization is key to creating an environment that perfectly suits your individual needs and the tasks at hand.
Understanding Default Workspaces
Photoshop comes with a variety of pre-defined workspaces, each optimized for different creative disciplines:
- Essentials: A general-purpose workspace suitable for many common tasks. This is the default workspace if you haven't selected another.
- Photography: Streamlined for photographers, often featuring panels like Histogram, Navigator, and Adjustments.
- Painting: Designed for digital artists, with panels like Brush Presets, Swatches, and Brush Settings readily available.
- Graphic and Web: Tailored for designers working on digital assets, potentially including panels for artboards and character styles.
- Motion: Optimized for video editing workflows within Photoshop.
- 3D: For users working with three-dimensional elements.
You can switch between these workspaces by accessing the Workspace icon (often depicted as a small monitor or a dropdown menu) in the top right-hand corner of the screen, or via the Window > Workspace menu. Selecting a different workspace will dynamically change the panels and options displayed on your screen, adapting the interface to the chosen workflow.
Building Your Personalized Workspace
The true power of Photoshop lies in your ability to create and save your own custom workspaces. This process involves adding, removing, and rearranging panels to create an arrangement that aligns precisely with your workflow.
Steps to Customizing Your Workspace:
- Start with a Base: You can begin with a default workspace like "Essentials" and modify it, or start from scratch.
- Open and Close Panels: Access any panel you need by going to Window in the Menu Bar and selecting its name. Panels with a checkmark are currently visible. To close a panel you don't use, right-click on its title bar and select "Close," or click the 'x' icon if available.
- Rearrange and Group Panels: Panels can be docked together into tabbed groups or stacked side-by-side. To move a panel, click and drag its title bar. As you drag, you'll see blue highlighted areas (drop zones) appear, indicating where the panel can be placed. Dragging a panel over an existing group will allow you to dock it within that group.
- Resize Panels: You can adjust the width and height of panel groups by hovering your mouse over their edges until the cursor changes to a double-headed arrow, then clicking and dragging.
- Customize the Toolbar: While workspaces primarily focus on panel layouts, the Toolbar itself can also be customized. Tools are often grouped; right-clicking on a tool icon reveals hidden variants. You can also add or remove tools from the Toolbar to suit your needs.
- Save Your Workspace: Once you've arranged the interface to your satisfaction, it's crucial to save it. Go to the Workspace icon (or Window > Workspace) and select New Workspace. Give your custom workspace a descriptive name. You can also choose to save custom keyboard shortcuts, menus, and the Toolbar layout along with your panel arrangement.
How To Customize Workspace In Photoshop | Create Custom Workspace (2025)-Easy guide
Saving, Updating, and Deleting Custom Workspaces
- Saving: As described above, the "New Workspace" option allows you to create and save your personalized layout.
- Updating: If you make further modifications to an existing custom workspace, you can update it by following the same "New Workspace" process and entering the exact same name. Photoshop will prompt you to overwrite the existing workspace.
- Deleting: To remove a custom workspace, you must first switch to a different workspace, as Photoshop will not allow you to delete the currently active one. Then, go to Window > Workspace > Delete Workspace and select the workspace you wish to remove from the list.
The Advantages of a Tailored Photoshop Environment
The ability to customize workspaces offers numerous benefits:
- Increased Efficiency: By having frequently used tools and panels readily accessible, you reduce the time spent searching through menus.
- Reduced Clutter: You can hide panels and tools that are irrelevant to your current task, creating a cleaner and less distracting interface.
- Task-Specific Optimization: Different creative tasks benefit from different panel arrangements. A photographer editing RAW files will have different needs than a graphic designer preparing assets for web use. Custom workspaces allow you to switch between optimized environments seamlessly.
- Consistency: Saving your custom workspace ensures that your preferred layout is consistently available, no matter when or where you open Photoshop.
- Learning and Exploration: Exploring different default workspaces can introduce you to tools and panels you might not have discovered otherwise, expanding your Photoshop knowledge.
By investing time in understanding and customizing your Photoshop workspace, you are not just organizing your tools; you are actively enhancing your productivity and unlocking the full potential of this powerful software.