Lightroom presets have become an indispensable tool for photographers seeking to streamline their editing workflow and achieve a consistent, signature style. For beginners, the prospect of mastering Lightroom's intricate sliders and settings can be daunting. However, presets offer an accessible entry point, allowing for stunning results with minimal effort. This guide delves into the world of Lightroom presets, from understanding what they are and how to use them, to creating your own and exploring the future of AI-powered editing.
What Exactly Are Lightroom Presets?
At their core, Lightroom presets are saved configurations of slider positions within Lightroom's Develop module. They encapsulate a specific set of editing adjustments - from exposure and contrast to color grading and tone curves - that can be applied to any image with a single click. Think of them not as a magic button that instantly perfects a photo, but rather as a powerful starting point, a well-defined foundation upon which further creative adjustments can be made. This recording of settings allows for the immediate application of a desired look across multiple images, significantly reducing the time spent on repetitive edits.
The concept of presets dates back to Lightroom's early days as a beta program. The ability to save and apply Develop module settings to different images, regardless of whether they were part of the same shoot, was a revolutionary feature. Unlike Photoshop Actions, these changes were immediate and easily reversible, laying the groundwork for the sophisticated preset system we use today. Lightroom itself comes bundled with a variety of built-in presets, categorized by their intended effect, offering users a starting point for experimentation without the need for immediate external purchases.
The Benefits of Using Lightroom Presets
For professional photographers, the advantages of incorporating presets into their workflow are substantial. The most immediate and noticeable benefit is the dramatic speeding up of the editing process. Consider a large event like a wedding, which can yield thousands of images. Editing each one from scratch would be an overwhelmingly time-consuming task. Presets allow for the application of a base edit to hundreds of photos simultaneously, freeing up valuable hours that can be redirected towards shooting, marketing, or client management.
Beyond efficiency, presets are crucial for achieving a consistent look and feel across a photographer's portfolio. This brand consistency is what draws clients and creates a recognizable artistic style. By employing a defined set of presets, photographers ensure their images possess a similar aesthetic, regardless of when or under what conditions they were captured. This uniformity builds trust and reinforces the photographer's unique vision.
Furthermore, good presets act as a starting point for creativity, rather than stifling it. A well-crafted preset handles the foundational color grading and toning, getting an image perhaps 80% of the way to its final look. This leaves the photographer to focus on the finer, image-specific details, such as subtle exposure adjustments, localized color tweaks, or sharpening, thereby enhancing the overall creative process.
Navigating the World of Presets: Free vs. Paid
When venturing into the realm of presets, users will encounter a vast array of options, broadly categorized into free and paid collections.
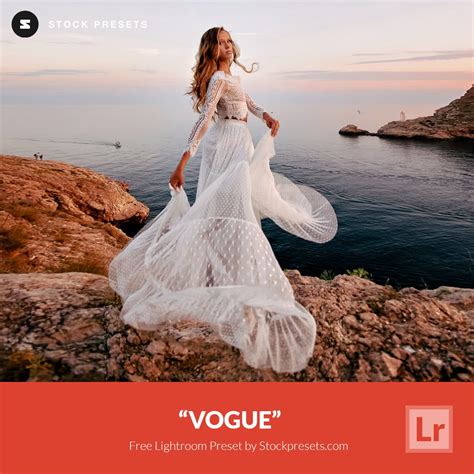
Free presets are abundant online, often found on photography blogs and in YouTube tutorials. They serve as an excellent tool for learning and experimentation, allowing beginners to deconstruct how edits are made and to try out different styles without financial commitment. However, it's important to approach free presets with a degree of realism. Many are offered as marketing tools for larger, paid collections and may be highly specialized, designed to work optimally on a very specific type of image but faltering in different lighting conditions. They can be a “one-trick pony,” useful for a single scenario but lacking versatility.
Paid preset collections, on the other hand, are typically developed by established professional photographers who have dedicated years to refining their craft and style. These presets generally offer higher quality and greater versatility. They are often sold in collections with variations tailored for different lighting scenarios - such as "golden hour," "overcast," "indoor reception," and so on. This foresight in design ensures better performance across a wider range of photographic situations. Additionally, paid presets frequently come with comprehensive installation guides and customer support, providing assistance should any issues arise. While the cost can vary significantly, a brilliant wedding photographer might charge $199 for 20 presets, and it's crucial to use best judgment and temper expectations regarding the immediate impact of any purchase.
How to Use a Lightroom Preset
The process of using a Lightroom preset is remarkably straightforward.
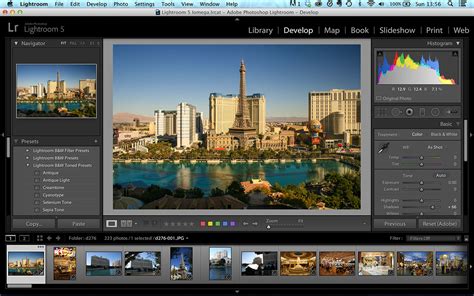
- Open the Develop Module: Select the image you wish to edit and navigate to the Develop module in Lightroom.
- Locate the Presets Panel: On the right-hand side of the screen, you will find the Navigator panel, which houses the Presets section. If it's not already open, click the triangle to expand it.
- Browse and Apply: Within the Presets panel, you'll see various preset folders. Click the triangle next to a folder to reveal the individual presets within. Hovering over a preset will display a live preview of its effect on your selected image in the Navigator panel's preview window. Clicking on a preset will apply its settings to your image instantly.
- Make Basic Corrections First (Pro Tip): It is generally recommended to ensure your image's white balance and exposure are correctly set before applying a preset. While some presets are designed to leave these elements untouched, they are unique to every image and form the foundation of a good edit. Many "one-click" presets will leave these parameters alone, but it's wise to verify and adjust them as needed.
Tweaking and Refining Presets
While presets can dramatically speed up editing, it's rare that a preset will perfectly suit every image straight out of the box. Not all presets are designed for all images, and sometimes an applied preset can even make an image look worse.
If a preset is close but not quite right, the solution often lies in making minor tweaks. This is where a basic understanding of Lightroom's editing tools becomes beneficial. By examining the adjustments the preset has made, you can identify what's missing or what needs to be toned down. For instance, if a black and white preset looks good but lacks contrast, you can simply navigate to the Basic panel and increase the contrast or deepen the blacks.
The key is to play and experiment. Explore the different panels and sliders to understand how the preset has altered the image and what adjustments can be made to achieve your desired look. This process not only helps you fine-tune the preset but also serves as an excellent way to learn Lightroom's editing capabilities. If you find yourself disliking the changes made by a preset, you can always revert to the original unedited image by clicking the "Reset" button at the bottom of the editing panels.
Lightroom Presets Aren’t One-Click… Here’s What You’re Missing!
Creating Your Own Lightroom Presets
For photographers aiming to develop a truly unique and recognizable style, creating custom presets is an essential step. This process involves distilling your personal creative vision into a reusable tool.
The process begins with a well-exposed, unedited RAW image. In the Develop module, adjust the sliders across all panels until you achieve a look you are completely satisfied with. This could involve basic adjustments like adding contrast and vibrance, or more complex manipulations of the tone curve, color grading, and effects.
Once you're happy with the edit:
- Navigate to the Presets Panel: In the left-hand Navigator panel, find the Presets section and click the plus (+) icon, or go to the Develop menu and select "New Preset."
- Configure Preset Settings: A "New Develop Preset" dialog box will appear, listing all the setting options that can be saved. This is a crucial step where you decide which adjustments to include.
- Excluding Settings: It's often advisable to uncheck boxes for settings like White Balance, Exposure, Transform, and Lens Corrections. These parameters are highly image-specific and are best adjusted manually on each photo before applying a preset. By excluding them, you ensure the preset provides a consistent look without overriding necessary foundational adjustments.
- Saving All Settings: The default option is to save all settings. This can be useful for highly specific looks but will limit the preset's versatility.
- Name and Organize: Give your preset a descriptive name that clearly indicates its purpose or the conditions under which it works best. This will aid in organization and recall later. You can also create new folders within the Presets panel to categorize your custom creations.
- Create: Click "Create" to save your new user preset. It will then appear in the "User Presets" folder within the Presets panel, ready to be applied to other images.
The creation of presets is an ongoing process. It takes time and countless hours of testing across diverse images to develop a cohesive set that works well across a variety of lighting and color situations. The presets developed by the author, for instance, took several months of trial and error, and were based on years of prior development. This iterative approach, involving creating a look, testing it on different photos, and then refining it, is key to building a robust library of presets. Don't be afraid of trial and error; mistakes are part of the learning process.
Mistakes to Avoid When Creating Presets
- Heavy Color Grading or Major Adjustments: Presets with drastic color grading or major adjustments are unlikely to work well across a wide range of images. Aim for minor adjustments to elements like temperature and exposure.
- Adjusting Lens Corrections or Optics: These settings are specific to the lens used and the image captured. It's better to exclude them from presets so they can be applied appropriately later.
- Starting with Challenging Images: Begin the preset creation process with images that have good, straightforward lighting and minimal complex elements. Avoid dramatic sunsets, light flares, or challenging color situations initially.
Installing Purchased or Downloaded Presets
Beyond creating your own, you can also install presets purchased from third-party creators or downloaded from free resources.
- Download and Unzip: Presets typically come in a .zip file. Download and extract the contents. You'll usually find files with the
.XMPextension. - Open Lightroom Preferences: On a PC, go to Edit > Preferences. On a Mac, go to Lightroom > Preferences.
- Navigate to the Presets Tab: In the Preferences window, click on the "Presets" tab.
- Show Lightroom Presets Folder: Click the "Show Lightroom Presets Folder" button. This will open a folder on your computer.
- Import Presets: Within the opened folder, navigate to the "Lightroom" subfolder, and then into the "Develop Presets" folder (or create a new subfolder within this for organization). Drag your downloaded
.XMPpreset files into this folder. - Restart Lightroom: Close and reopen Lightroom for the new presets to be recognized and appear in your Presets panel.
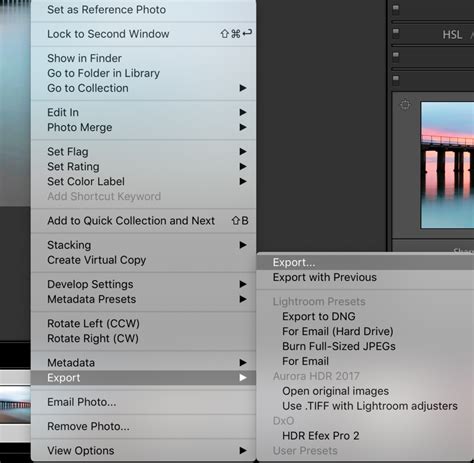
Alternatively, some presets can be imported directly from within Lightroom:
- Right-click: In the Presets panel, right-click on a preset folder.
- Import: Select "Import" and navigate to the location of your preset files.
The "Store presets with this catalog" checkbox in Lightroom's preferences has a practical implication: if checked, your presets are stored within the current catalog. This means they won't be accessible if you switch to a different catalog. For broader accessibility, it's generally better to keep this unchecked and manage presets in Lightroom's global presets folder.
The Evolution of Editing: AI and Presets
While traditional Lightroom presets have revolutionized photo editing, the industry is continuously evolving. Artificial intelligence (AI) is emerging as the next frontier, offering even more sophisticated and personalized editing solutions.
Imagen: The Next Step in AI-Powered Editing
Tools like Imagen represent a significant leap beyond static presets. Unlike presets that apply the same set of rules to every photo, AI-powered solutions analyze each image individually and make intelligent adjustments tailored to its specific content and your unique editing style.
Personal AI Profiles: The core of AI editing lies in the creation of a Personal AI Profile. This is achieved by training the AI on a substantial collection of your previously edited photos (a minimum of 3,000 images is recommended for optimal results). The AI learns your specific approach to exposure in challenging light, skin tone adjustments, color grading in shadows and highlights, and even cropping preferences.
Workflow Integration: Imagen integrates seamlessly with Lightroom Classic, Lightroom, Photoshop, and Bridge. You upload unedited photos through the Imagen app, and the AI processes them in the cloud at remarkable speeds, often in under half a second per photo. The edits are then downloaded directly back into your Lightroom catalog, appearing as if you had made the adjustments manually.
Talent AI Profiles: For newer photographers or those admiring the styles of industry leaders, Imagen offers "Talent AI Profiles." These are AI profiles built by analyzing the editing styles of world-renowned photographers, allowing you to leverage their expertise.
Presets vs. AI Editing: A Comparison
| Feature | Lightroom Presets | Imagen Editing |
|---|---|---|
| Application | Applies static, saved settings. | Analyzes each photo individually for intelligent, unique adjustments. |
| Consistency | Provides a baseline but requires manual adjustments. | Delivers high consistency by adapting edits to each photo. |
| Personalization | Personal if created by you; adopts others' styles if downloaded. | Learns from your own past edits to create a deeply personalized AI Profile. |
| Workflow Role | A single step in manual editing. | Can be a comprehensive workflow solution (culling, editing, backup). |
| Adaptability | Not adaptable; struggles with varied lighting. | Highly adaptable; intelligently adjusts to diverse lighting and subjects. |
| Learning Curve | Easy to apply; creation requires skill and practice. | Requires initial training of AI profile; editing is then largely automated. |
AI-powered tools like Imagen are not merely a trend; they represent the future of professional post-production. By automating the repetitive and technical aspects of editing, AI frees up photographers to focus on the truly creative elements of their work, enhancing their ability to capture beautiful images, tell compelling stories, and build stronger client relationships.
Beginner-Friendly Lightroom Presets
For those just starting their editing journey, specific types of presets can be particularly helpful. These are designed to offer clean, balanced edits that require minimal or no adjustment after application, making the process simple, fast, and cohesive.
- Light & Airy Preset: Ideal for creating a soft, bright, and natural aesthetic. Works wonders for portraits, outdoor scenes, and any image where a luminous, dreamy look is desired.
- Moody Tones Preset: Adds depth and mood, perfect for creating rich, impactful images.
- Kodak Portra Film Preset: Mimics the classic film-like aesthetic of Kodak Portra 400, known for its soft yet vibrant colors and natural skin tones.
- Creamy Moody Preset: Combines deep, creamy tones with a smooth finish, enhancing shadows while softening highlights.
- Natural Light Preset: Emphasizes natural light, brightens images, and creates a fresh, authentic feel without over-editing.
These beginner-friendly presets, often found in starter kits or offered as free downloads, are designed to work on everyday photos such as portraits, travel pictures, family photos, and lifestyle images. While they provide a great starting point, don't be afraid to experiment and tweak them to match your unique style. As your skills grow, you can explore more advanced presets or delve into the creation of your own custom settings. For those new to Lightroom, the mobile version is particularly beginner-friendly, offering a more accessible entry point before potentially moving to desktop versions for greater control.