Adobe Photoshop, a powerhouse in digital image editing, offers a robust suite of tools for isolating and manipulating specific elements within an image. Whether you're looking to remove unwanted backgrounds, extract subjects for compositing, or simply rearrange elements, understanding how to cut and copy effectively is fundamental. This guide delves into the core techniques, from basic selections to advanced refinements, empowering users to achieve precise and professional results.
The Foundation: Making Your Initial Selection
Before you can cut or copy anything, you need to tell Photoshop what you want to select. The program offers a variety of tools, each suited to different types of subjects and desired outcomes.
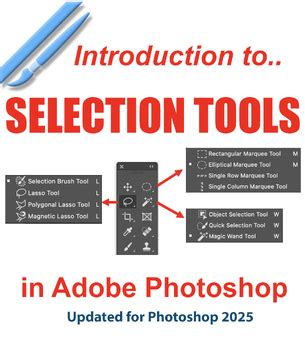
One of the most intuitive tools for quick selections is the Object Selection tool. You simply hover over the item you’d like to cut out, and Photoshop intelligently identifies and selects it. For more control, you can drag the Quick Selection tool across the area you wish to select. This tool is highly adaptable; it makes it easy to add to your selection or remove areas from your selection, so you don't have to get it right on your first try. This flexibility is crucial for refining your initial pick.
For subjects with distinct, straight edges, such as a book or a picture frame, the Polygonal Lasso tool proves invaluable. You simply click around your shape, creating a series of straight line segments, until you come back to where you started, closing the selection. This method offers a high degree of precision for geometric shapes.
Refining Your Selection: The Power of "Select and Mask"
Once you have an initial selection, it's rare that it will be perfectly accurate, especially when dealing with complex edges like hair or fur. This is where the Select and Mask workspace becomes your most powerful ally. To access it, after making your initial selection, simply click "Select and Mask…" in the options bar at the top of your Photoshop window.
Inside the Select and Mask workspace, you are presented with a range of tools and sliders designed to refine your selection meticulously. You can adjust parameters like Radius, Smooth, Feather, Contrast, and Shift Edge to perfect all the details. The Radius setting helps to control the sensitivity of edge detection, while Smooth softens jagged edges. Feather introduces a gradual transition between the selected area and the background, creating a softer blend. Contrast sharpens the edges, and Shift Edge allows you to expand or contract the selection boundary.
When you’re working with intricate details like hair, the Refine Edge tool within this workspace is your best friend. It intelligently analyzes the edges of your selection and helps to separate fine strands from the background, preventing those unsightly halo effects. You can even make selections with holes in the center using these tools, which is useful for objects with internal cutouts.
Secret Buttons for Precise Hair Selection in Photoshop!
Executing the Cut or Copy: Layer Masks and Beyond
With your selection perfected within the Select and Mask workspace, you can choose how to output it. The most professional and non-destructive method is to output your selection to a Layer Mask. When you’re ready, simply scroll to the bottom of the Select and Mask workspace and choose to output it to a Layer Mask.
A layer mask, when applied, doesn't actually delete any pixels from your original image. Instead, it uses black and white values to control the visibility of the layer. Black conceals pixels, white reveals them, and shades of gray create partial transparency. This means you can always go back and refine the mask later without losing any original image data.
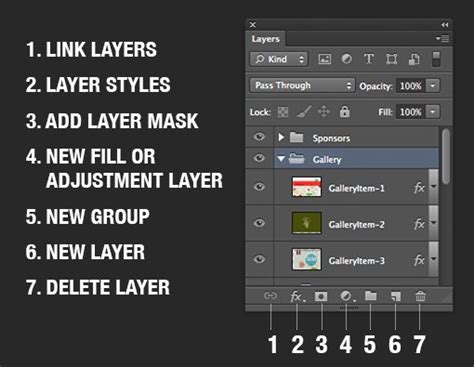
To apply the layer mask, with your selection active, click the Layer Mask icon in your Layers panel. This icon typically looks like a rectangle with a circle inside it. Your selected area will then be isolated, and the rest of the image will be hidden.
If your intention is to copy the selected element to a new layer, you can do so after making your selection. Once the item is selected, you can go to Edit > Copy and then Edit > Paste. This will place the copied element onto a new layer, preserving its transparency. Alternatively, you can use the keyboard shortcuts: Ctrl+C (Windows) or Cmd+C (Mac) to copy, and Ctrl+V (Windows) or Cmd+V (Mac) to paste.
Understanding the Implications: Non-Destructive Editing
The emphasis on using Layer Masks for cutting and copying in Photoshop is rooted in the principle of non-destructive editing. This approach is crucial for maintaining the integrity of your original image and allowing for maximum flexibility during the editing process.
When you use a layer mask, the original pixels of your image remain untouched. The mask simply dictates which parts of the layer are visible. This is in contrast to destructive methods, such as using the Eraser tool, which permanently removes pixels. With a layer mask, you can easily refine the edges, add or remove areas from the masked portion, or even invert the mask to reveal what was previously hidden. This ability to revisit and adjust your edits at any time is invaluable, especially in professional workflows where revisions are common.
Furthermore, understanding layer masks opens the door to more advanced compositing techniques. You can blend multiple images together seamlessly, create composite scenes, and achieve effects that would be impossible with destructive editing methods. The precision offered by tools like the Object Selection tool, Quick Selection tool, and the refining capabilities within Select and Mask ensure that even the most complex subjects can be isolated with remarkable accuracy, paving the way for sophisticated image manipulation.
Beyond Basic Selections: Advanced Considerations
While the core tools and techniques are essential, experienced Photoshop users often employ a combination of methods to achieve the best results, especially for challenging images.
For instance, when dealing with very fine details like wisps of hair or transparent elements, a combination of selection tools might be necessary. You could start with the Quick Selection tool for the main body of the object and then switch to the Lasso tool or even the Pen tool for more precise control over specific areas. The Pen tool, while having a steeper learning curve, offers the ultimate precision for creating smooth, vector-based paths that can be converted into selections.
The Color Range command (Select > Color Range...) is another powerful, albeit less frequently used, tool for selections. It allows you to select areas of an image based on their color. This can be particularly useful for isolating objects with distinct and uniform colors against a contrasting background.
When working with selections for compositing, consider the overall context of the final image. The lighting, shadows, and perspective of the subject being cut out should ideally match the environment it will be placed into. This is where careful observation and potentially further adjustments using adjustment layers and blending modes come into play after the initial cut and copy operation.
The ability to make selections with holes in the center, as mentioned earlier, is a practical aspect that arises when working with tools like the Quick Selection tool or the Lasso tools. This means you can accurately select an object that has a transparent or hollow center, such as a ring or a donut, without the tool inadvertently filling in the inner area.
Ultimately, mastering cutting and copying in Photoshop is an ongoing process of learning and practice. By understanding the strengths of each selection tool and leveraging the refining power of the Select and Mask workspace, you can transform your ability to isolate and manipulate image elements, opening up a world of creative possibilities.