Bringing your digital art to life often begins with the crucial step of connecting your creative tools. For artists utilizing XP-Pen tablets, understanding the connection process is fundamental to unlocking their full potential. This guide will walk you through the various methods to connect your XP-Pen tablet to your PC, ensuring a smooth and efficient workflow, whether you're a seasoned digital professional or just embarking on your artistic journey. We will explore the different connection options, delve into the specifics of popular models, and provide insights to troubleshoot common issues, ensuring you can get to the business of creating with minimal delay.
Understanding Your XP-Pen Connection Options
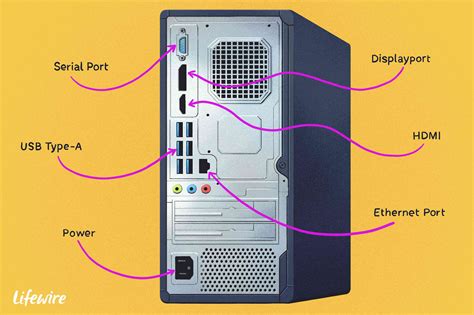
XP-Pen offers a variety of drawing tablets, from pen displays that act as a second monitor to screenless pen tablets. The connection method will largely depend on the specific model you own and the ports available on your computer. Generally, XP-Pen tablets connect to a PC using a combination of USB and HDMI cables, or increasingly, a single USB-C cable for a more streamlined setup.
The primary functions of these connections are to transmit drawing data from the tablet to your computer and, for pen displays, to receive video output from your PC to the tablet's screen. Some tablets also require a separate power source, which is often integrated into the USB connection or provided by an external power adapter.
Connecting Your XP-Pen Artist 13.3 Pro V2
The XP-Pen Artist 13.3 Pro V2 offers two primary connection methods, catering to different computer configurations. This flexibility ensures that a wide range of users can successfully integrate the tablet into their creative setup.
Option 1: Direct USB-C to USB-C Connection (for computers with a full-featured USB-C port)
This is the most streamlined and modern approach, utilizing a single cable for both data and display.
- Connect the USB-C to C cable: Insert one end of the USB-C to C cable into the designated full-featured USB-C port on your XP-Pen Artist 13.3 Pro V2.
- Connect to your computer: Insert the other end of the USB-C cable into a USB-C port on your computer. Crucially, this port must support DisplayPort output for the video signal to be transmitted. If your computer's USB-C port only supports data transfer, this method will not work for video output.
This method is preferred for its simplicity and reduced cable clutter, offering a clean aesthetic to your workspace.
Option 2: USB-A and HDMI Connection (for computers with USB-A and HDMI ports)
This method is ideal for users whose computers lack a full-featured USB-C port or prefer a more traditional connection.
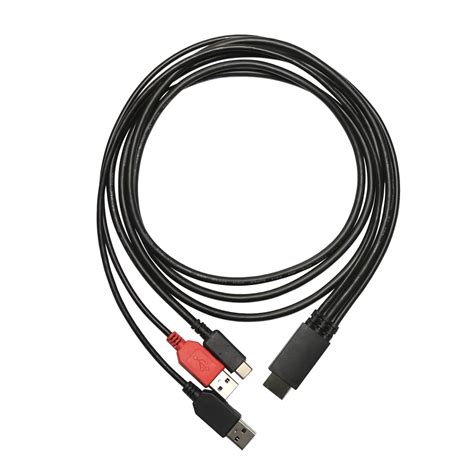
- Connect the USB-C cable: Insert the USB-C end of the 3-in-1 cable into the corresponding port on your Artist 13.3 Pro V2.
- Connect the USB-A and HDMI cables: Connect the black USB-A cable and the HDMI cable to their respective ports on your computer. The USB-A cable typically handles data transmission and power, while the HDMI cable transmits the video signal.
- Provide additional power (if necessary): If you notice that the screen flickers or does not power on, you may need to connect the red USB-A plug. This plug is designed to draw additional power, which can be essential for some systems or under heavy load. Connect this red USB-A plug to another available USB port on your computer.
- Using the Power Extension Cable: If the length of the provided cables is insufficient to comfortably reach your computer's ports, utilize the included Power Extension Cable to extend the reach of the power delivery.
Connecting Your XP-Pen Artist 15.6 Pro V2
Similar to the Artist 13.3 Pro V2, the Artist 15.6 Pro V2 also prioritizes ease of connection, offering distinct pathways based on your computer's available ports. The core principle remains the same: establishing a stable link for both drawing input and visual output.
Step 1: Connect the Cables
The initial and most critical step involves physically linking your tablet to your PC. XP-Pen provides comprehensive cabling solutions to accommodate various setups.
Method 1: Computer USB-C Connection
This method leverages the versatility of USB-C for a cleaner setup.
- USB-C to USB-C: Connect your computer and the drawing display using a USB-C to USB-C cable. This single cable is designed to carry both data and display signals, assuming your computer's USB-C port supports these functions (often indicated as Thunderbolt 3/4 or USB-C with DisplayPort Alt Mode).
- USB-A to USB-C for Power: If the drawing display does not illuminate or power on when using the USB-C to USB-C connection alone, you will need to connect the drawing display via a USB-A to USB-C cable to a power adapter for an additional power supply.
- Note on Power Adapters: It's important to be aware that due to different product specifications and regional power standards, the power adapter may not be a standard inclusion or may vary. Always refer to the actual product you received for specific details regarding power requirements and any included adapters.
Method 2: USB-A and HDMI Connection
This approach is a reliable alternative for computers that do not fully support USB-C for display output or for users who prefer a more traditional connection.
- Connect the USB-C cable: Insert the USB-C end of the provided 3-in-1 cable into the designated port on your XP-Pen Artist 15.6 Pro V2.
- Connect the USB-A and HDMI cables: Connect the black USB-A cable and the HDMI cable to their corresponding ports on your computer. The USB-A connection typically handles the data transfer for your pen input, while the HDMI cable is responsible for transmitting the video signal from your computer to the tablet's display.
- Additional Power for Stability: In cases where the screen flickers or fails to power on, it is often necessary to connect the red USB-A plug from the 3-in-1 cable. This plug provides supplementary power, which can stabilize the connection and ensure the tablet functions correctly. Connect this red USB-A plug to another available USB port on your computer.
- Cable Length Adjustments: If the standard cable lengths are not sufficient to position your tablet comfortably, XP-Pen provides a Power Extension Cable. This allows you to extend the reach of the power connection, offering greater flexibility in setting up your workspace.
3-in-1 USB-C Cable Connection
Driver Installation: The Key to Functionality
Once your XP-Pen tablet is physically connected to your PC, the next crucial step is to install the necessary drivers. These drivers act as the bridge between your operating system and your drawing tablet, enabling features like pen pressure sensitivity, button customization, and accurate cursor tracking.
- Visit the XP-Pen Official Website: Navigate to the support or download section of the official XP-Pen website.
- Locate Your Tablet Model: Find your specific tablet model in the product list.
- Download the Latest Drivers: Download the most recent driver package compatible with your operating system (Windows or macOS). It is always recommended to download the latest version to ensure optimal performance and compatibility with the newest operating system updates.
- Install the Drivers: Before running the installer, it is often recommended to disconnect your XP-Pen tablet from your computer. Once the download is complete, run the driver installer and follow the on-screen prompts.
- Reconnect Your Tablet: After the driver installation is finished, restart your computer. Once your computer has rebooted, reconnect your XP-Pen tablet using the appropriate cables.
- Driver Confirmation: The XP-Pen driver software should now recognize your tablet. You can typically verify this by opening the driver application, which will display your tablet model and its current status. Within the driver software, you can customize pen button functions, adjust pressure sensitivity curves, and configure other tablet settings to suit your artistic preferences.
Troubleshooting Common Connection Issues
While XP-Pen tablets are generally reliable, occasional connection issues can arise. Here are some common problems and their solutions:
Tablet Not Detected:
- Check Cable Connections: Ensure all cables are securely plugged into both the tablet and the computer. Try unplugging and replugging them.
- Try Different Ports: If using USB-A, try connecting to different USB ports on your computer. Some ports may provide more power or have better data transfer capabilities.
- Verify USB-C Port Functionality: If using USB-C, confirm that your computer's USB-C port supports DisplayPort output and data transfer. Refer to your computer's manual or manufacturer's website.
- Reinstall Drivers: Uninstall the current XP-Pen drivers, restart your computer, and then download and install the latest drivers from the official website.
- Check for Conflicts: Ensure no other drawing tablet drivers are installed, as they can sometimes conflict.
Screen Flickering or No Display (for Pen Displays):
- Use Additional Power: As mentioned in the connection guides, connect the red USB-A plug for supplemental power if available.
- Check HDMI Cable: For HDMI connections, ensure the cable is fully inserted and not damaged. Try a different HDMI cable if possible.
- Update Graphics Drivers: Outdated graphics card drivers can sometimes cause display issues. Update your GPU drivers from the manufacturer's website (NVIDIA, AMD, or Intel).
- Adjust Display Settings: In your computer's display settings, ensure the XP-Pen tablet is detected as a second monitor and set to "Extend" mode.
Pen Not Working or Lacking Pressure Sensitivity:
- Driver Installation: This is almost always a driver-related issue. Ensure the drivers are correctly installed and that the tablet is recognized by the driver software.
- Pen Nib: Check if the pen nib is worn out or loose. Replace it if necessary.
- Tablet Surface: Ensure the drawing surface of the tablet is clean and free of debris that might interfere with the pen's signal.
By systematically addressing these connection steps and troubleshooting common issues, you can ensure your XP-Pen tablet is properly set up and ready to facilitate your creative endeavors. The consistent use of provided cables and adherence to driver installation protocols are key to a frustration-free experience.
The information provided regarding cookies, while extensive, does not directly pertain to the technical connection process of an XP-Pen tablet to a PC. This data appears to be related to website analytics and user tracking, and thus has been excluded from the core instructions on connecting the hardware. The focus remains on the practical steps and technical requirements for establishing a functional link between the drawing tablet and your computer.