Photoshop, a powerhouse in digital image manipulation, offers a multitude of ways to create precise and aesthetically pleasing circular elements. Whether you're a seasoned graphic designer aiming to integrate a circular motif into a complex layout, a social media manager preparing profile pictures, or a beginner looking to grasp fundamental shape creation, understanding how to make a circle is an essential skill. This guide will demystify the process, exploring various tools and techniques to ensure you can achieve the perfect circle, from basic outlines to sophisticated masked images, catering to all levels of expertise.
Importing and Preparing Your Image
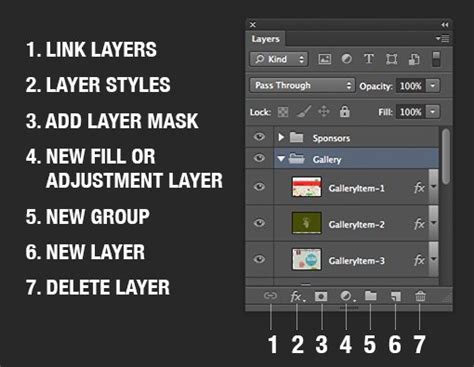
Before diving into circle creation, the first step is to bring your chosen image into the Photoshop environment. The most straightforward method is to simply drag your image file directly onto the Photoshop icon. Once your image is open, you'll notice a padlock icon next to the image layer in the Layers panel, typically located in the bottom right-hand corner of the screen. To enable editing, you must unlock this layer by clicking on the padlock icon. This converts the background layer into a standard, editable layer.
The Frame Tool Approach: Ideal for Cropping
One of the most efficient methods for cropping an image into a perfect circle, especially for profile pictures or logos, involves utilizing the Frame Tool.
- Select the Frame Tool: Navigate to the toolbar on the far left-hand side of the screen and locate the Frame Tool. It might be nested with other shape tools, so a click-and-hold action might be necessary to reveal it.
- Switch to Circle Shape: Once the Frame Tool is active, observe the options bar at the top of the Photoshop interface. Here, you'll find an option to change the default rectangular frame to a circular one.
- Create the Circular Mask: To draw your circle, hold down the Shift key on your keyboard. This crucial step ensures that the shape you draw will be a perfect circle, not an oval. Drag your mouse across the part of the image you wish to focus on, creating the circular mask. The Shift key will maintain the perfect circular aspect ratio as you drag.
- Non-Destructive Editing: A significant advantage of this method is that the Frame Tool automatically converts your image layer into a Smart Object upon creating the circle mask. This means any edits you make are non-destructive. If you wish to adjust the image within the circle, simply double-click the image layer. This will open the image in a new window, allowing you to make further adjustments.
- Saving Edits: After making any necessary edits within the Smart Object, save the document by pressing Command+S (on a Mac) or Control+S (on a Windows computer).
- Returning to Original Document: Once saved, return to your original document using the tabs located towards the top left side of your screen.
How To Use Frame Tool | Adobe Photoshop Tutorial 2024
Refining and Exporting Your Circular Crop
With your image masked as a circle, you'll want to ensure it's ready for use.
- Crop the Composition: To finalize the composition before exporting, press the 'C' key on your keyboard to activate the Crop Tool. This tool will now respect the circular mask you've created.
- Export as PNG: For optimal results, especially when transparency is desired, export your circular crop as a PNG file. Navigate to File > Export > Export for Web (Legacy).
- Save the File: In the export dialog box, select PNG as your file format. This format is vital as it preserves the transparency around your circular image, making it perfect for integration into various designs or web pages where a background is present. Save your newly cropped image to your desired location.
This process allows you to crop your image into a circle with a transparent background, ensuring it looks great in any design or on the web.
The Elliptical Marquee Tool: Precision Selection
For those who prefer a more selection-based approach, the Elliptical Marquee Tool offers precise control.
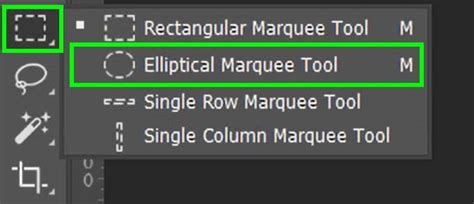
- Access the Elliptical Marquee Tool: In the toolbar, locate the Rectangular Marquee Tool. Click and hold this tool until a fly-out menu appears, revealing the Elliptical Marquee Tool.
- Draw the Elliptical Selection: With the Elliptical Marquee Tool active, click and drag on your image to begin drawing an elliptical selection outline. Don't worry if it's not a perfect circle or precisely centered on your subject initially.
- Forming a Perfect Circle: To force the outline into a perfect circle, keep your mouse button held down and simultaneously press and hold the Shift key on your keyboard. Continue dragging.
- Repositioning the Selection: If the selection outline isn't centered around your subject, you can adjust its position without releasing the mouse button or the Shift key. Press and hold the spacebar, then drag the selection to its desired location. Release the spacebar to continue drawing or resizing the selection.
- Finalizing the Selection: Once you've achieved the desired size and position for your circular selection, release your mouse button to complete it, and then release the Shift key.
- Inverting and Deleting: With the selection still active, you can now crop the image. A quick method is to invert the selection by going to Select > Inverse (or using the shortcut Ctrl+Shift+I / Cmd+Shift+I). This selects everything outside your circular area. Then, press the Delete key. This action will remove the areas outside your perfect circle.
- Trimming Transparent Pixels: To ensure there are no leftover transparent areas, you can use the Trim function. Go to Image > Trim. In the Trim dialog box, select "Transparent Pixels" at the top and ensure "Top," "Bottom," "Left," and "Right" are all checked at the bottom. This will trim the canvas down to the exact size of your circular image.
Saving with Transparency
Crucially, after trimming, you still need to save your image in a format that preserves transparency. The JPEG format does not support transparency and will fill the transparent areas with a solid color, defeating the purpose.
- Save As: Go to File > Save As.
- Choose File Type: In the "Save as type" dropdown menu, select PNG.
- Name and Save: Give your file a name and navigate to your desired save location.
By saving as a PNG, you ensure that the transparent corners of your document will remain transparent, allowing your circular image to blend seamlessly into any background.
The Ellipse Shape Tool: Vector-Based Circles
For creating vector-based circles-which are infinitely scalable without loss of quality-the Ellipse Tool is the preferred method. This is particularly useful for logos and designs that may need to be resized frequently.
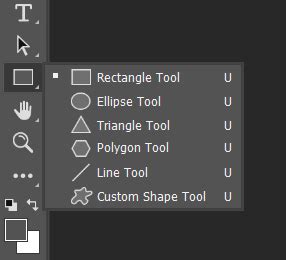
- Select the Ellipse Tool: Access the Ellipse Tool from the toolbar. It's often grouped with other shape tools, so a click-and-hold on the Rectangle Tool icon will reveal it. Alternatively, press 'U' on your keyboard to cycle through the shape tools until the Ellipse Tool is active.
- Configure Tool Options: In the options bar at the top, you'll see options for "Shape," "Path," and "Pixels." Choose "Shape" to create a vector shape layer. You can then set your desired Fill and Stroke colors. For an unfilled circle with an outline, set the Fill to "None" (indicated by a red diagonal line) and choose your desired Stroke color and thickness.
- Draw a Perfect Circle: To create a perfect circle, hold down the Shift key while dragging on your canvas. This constrains the proportions.
- Drawing from the Center: To draw a circle starting from its center point, hold down both the Alt (or Option on Mac) key and the Shift key simultaneously while dragging.
- Precise Sizing: If you need a circle of a specific dimension, you can click once on the canvas with the Ellipse Tool active. This will open a dialog box where you can enter the exact Width and Height values. For a perfect circle, ensure these values are identical.
- Resizing and Positioning: Once created, the circle exists as a shape layer. You can select the Move Tool (V) to reposition it. To resize, ensure the shape layer is selected, then use the bounding box handles. Holding Shift while resizing will maintain the circular aspect ratio. For precise alignment, use the alignment options in the Move Tool's options bar or the Properties panel.
Advanced Styling and Customization
Once your circle is created using any of the methods above, Photoshop offers extensive options for styling and customization.
Stroke and Fill Options
When using shape tools, the Fill and Stroke options are paramount.
- Fill: This controls the color inside the circle. You can select solid colors, gradients, or patterns. Clicking the Fill Color box in the options bar opens the Color Picker.
- Stroke: This defines the outline of your circle. You can set its color, width, and style (solid, dashed, dotted). The Stroke Color box in the options bar allows you to select the outline color. The Stroke Width field lets you define the thickness in pixels.
For more intricate stroke styles, such as varying widths or complex patterns, you can access additional options through the Properties panel.
Gradient Fills and Strokes
To create a circle with a smooth transition of colors, you can utilize the Gradient Tool. This can be applied as a fill or as a stroke. The gradient editor allows for fine-tuning the colors, their positions, and the overall style of the gradient.
Brush Tool for Textured Circles
The Brush Tool can also be employed to create circular elements, especially when a more organic or textured look is desired.
- Select a Round Brush: Choose a round brush from the Brush Tool options.
- Open Brush Settings: Access the Brush Settings panel (Window > Brush Settings). Here, you can adjust parameters like spacing, shape dynamics, and texture to create unique brush presets.
- Drawing Perfect Circles with Brushes: Similar to other tools, holding the Shift key while dragging can help create more controlled, circular strokes. For textured circles, select a textured brush from the Brush Preset picker.
- Creating Dashed or Dotted Lines: For stylistic outlines, you can create dashed or dotted lines using the Brush Tool by adjusting the spacing in the Brush Settings panel. Higher spacing values result in more pronounced dashes or dots.
Final Touches and Saving
After creating and styling your circle, a few final steps can polish your design.
- Deselecting: To remove the "marching ants" outline of a selection, press Ctrl+D (Windows) or Cmd+D (Mac).
- Refining Edges: If you've used selection-based methods and notice rough edges, the Select and Mask workspace (Select > Select and Mask) offers advanced tools for refining selections.
- Blurring Edges: For a softer appearance, a subtle Gaussian Blur can be applied (Filter > Blur > Gaussian Blur) with a very small radius (e.g., 0.5-1 pixel).
- Saving Your Work:
- For Web Use or Transparency: As mentioned, File > Export > Export As, choosing PNG.
- For Further Editing: File > Save As, selecting Photoshop (.psd) format. This preserves all layers and editing capabilities.
- For Vector Scalability: If you created your circle as a vector shape layer using the Ellipse Tool, you can right-click the layer and choose "Convert to Shape" if you need to further manipulate its vector paths.
Working with Multiple Circles
When incorporating multiple circles into a design, managing them effectively is key.
- New Layers: It's best practice to create each circle on its own layer. Click the "New Layer" button in the Layers panel (or use Ctrl+Shift+N / Cmd+Shift+N).
- Naming Layers: Double-clicking a layer's name allows you to rename it, making it easier to identify different circles.
- Layer Order: The stacking order of layers in the Layers panel determines which circles appear in front of others. You can drag layers up or down to adjust this order.
By mastering these techniques, you can confidently create and customize circles of any size, style, and complexity within Adobe Photoshop, enhancing your designs and streamlining your workflow.