If you are accustomed to working with photos in Lightroom, you are bound to hear yourself say, “Oops!” from time to time. Lightroom makes the job of undoing a breeze, whether you make a mistake or do not like the results. Unlike other software programs that may limit the number of backtracking steps, Lightroom offers a robust and flexible system for managing your edits. Many software programs are limited to a certain number of backtracking steps. Once you go so far back, you can no longer undo your changes. For example, some versions of Excel allow a default of 16 undo levels and extending the allowed number of levels uses a lot of memory and causes the program to act erratically. The Lightroom Undo function works in a unique way through its History panel, offering an unlimited number of versions of your image updates rather than merely tracing your steps backward one at a time.
The Power of the History Panel
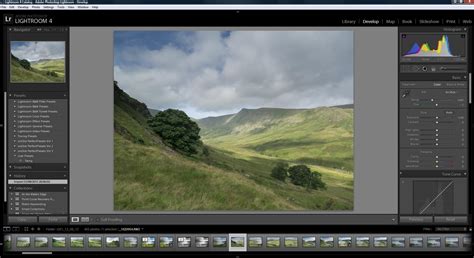
The "History" panel is your primary tool for navigating through past edits. You can find it located near the "Develop" menu, or you can access it under the "Windows" menu where all of the panel views are located. This panel meticulously tracks every single change you make to an image within the Develop module. It’s sequential, so it lists edits in the order they were applied, with the latest edit appearing at the top.
To undo a specific change, you can simply browse through the entire history of changes for your open image. When you run your cursor over a listed action, you can preview how the image looked at that specific point in the "Navigator" area. If you decide that you like a previous version better, just click on that specific state in the History panel. This action will revert your image to that point, effectively undoing all subsequent edits. Be warned: once you make a new change to an undone version, all later actions in the history will be deleted. This ensures that your editing path remains linear and prevents the creation of conflicting edits.
You can always go back and browse other actions to undo as well. If you wish to revert your image to its absolute original state, you can choose the very first action in the list, which is typically "Import." This will take you back to the image as it was when it was first imported into Lightroom. However, if an import preset was applied, the image will revert to that state, not necessarily the raw file straight out of the camera. To truly go back to the way it was right out of the camera, you can click the "Reset" button located on the lower right of the Develop module. This action zeroes out all sliders, effectively returning the image to its unedited, camera-original state.
What is Non-Destructive Editing? Lightroom Classic Tutorial 18
Beyond a Simple Undo: Virtual Copies and Snapshots
When it comes to knowing how to undo in Lightroom, two other functions are exceptionally beneficial to use: Virtual Copies and Snapshots. Both are similar in that they produce duplicates of images that you can edit independently, allowing for extensive experimentation without altering your original file.
Virtual Copies: Exploring Different Creative Directions
A Virtual Copy is, as its name suggests, a virtual copy of your image. When you create a Virtual Copy, a new version of the original image is created within Lightroom's catalog. This new version is not a physical, pixel-based copy saved to your hard drive; rather, it is a different editing "recipe" or set of instructions applied to the catalog. In Lightroom, you can make a Virtual Copy of any photo. You can also make a copy of the images you select in the History panel. Simply right-click on the photo and choose "Create Virtual Copy." You can then save and apply different effects to each Virtual Copy.
As a wedding photographer, for instance, you might want to experiment with creating a specific style for a particular photo before you decide on a final preset to use. You can save multiple Virtual Copies of the same photo and apply drastically different effects to each one. In the Lightroom Develop module, you can then view your various versions side-by-side in a filmstrip layout, making it easy to compare and contrast your creative choices. This is particularly useful when you're unsure whether to go for a vibrant, colorful look or a more muted, artistic black and white rendition.
Snapshots: Capturing Key Editing Milestones
Similarly, a Snapshot is just what it sounds to be: a quick capture of a moment in your editing process. In contrast to a Virtual Copy, a Snapshot is a way to save specific points during your workflow. You can create Snapshots directly from the History panel in the Develop module. Just above the History panel is the Snapshots panel. To create a snapshot, click the "+" sign and name your snapshot. Lightroom will then take a virtual snapshot of your image's current state, and you can continue to make further edits.
The benefit of using Snapshots becomes apparent when you make a large number of adjustments to an image. The History panel can end up with a substantial number of levels, making it difficult and time-consuming to sort through them to find specific effects you applied earlier. Snapshots act as bookmarks, allowing you to quickly jump back to a particular editing stage without having to meticulously retrace your steps through a lengthy history. This is invaluable when you're exploring complex edits or trying out multiple creative directions for a single image.
Lightroom Edits vs. Photoshop Edits: A Fundamental Difference
A crucial distinction to understand is how Lightroom handles edits compared to programs like Photoshop. Unlike Photoshop, which often makes direct, pixel-based changes to your images, all of Lightroom's edits are actually instructions stored within its catalog database. This means that your original image files remain untouched. When you close a photo in Photoshop, any history of edits can be lost from the buffer once the program is closed. However, in Lightroom, this history of all your steps is always available to you, days, months, and even years later, as long as you maintain your catalog.
This non-destructive editing approach is a cornerstone of Lightroom's power and flexibility. It allows you to revisit and modify any edit at any time without degrading the image quality. This is a far cry from older, destructive editing methods where a single wrong move could permanently damage your photograph. The ability to undo, revert, and experiment freely is what makes Lightroom such an indispensable tool for photographers of all levels.
Resetting Panels and Sliders
Sometimes, you may not need to go back through the entire history; you might just want to reset a specific adjustment. If you want to reset all the sliders in a particular panel, or even just a section of a panel, you can do so by double-clicking on the slider name or on the heading of the panel. For example, if you want to reset the Exposure slider back to zero, you can just double-click on the word "Exposure." This offers a quick and precise way to fine-tune individual adjustments without affecting others.
Addressing Common Concerns
It's understandable for a beginner to feel concerned about losing work if they are not immediately familiar with Lightroom's undo functionalities. The thought process of "I know I'm a relative beginner, but to have to lose all my work just because I can't find an Undo history seems like a pretty severe learning curve" highlights a common initial apprehension. However, as explained, Lightroom's saving mechanism is fundamentally different.
When you open a photo and accidentally apply unintended edits, such as clicking through duplicated presets, it's important to remember that Lightroom is likely not "saving" these accidental changes in a way that permanently alters your original file. The edits are being recorded in the History panel. Therefore, pressing Ctrl+Z (or Command+Z on a Mac) should indeed work to undo those recent, unintentional edits. If Ctrl+Z doesn't seem to work immediately, the History panel is your next recourse.
The question "Once you close a photo and return to the album, is every change really unrecoverable? Are all my edits really lost just because I opened the photo and messed with some presets? Shouldn't it ASK me if I want to save what happened during a session?" stems from a misunderstanding of Lightroom's non-destructive workflow. The edits are not "lost" upon closing the photo; they are meticulously recorded in the catalog's history. Lightroom doesn't typically "ask" if you want to save in the traditional sense because every edit is automatically saved as an instruction. The power lies in the ability to access and revert to any point in that saved history.
Learning how to effectively utilize the History panel, Virtual Copies, and Snapshots is key to mastering Lightroom's undo capabilities. These features not only allow you to correct mistakes but also empower you to explore creative possibilities with confidence, knowing that your original image data remains safe and that you can always return to previous states. By understanding these powerful tools, you can significantly speed up your post-processing workflow and enhance your overall editing efficiency.