In the digital age, protecting your creative work and asserting ownership is paramount. Watermarking your images in Adobe Photoshop is a powerful method to achieve this, serving multiple purposes from deterring unauthorized use to promoting your brand identity. This guide will walk you through various techniques for creating and applying watermarks, ensuring your images are both secure and professionally presented.
The Foundation: Preparing Your Workspace and Watermark Elements
Before diving into the creation process, it's essential to set up your Photoshop environment for optimal results. For any new watermark creation, it is advisable to start with a large canvas, such as 1920x1080 pixels. This provides ample space to work with and ensures your watermark retains quality when scaled down for application to various image sizes.

The content of your watermark can take many forms. You might opt for your company's logo, a stylized piece of text, or even your handwritten signature. If you choose to use your signature or other handwritten script, employing a drawing tablet and a stylus with the Pen Tool will yield the most natural and authentic look. For text-based watermarks, selecting the right font is crucial for conveying a specific brand aesthetic. For instance, the Bodoni font can lend a high-end interior design vibe, while a font like Choc might evoke a Brooklyn design studio style.
Most often, watermarks are rendered in white to ensure they are visible against a variety of photographic backgrounds. However, you are not limited to white. If your brand features a specific color, such as a gold logo, feel free to incorporate it. To invert a black watermark to white, you can utilize keyboard shortcuts: press Command + I on a Mac or Control + I on a PC.
Creating a Text-Based Watermark
To add type to your design, select the Type Tool by clicking on the 'T' icon. Once the Type Tool is active, you can create a text box. Choose your desired font, size, and color. For a classic copyright notice, you can create the copyright symbol by holding down the ALT key and pressing G on a Mac (Alt+0169 on a PC).

After typing your watermark text, it's a good practice to refine it. You can adjust its size and angle using Free Transform (Ctrl+T on PC, Cmd+T on Mac). Holding down the Shift and Alt keys while dragging the corner handles will allow you to resize the watermark proportionally from its center. Once you are satisfied with the appearance, press Enter or click the Commit Transform button in the Options Bar.
Defining Custom Shapes for Reusability
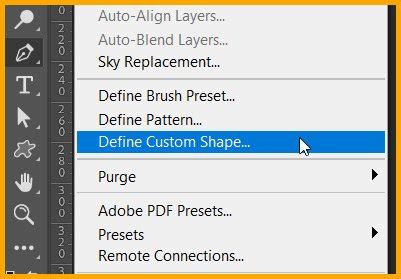
An efficient method for creating reusable watermarks is by defining them as custom shapes. After preparing your text or logo element, navigate to the Edit menu and select "Define Custom Shape." A dialog box will appear, prompting you to name your shape. Give it a descriptive name, such as "Watermark," and click OK. This custom shape will now be available in your Shape Presets Library, ready to be applied to any image.
To access and use your custom shape, select the Custom Shape Tool (Shift+U). In the Options Bar, click on the thumbnail next to the word "Shape" to open the Shape Presets Library. Locate your saved watermark shape and select it. To add the shape to your image, ensure your foreground color is set to your desired watermark color (e.g., white). Then, hold down the Shift key and click and drag across your image. The Shift key ensures the shape maintains its proportion.
If you need to adjust the color of your custom shape after it's placed, go to the Layers panel, click on the layer thumbnail, and the Color Picker dialog box will appear. You can then select a new color. To further refine the watermark's integration with your photograph, you can reduce its opacity. Double-click in the space to the right of the watermark layer in the Layers panel to open the Layer Style menu, or click the 'fx' icon at the bottom of the Layers panel and select "Blending Options." Adjust the Opacity slider to your desired setting.
Incorporating Existing Logos and Graphics
If you already have a logo or graphic that you wish to use as a watermark, ensure it is saved in a format that supports transparency, such as PNG or PSD. While JPEGs can be used, they lack transparency, meaning your watermark will have an opaque background, which might not be ideal. It's also important to ensure your logo file is of a sufficient size; scaling a small logo up will result in a blurry and pixelated appearance.
A highly efficient workflow for applying existing logos involves using Photoshop's Actions panel. This allows you to record a series of steps and then play them back on multiple images, saving considerable time.
- Open the Actions Panel: Go to Window > Actions.
- Create a New Action: Click the plus icon to create a new action and give it a descriptive name (e.g., "Logo Watermark").
- Start Recording: Click the Record button (the red circle).
- Place Your Logo: Go to File > Place Embedded. Select your logo file and click "Choose."
- Resize and Position: Use the Free Transform tool (Ctrl+T or Cmd+T) to resize and rotate your logo. You can align it with your image using the Move Tool and the alignment buttons in the Options Bar. Holding Shift and using the arrow keys can fine-tune its position.
- Adjust Opacity: In the Layers panel, reduce the opacity of the logo layer to blend it with the image.
- Add Effects (Optional): You can add layer styles like a Drop Shadow by clicking the 'fx' icon in the Layers panel.
- Stop Recording: Click the Stop button (the square icon) in the Actions panel.
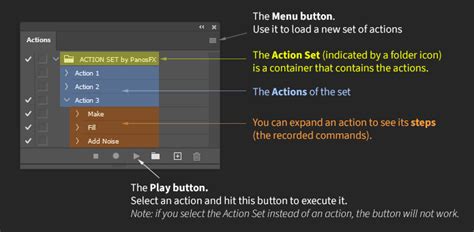
Now, to apply your watermark to another image, simply open that image, select your recorded action from the Actions panel, and click the Play button.
Leveraging Creative Cloud Libraries
For seamless integration and easy access across devices, Adobe Creative Cloud Libraries offer a robust solution.
- Prepare Your Watermark: Create your watermark (text, logo, or signature) in Photoshop. Ensure it's on its own layer and has any desired effects applied. Trim any excess space around your watermark using Image > Trim.
- Save to Library: Open the Libraries panel (Window > Libraries). Click "Create New Library" and give it a name. With your watermark file open, click the '+' icon at the bottom of the Libraries panel and choose "Graphic."
- Apply to Photos: Open the photograph you wish to watermark. From the Libraries panel, drag and drop your watermark graphic onto your photo document. This will add it as a Smart Object.
- Adjust and Save: Position the watermark using the Move Tool (V). Adjust its size, opacity, and add any layer styles as needed. Finally, flatten the image (Layer > Flatten Image) and save it.
How to Add a Logo to multiple Photos automatically using Photoshop tutorial - Easy and quick
Advanced Watermarking Techniques: Tiled and Glass-like Effects
For a more pervasive form of watermarking, you can create a tiled watermark. This involves repeating your chosen watermark element across the entire image.
- Create Your Watermark Element: Use the Type Tool to create your text watermark, or import a logo. Resize and rotate it as desired using Free Transform (Ctrl+T or Cmd+T). Crop out any unnecessary space.
- Define as a Pattern: Go to Edit > Define Pattern. Name your pattern and click OK.
- Apply the Pattern: Open the image you want to watermark. Go to Layer > Layer Style > Pattern Overlay. In the Pattern Overlay settings, select your newly created pattern from the dropdown menu. Adjust the opacity, scale, and angle to achieve the desired look. You can even click and drag the pattern directly on your image to reposition it.
- Save the Style (Optional): To easily reapply this patterned watermark, you can save it as a Style by clicking the "New Style" button in the Layer Style dialog.

For a more sophisticated textual watermark, a glass-like effect can be achieved:
- Create Text and Record Action: Start recording a new action. Use the Type Tool to add your text, including a copyright symbol if desired. Resize and position it.
- Apply Layer Style: Select the text layer and click the 'fx' icon. Choose "Bevel & Emboss."
- Adjust Fill Opacity: In the Layers panel, set the "Fill" opacity to 0%. This will leave only the Bevel and Emboss effect, creating a glass-like appearance.
- Stop Recording: Stop the action recording.
To export your watermarked image, use File > Export > Export As. Choose your desired file format (e.g., JPG, PNG) and export settings.
Alternatives and Considerations
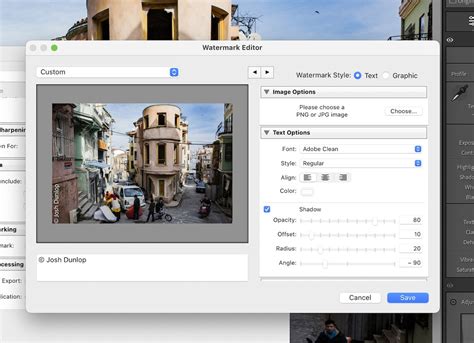
While Photoshop offers extensive control over watermark creation, other tools and workflows exist. Adobe Lightroom provides a streamlined process for adding text or graphic watermarks, especially during the export process. On desktop or mobile, you can enable the "Include Watermark" option in the Export As screen (iOS) or Export Settings (Android). The Watermark Editor in Lightroom allows for customization of text and graphics.
For those seeking an even simpler and faster approach, dedicated watermarking software like Visual Watermark can be a compelling alternative. These tools often streamline the process of designing, applying, and managing watermarks, sometimes offering features like automatic tiling and effects that are more intuitive than in Photoshop.
Ultimately, the decision of whether or not to watermark, and which method to employ, rests with the creator. Watermarking is a valuable tool for protecting your intellectual property and reinforcing your brand in the digital landscape. By mastering the techniques available in Photoshop, you can ensure your images are both secure and aesthetically enhanced.