DaVinci Resolve stands as a powerhouse for video and audio editing, offering a comprehensive suite of tools for creators. Yet, a common stumbling block for many, particularly newcomers, lies in navigating the export process to achieve optimal settings for diverse formats. This guide delves into the intricacies of exporting, with a specific focus on audio-only settings within DaVinci Resolve, ensuring your sound projects meet professional standards.
The Crucial Export Stage: Initial Considerations
Before diving into the technicalities of audio export, it’s essential to lay the groundwork for a successful project delivery. A fundamental step, often overlooked, is assigning a clear and descriptive File Name to your project. This not only aids in organization but also ensures clarity when managing multiple exported files.
For creators targeting platforms like YouTube, understanding their specific guidelines is paramount. YouTube, for instance, has stringent recommendations for video properties. When exporting, the Quality setting defaults to "Automatic." While this allows DaVinci Resolve to make rendering decisions, it may not always align with platform best practices or your specific needs. For optimal results, especially for high-resolution content like 4K video, actively managing this setting is advised. Regarding Data Rate, while it can be adjusted to personal preference, selecting the highest possible option is generally recommended to preserve the most detail.
Navigating Video Export Settings: A Foundation for Audio
While this article primarily addresses audio export, understanding the video export process provides a crucial context. When preparing to export a 4K video, a critical initial action is to adjust the Timeline Resolution. If your source footage is not in a vertical format (e.g., 1080 x 1920), significant adjustments may be necessary. You have the flexibility to manually reposition and resize your video elements, or you can allow DaVinci Resolve to automate these adjustments. This adaptability ensures that your exported content fits the intended viewing platform seamlessly.
YouTube's recommendations for 4K video, for example, suggest a data rate of approximately 66 to 85 mb/s. By understanding these video parameters, you build a more informed approach to your overall export strategy, which directly influences how audio is handled and perceived within the final output.
The Nuances of Exporting Audio-Only Projects
The primary challenge arises when dealing with projects where audio is a standalone concern, or when separate audio tracks need to be meticulously exported. A common scenario involves shooting with external audio recorders and syncing them manually within DaVinci Resolve. This can become particularly perplexing when, after careful synchronization, the export process inexplicably reverts to the camera's lower-quality "scratch audio" instead of the pristine, separately recorded audio.
This issue often stems from how DaVinci Resolve handles linked tracks during export. By default, it may not render these linked tracks, leading to the undesirable outcome of exporting the wrong audio source.
Troubleshooting Sync and Export Issues
When faced with a situation where the desired external audio is not exporting, the first step is to verify the synchronization process. The user reported attempting synchronization on the Media page, a crucial detail. If there is no timecode available, or if the camera's scratch audio is too faint to be useful, manual synchronization becomes the only viable option.
Crucially, even without timecode or usable scratch audio, the act of manually syncing on the Media page is essential. This process associates the external audio with the video clips in a way that the Edit and Deliver pages can recognize and utilize. Failure to perform this association correctly will result in the export defaulting to the camera's internal audio.
How to Sync Audio and Video in DaVinci Resolve (Fast & Easy Tutorial)
Advanced Audio Export Settings in DaVinci Resolve
Moving beyond the basic export, DaVinci Resolve offers granular control over audio parameters. When you're not exporting a complete video project but rather focusing on the audio component, several settings become paramount.
Choosing the Right Audio Codec
The selection of an appropriate audio codec is critical for balancing file size and audio quality. Common choices include:
- AAC (Advanced Audio Coding): A widely supported and efficient codec, suitable for web streaming and general use. It offers good compression with minimal perceived loss of quality.
- MP3 (MPEG-1 Audio Layer III): Another widely compatible format, though generally less efficient than AAC. It's a good option if maximum compatibility is required.
- PCM (Pulse-Code Modulation): This is an uncompressed audio format, offering the highest fidelity. It results in very large file sizes and is typically used for archival purposes or when further processing is intended.
- FLAC (Free Lossless Audio Codec): A lossless compressed format that retains all original audio data while achieving smaller file sizes than PCM.
For most applications where quality and reasonable file size are desired, AAC is often the preferred choice.
Understanding Bit Depth and Sample Rate
- Bit Depth: This refers to the number of bits used to represent each audio sample. Higher bit depths (e.g., 24-bit) capture more dynamic range and detail compared to lower bit depths (e.g., 16-bit). For professional audio work, 24-bit is the standard.
- Sample Rate: This indicates how many times per second the audio signal is sampled. Common sample rates include 44.1 kHz (CD quality), 48 kHz (common for video), and 96 kHz (high-resolution audio). For video projects, 48 kHz is typically used.
When exporting audio-only, ensure these settings align with your source material and the intended use of the audio.
Controlling Audio Channels and Loudness
- Channels: DaVinci Resolve allows you to export audio in mono, stereo, or even surround sound configurations. For a standard stereo export, ensure "Stereo" is selected.
- Loudness: This is a critical parameter for broadcast and online distribution. DaVinci Resolve provides tools to monitor and adjust loudness according to standards like EBU R128 or LUFS. Properly setting loudness prevents audio from being too quiet or too loud on different playback systems.
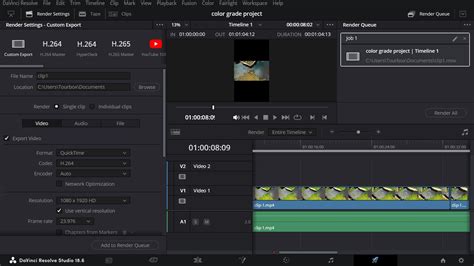
When exporting audio-only, accessing the "Audio" tab within the Deliver page is where these settings are primarily managed. You can select the desired format, codec, bit depth, sample rate, and channel configuration.
Exporting Individual Clips and Linked Tracks
A specific challenge arises when attempting to export individual clips that have had external audio meticulously synced. As mentioned, DaVinci Resolve's default behavior might not render these "linked tracks" automatically. To overcome this, ensure that the audio synchronization is performed at the clip level on the Media page. This establishes a robust link between the video and the desired audio source, which should then be recognized during the export process. If you are exporting multiple individual clips, you'll need to ensure each clip's audio association is correctly established.
The "Render All Clips" Option
When exporting individual clips, look for an option that explicitly enables the rendering of linked tracks or individual clip audio. In some versions of DaVinci Resolve, this might be implicitly handled when exporting individual files, but it's a point of frequent confusion. If you are exporting a timeline containing multiple clips with synced audio, and only the scratch audio is present, revisit the Media page and confirm the association of your external audio files.
Optimizing for Specific Platforms
While the focus is audio, it's impossible to divorce it entirely from the video context, especially for platforms like YouTube. The "Quality" setting on the Deliver page, even when exporting primarily audio, can indirectly influence how DaVinci Resolve processes the audio stream.
For instance, if you are exporting a video file that contains your primary audio, adhering to YouTube's recommended data rates (66-85 mb/s for 4K) ensures that the audio embedded within that video is also preserved with sufficient bandwidth.
Understanding the "Automatic" Setting
The default "Automatic" setting for Quality can be a double-edged sword. For simple projects, it might suffice. However, for professional results, especially when aiming for precise audio quality and loudness, manual control is indispensable. By understanding the interplay between video and audio export settings, you can make informed decisions that lead to superior final products.
Exporting projects in DaVinci Resolve, whether audio-only or full video, doesn't have to be an overwhelming experience. By understanding the core settings, troubleshooting common issues, and optimizing for your intended platform, you can achieve professional-grade results with confidence. The key lies in meticulous attention to detail during the synchronization and export stages, ensuring that your carefully crafted audio is delivered exactly as intended.